

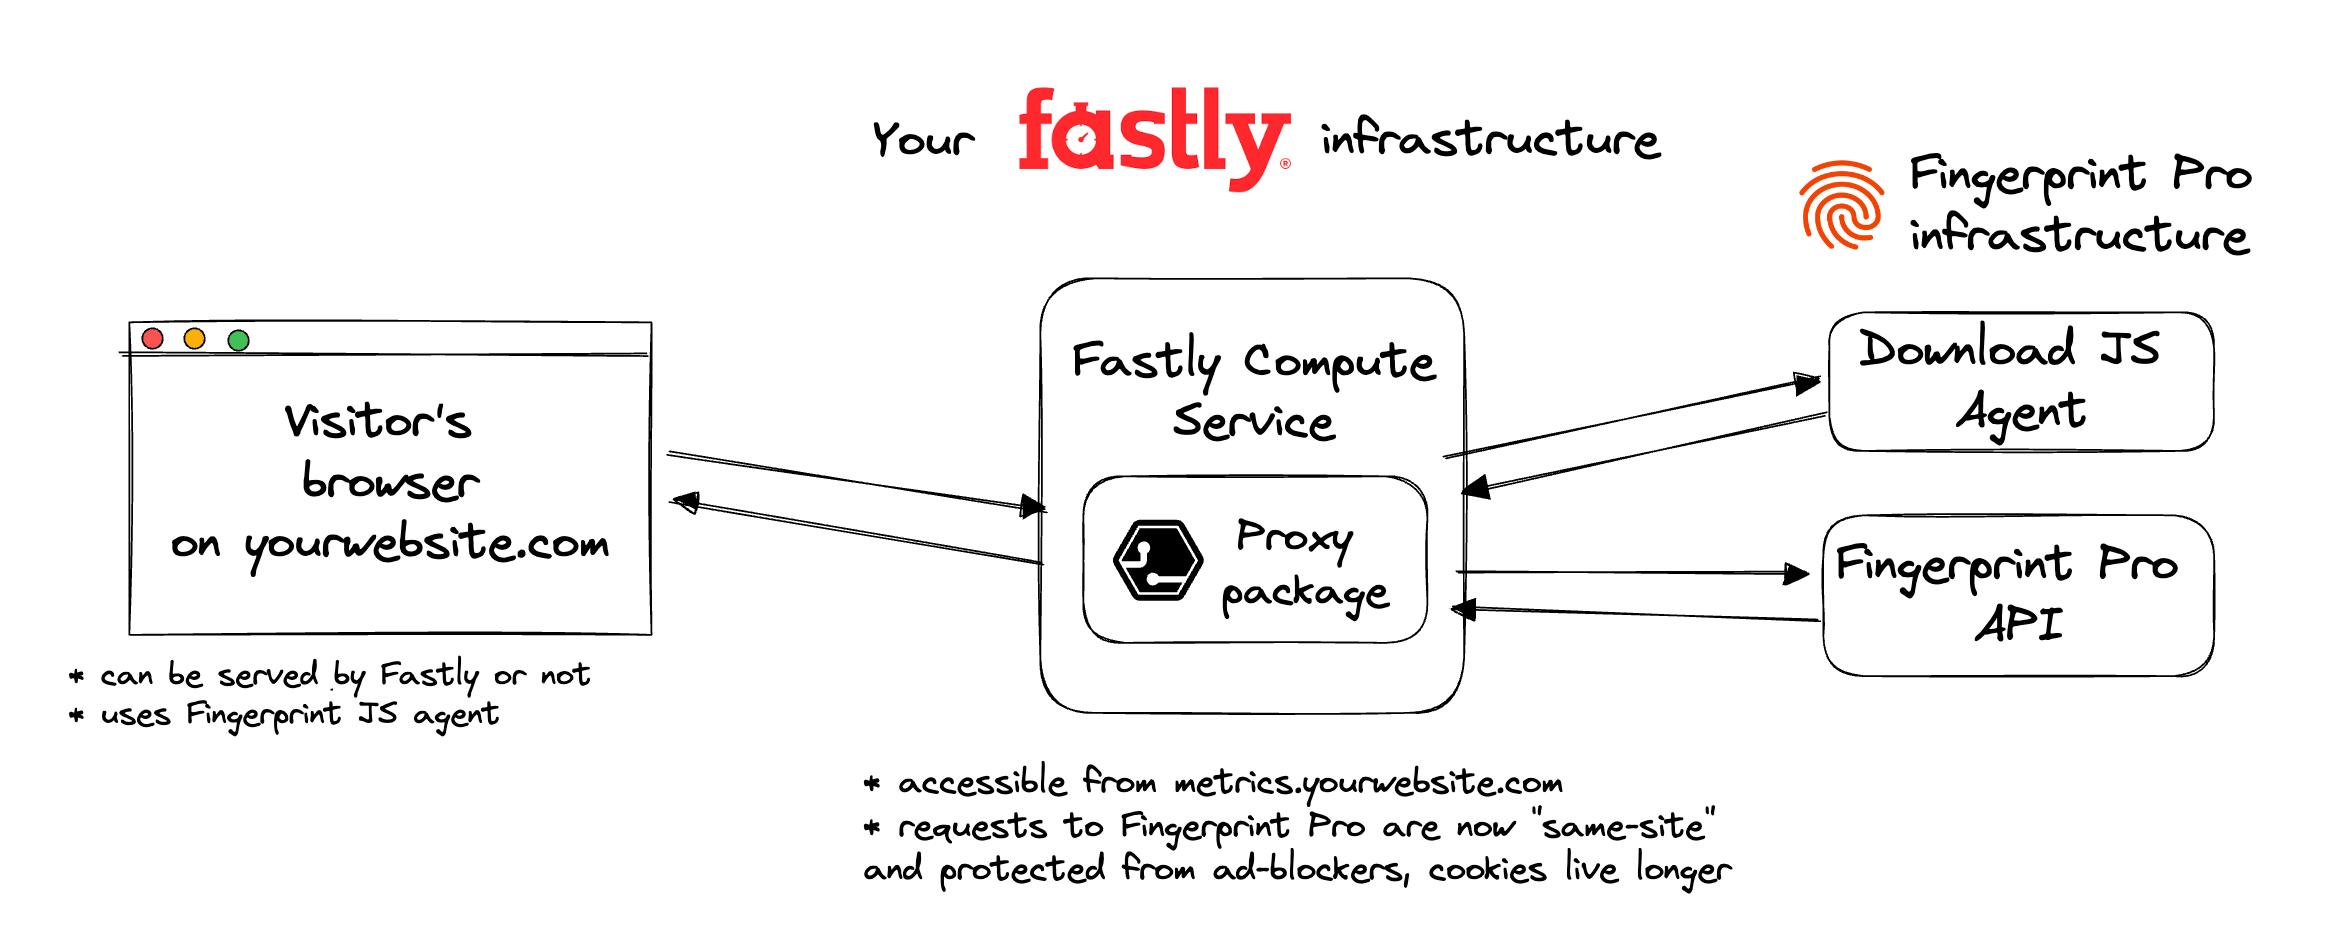
The benefits of using the Fastly Compute Proxy Integration
- Significant increase in accuracy in browsers with strict privacy features, such as Safari or Firefox.
- Cookies are now recognized as “first-party”. This means they can live longer in the browser and extend the lifetime of visitor IDs.
- Ad blockers will not block the Fingerprint JavaScript agent from loading. Requests to Fingerprint domains are stopped by most ad blockers, but requests to same-site URLs are always allowed.
- Ad blockers will not block Fingerprint identification requests since they are sent to a subdomain that belongs to the same site.
- Insight and control over the identification requests that can be combined with other Fastly features like Compute and traffic reports.
- Cookie security: Fastly Compute Proxy Integration drops all the cookies sent from the origin website. The code is open-source, so you can transparently verify this behavior.
- Easy to meet compliance and auditing requirements.
Integration setup overview
The integration setup consists of the following three steps. Each step is described in detail below.- Issue a proxy secret in the Fingerprint dashboard.
- Deploy Fingerprint proxy integration Compute service in your Fastly account.
- Configure the Fingerprint client agent on your website or mobile app.
Step 1: Create a Fingerprint proxy secret
Issue a Fingerprint proxy secret to authenticate requests from your Fastly infrastructure.- Go to the Fingerprint dashboard and select your workspace.
- In the left menu, click API keys.
- Click Create Proxy Key.
- Give it a name, for example,
Fastly Compute proxy integration. - Optionally, you can choose an environment for the proxy secret.
- By default, the proxy secret works for all environments in your workspace.
- A proxy secret scoped to a specific environment can only authenticate identification requests made with a public API key from the same environment.
- Click Create API Key.
Step 2: Deploy the proxy integration Compute service
You can choose from two available installation methods.Using Terraform
If you manage your infrastructure using Terraform, you can use the official Fastly Compute Proxy Integration Terraform module. This is the recommended method for deploying the integration. It provides a streamlined, versioned setup with fewer manual steps. Continue to Deploy Fastly Compute Proxy integration using Terraform.Deploying Manually
If you don’t use Terraform, you can manually deploy the integration using the Fastly web interface. This method requires more manual steps. If you prefer the manual installation method, continue to Deploy Fastly Compute Proxy integration manually.Step 3: Configure the Fingerprint client agent to use your service
Configure the Fingerprint client agent on your website or mobile app accordingly:Monitoring and troubleshooting the integration
You can go to the integration’s status page at/status (for example https://metrics.yourwebsite.com/status) to check that the integration is running and all required configuration variables have been set correctly.
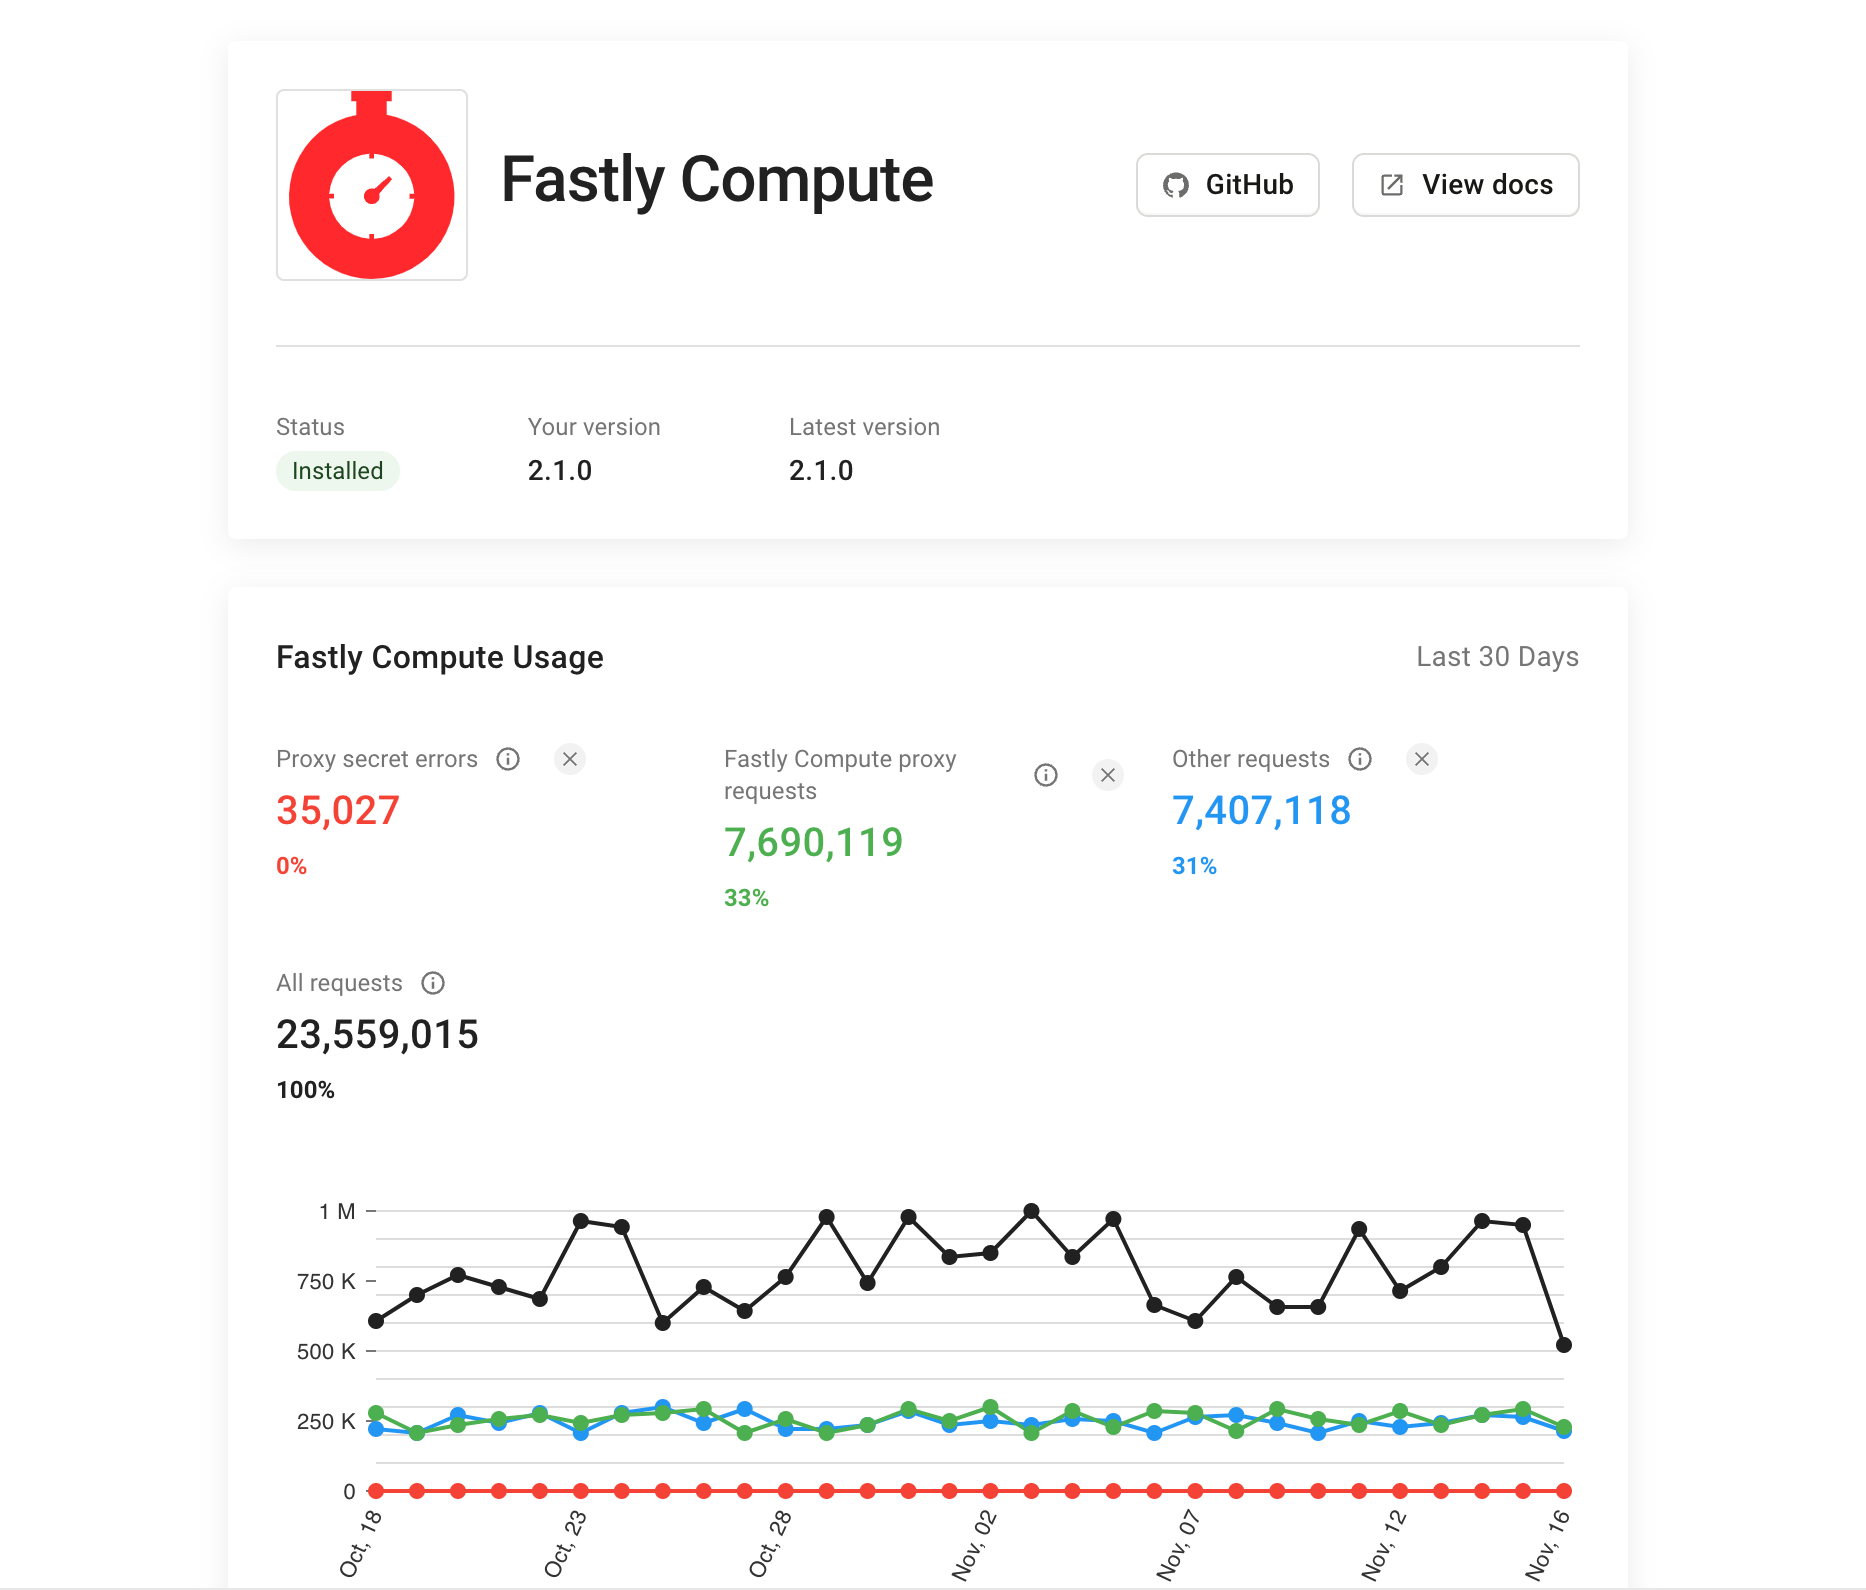
Inside your Fingerprint Dashboard, go to SDKs & integrations > Fastly Compute to see the usage metrics of your integration. Here you can monitor:
- If the integration is up to date.
- How many identification requests are coming through the integration (and how many are not).
- The error rate of proxied identification requests (caused by missing or incorrect proxy secret).
Fastly logging
If your integration isn’t working as expected, it can be useful to look at the Fastly Compute service logs. Fastly offers a variety of logging options and integrations. For simple debugging purposes, we recommend using Fastly log-tail:- Install and configure the Fastly CLI on your machine.
- Run
fastly log-tail --service-id <SERVICE_ID>to see a stream of log messages from the integration Compute service.
Keeping your integration up to date
The Fastly Compute proxy integration does not update automatically. To stay current:- If you’re managing your integration manually, regularly check the GitHub Releases page and follow the manual deployment steps to update your service package when needed.
- If you’re using Terraform, refer to the Terraform deployment guide to redeploy your package after reviewing the latest release.
Cost calculation
The resources required by the proxy integration fit within the Fastly Free Tier:- The integration uses 1 out of the 5 available Origins per Compute Service.
- The integration uses 0-2 out of the 100 available Config Store Items (only if supporting JavaScript agent v3).
- By default, the integration uses 200 out of the 1000 theoretically available connections per Compute service. Please contact our support team if you need to configure this value.