Documentation Index
Fetch the complete documentation index at: https://docs.fingerprint.com/llms.txt
Use this file to discover all available pages before exploring further.
- Significant increase in accuracy in browsers with strict privacy features such as Safari or Firefox.
- Cookies are now recognized as “first-party.” This means they can live longer in the browser and extend the lifetime of visitor IDs.
- Ad blockers, browser extensions, and VPNs will not block the Fingerprint client agent from loading and making identification requests. Connecting to a Fingerprint CDN and API is blocked by most ad blockers but connecting to the same site URL is allowed. To learn more, see Protecting the JavaScript agent from ad blockers.
This documentation applies to the JavaScript agent v4. For the deprecated v3 version, see v3 custom proxy integrations. If you are migrating from v3 to v4, you can see an overview of the required changes in the migration guide below.
Existing proxy integrations
Fingerprint currently offers these ready-made proxy integrations:- Custom subdomain setup — built-in proxy integration running entirely on Fingerprint infrastructure.
- Akamai Integration — uses Akamai property rules to proxy requests.
- Azure Integration— uses an Azure function as a proxy.
- AWS CloudFront Integration — uses a Lambda@Edge function as a proxy.
- Cloudflare Integration — uses Cloudflare Workers as a proxy.
- Fastly VCL Integration — uses Fastly CDN service VCL rules as a proxy.
- Fastly Compute@Edge Integration — uses Fastly Compute service as a proxy.
Custom proxy integration requirements
Your proxy integration will consist of several server-side API endpoints that proxy requests from Fingerprint client libraries to the Fingerprint servers. Your proxy logic must forward the HTTP request payload and correctly handle request headers and query parameters of each request to conform to the Fingerprint API data contract.First-party context
Your integration must be served in a first-party context. It must be available on a URL on the main website domain or one of its subdomains.- For example, if your website is
yourwebsite.com, thenyourwebsite.com/metricsormetrics.yourwebsite.comare both acceptable URLs. - When choosing the endpoint URLs, don’t use
fingerprint,fpjs, or other words related to fingerprinting that might get blocked by ad blockers. Pick generic words likemetrics,data, or completely random strings.
Types of HTTP requests to proxy
A proxy integration sits between the Fingerprint client agent on the browser/device and Fingerprint servers. There are three kinds of HTTP requests that the client agent makes:| HTTP request | HTTP Method | The purpose of a proxy integration |
|---|---|---|
| Agent download request (browser only) — downloads the latest device intelligence logic from the Fingerprint CDN | GET | avoid ad blockers, drop cookies, handle caching |
| Browser cache request (browser only) — gathers additional signals | GET | avoid ad blockers, drop cookies, handle caching |
| Identification request — sends collected signals to Fingerprint, gets the identification result in return | POST | avoid ad blockers, drop cookies |
1. Proxy the Agent download request (browsers only)
-
Create a GET server endpoint. Make it available on a
/RANDOM_PATH/web/*path in your application, so that it will expect additional path segments. The random path segment is used to avoid detection by ad blockers. -
Use the path segment after
webto compile correct agent-download URL. -
Forward all existing query parameters and add a
iimonitoring parameter. Use this form for theiiparameter:custom-proxy-integration/<integration_version>/procdn. Theiiparameter is necessary to display an integration usage chart in the dashboard. It will help you and the Fingerprint team monitor your integration and diagnose potential issues. Make sure to append, not set theiiparameter to avoid overwriting existingiiparameters. -
Forward all headers except the
cookieheader. Because the integration runs in the first-party context it has access to authentication cookies and other sensitive data. Remove all cookies before forwarding the agent download request to Fingerprint. -
Request the JavaScript agent from Fingerprint CDN. Use the download URL and headers you have prepared.
-
Set your own
cache-controlheader if necessary. The integration should generally forward thecache-controlheader it gets from Fingerprint CDN to the client. However, these are GET requests that can end in.jsand your cloud infrastructure setup or pre-existing cache mechanism might get in the way and overwrite the cache limits to excessively large values. This would result in the JavaScript agent getting out of date, leading to lower identification accuracy. You might need to experimentally verify if this is happening. If you are not sure, it’s safest to overwrite thecache-controlheader of the proxied response to ensure the JavaScript agent is not being cached for longer than one minute. -
Delete encoding headers if necessary. If your HTTP library decompresses or decodes the response automatically (as
fetchdoes in this example), you need to remove these headers to tell the client that the response is not compressed. Alternatively, depending on your HTTP library, you can disable the automatic decompression and keep the headers. -
Return the response to the client. No error handling is needed, the proxy integration must return the response as received.
-
Handle internal errors. When the proxy integration itself throws an error, it should return
HTTP 500. The response body is optional but recommended.
2. Proxy the Identification request
-
Create a POST server endpoint. In API v4, the identification path is base path, so it should be available on
/RANDOM_PATHthat is equal to the path used in the agent download request. -
Use the right identification URL —
https://api.fpjs.io,https://eu.api.fpjs.io, orhttps://ap.api.fpjs.iodepending on your workspace region. -
Forward all existing query parameters and add an
iimonitoring parameter. Use this form for theiiparametercustom-proxy-integration/<integration_version>/ingress. Theiiparameter is necessary to display an integration usage chart in the dashboard. It will help you and the Fingerprint team monitor your integration and diagnose potential issues. Make sure to append, not set theiiparameter to avoid overwriting existingiiparameters. -
Forward all headers as they are, except the
cookieheader. -
Delete all cookies except
_iidt. Remove all cookies from thecookieheader and include only the_iidtidentification cookie if present. The_iidtcookie is set by the Fingerprint server and is needed to ensure high identification accuracy. -
Add the necessary Fingerprint headers. Authenticate your request and forward the incoming request’s IP and host to the Fingerprint Identification API. Missing or invalid values of any of these headers will result in failure of the identification request.
Header Key Header Value FPJS-Proxy-Secret Your Fingerprint workspace’s proxy secret. You can create one in the Fingerprint dashboard. You can choose to scope the proxy secret to a specific environment. FPJS-Proxy-Client-IP The client IP address of the incoming request. Only accepts valid, public (not private or bogon) IPv4 or IPv6 addresses. FPJS-Proxy-Forwarded-Host The URL host of the incoming request. Only accepts a valid Host string. Securely storing the proxy secretTheFPJS-Proxy-Secretheader contains a sensitive proxy secret value. To ensure security, do not hard-code this value in the source code as plaintext . Instead, use encrypted environment variables or another secret storage mechanism available on your chosen deployment platform.PassingFPJS-Proxy-*header validationTheFPJS-Proxy-*headers sent by your integration are validated by the Fingerprint Identification API.-
If the
FPJS-Proxy-Secretis missing or does not contain a valid proxy secret associated with your Fingerprint workspace and environment, the identification request will fail with a403 Forbiddenstatus code. -
If any of the other
FPJS-Proxy-*headers is missing, duplicate, or contains an invalid value, the identification request will fail with a422 Unprocessable Entitystatus code. For example:FPJS-Proxy-Forwarded-Hostis empty or it’s value is not a valid host string.FPJS-Proxy-Client-IPis empty, contains multiple IP addresses, or contains a private or bogon IP address.
FPJS-Proxy-Client-IPcan cause issues when developing or testing your proxy integration on your machine. Even a correct implementation will end up passing a private IP address when running on a local network. To work around this, you can:- Temporarily hard-code the
FPJS-Proxy-Client-IPheader to your public IP address during development. - Deploy your integration to a staging environment on a public network for testing.
- Use a tunneling library like ngrok or LocalTunnel to make your locally running integration available on a public URL and test it from there. Note that not all tunneling libraries correctly forward the true client’s IP address, but we tested both Ngrok and LocalTunnel and found them to work well.
-
If the
-
Make the identification request. Use the identification URL and headers you have prepared above. Forward the incoming request’s body without change.
-
Remove the HSTS header if necessary. If your app needs to work using HTTP, remove the
strict-transport-securityheader. Otherwise, forward all headers as they come. -
Return the response to the client. No error handling is needed, the proxy integration must return the response as received.
-
Handle internal errors. When the proxy integration itself throws an error, it should return
HTTP 500using a specific error format shown in the example implementation below.error.messageis the message provided by your integration.requestIdis a unique ID in the following format:<timestamp>.<id>. Theidis a 6-character long string randomly picked from[a-zA-Z0-9]\.
3. Proxy the Browser cache request (browsers only)
-
Create a GET server endpoint. Make it available on the same path as the identification endpoint but expect additional random path segments. For example, if your identification endpoint is available on
https://yourwebsite.com/RANDOM_PATHthen the JavaScript agent will make GET browser cache requests to URLs likehttps://yourwebsite.com/RANDOM_PATH/abc345/xyz123. -
Use the random path segments with the identification URL to get the right browser cache URL. For example, if the incoming request is
https://yourwebsite.com/RANDOM_PATH/abc345/xyz123and youridentificationUrlwashttps://api.fpjs.io/(global region) then the request to Fingerprint servers must have this URL:https://api.fpjs.io/abc345/xyz123. -
Forward all query parameters. You don’t need to add any parameters here.
-
Forward all headers except the
cookieheader. -
Make the browser cache request. Use the browser cache URL and headers you have prepared above.
-
Return the fresh response to the client. No changes to the provided headers or error handling are necessary here. Make sure that the response is never cached. The response is unique for each browser, any caching could lead to false positives (returning the same visitor ID for different browsers).
-
Handle internal errors. When the proxy integration itself throws an error, it should return
HTTP 500. The response body is optional but recommended.
Return
404 for unmatched pathsIf the request path does not match any of the defined paths, the integration must return a HTTP 404. This can happen if there is a typo or a configuration problem with the Fingerprint client agent or the proxy integration itself.4. Configure the Fingerprint client agent
Configure the Fingerprint client agent to make requests to your integration instead of the default Fingerprint APIs.- Set
endpointsto the path of your identification proxy endpoint, for example,yourwebsite.com/RANDOM_PATH.
Fallback endpoints
If requests to your proxy integration fail, the Fingerprint client agent will fall back to the default endpoints and keep identifying visitors, albeit without the proxy integration accuracy benefits.5. Test and monitor your proxy integration
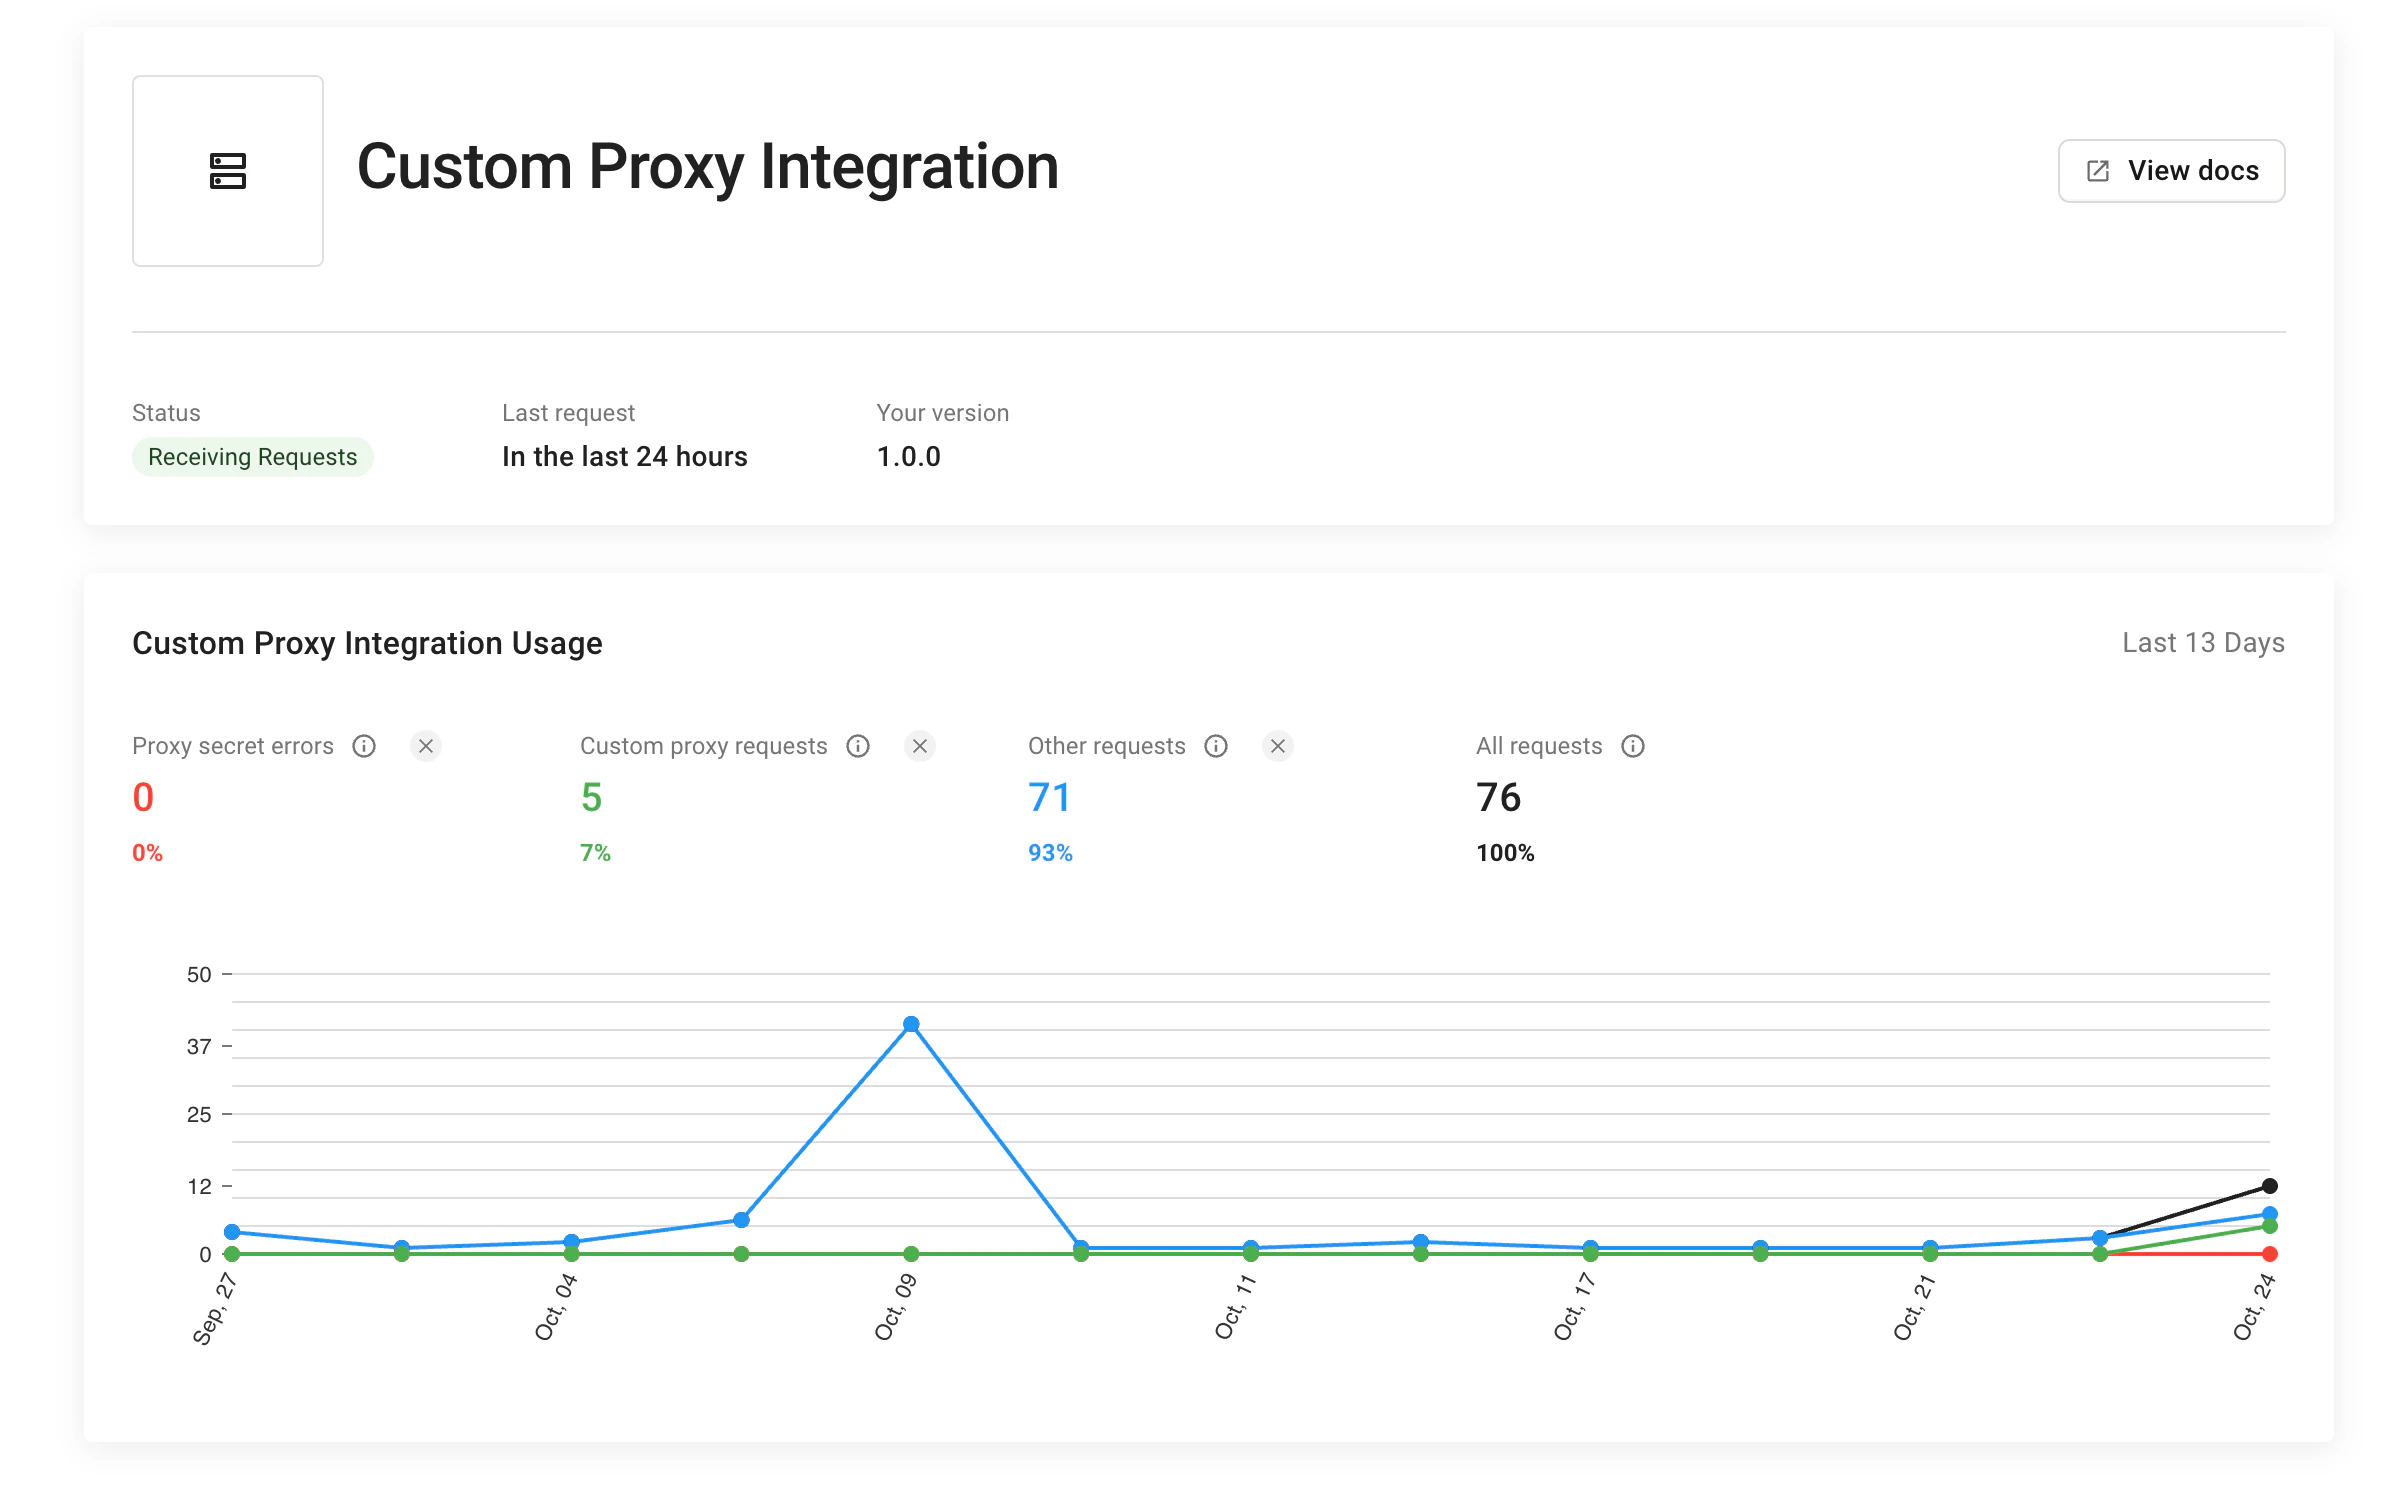
A misconfigured proxy integration or client agent can completely disrupt visitor identification on your website. We recommend testing your integration thoroughly before deploying it to production. If you implemented theii monitoring parameter correctly, you can go to Dashboard > App setting > Integrations > Custom proxy integration to see the status of your integration. Here you can monitor:
- The latest used integration version.
- How many identification requests are coming through the integration (and how many are not).
Migrating from v3 to v4
If you already have a custom proxy integration built for API v3, here is an overview of the changes required to migrate to v4. For more details, see the full guidelines above. We recommend deploying a separate v4 proxy implementation on a new path and then switching to JavaScript agent v4 using the new proxy. Alternatively, you can consider adjusting your existing proxy to support v3 and v4 at the same time, but that is outside the scope of this guide.Server-side changes
- Agent download endpoint — change from query parameter-based to path-based URL construction. In v4, the path is extracted from the request URL instead of using query parameters:
Agent download URL construction
- Unified base path — in v4, the agent download and identification endpoints share a common base path instead of separate paths:
| Endpoint | v3 | v4 |
|---|---|---|
| Agent download | /metrics/YOUR_AGENT_PATH | /RANDOM_PATH/web/* |
| Identification | /metrics/YOUR_IDENTIFICATION_PATH | /RANDOM_PATH |
| Browser cache | /metrics/YOUR_IDENTIFICATION_PATH/[...segments] | /RANDOM_PATH/[...segments] |
Client-side changes
JavaScript agent (NPM) — update your import and configuration. The v4 SDK usesstart() instead of load() and a single endpoints option instead of separate scriptUrlPattern and endpoint options:
Client configuration
CDN installation