

- Supports all standard functionality of the JavaScript agent.
- Pushes data to the GTM’s data layer which can be processed by other tags or by JavaScript code on your website.
1. Import the Fingerprint GTM template
You can install the template manually from the integration’s GitHub repository.- Download the template and make sure it is saved as
template.tplnottemplate.tpl.txt. - Open the Google Tag Manager workspace of your website.
- Go to Templates and click New to create a new template.
- To import the template, click the More actions (⋮) button in the top right corner, select Import and pick the downloaded
template.tplfile. - Click Save.
2. Add a Fingerprint tag to your website
- Go to Tags and click New to create a new tag.
- Click Choose a tag type and under Custom, pick your imported Fingerprint template.
- Configure the tag:
- Choose your Tag type. Start and Identify loads the script and identifies the visitor right after the tag is triggered. This is the recommended option if you want to identify visitors on page initialization.
Note: If you want to identify visitors after an event (e.g. form submission) with minimum latency, you might want to separate starting the JavaScript agent from the identification request. In that case, you can create two separate Fingerprint tags:
- First, with tag type Start, which is triggered on page initialization.
- Second, with tag type Identify which is triggered by another event. You can create your own custom event trigger and then fire it from a 3rd party tag or from your JavaScript code:
dataLayer.push({'event': 'identifyVisitor'});
- Enter your
public API keyandregion. - In the Additional fields section, you can optionally configure the
endpoints,tags,linkedId. You can change Result custom name to change the name of theresultobject in the dataLayer.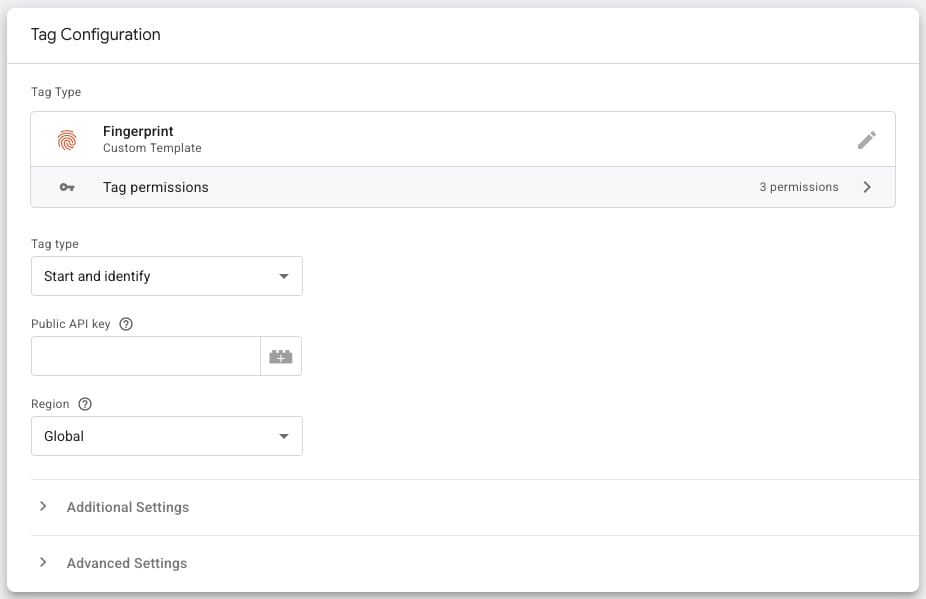
- Choose your Tag type. Start and Identify loads the script and identifies the visitor right after the tag is triggered. This is the recommended option if you want to identify visitors on page initialization.
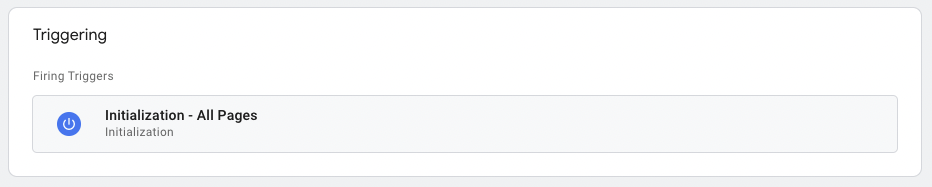
- In the Triggering section, add a new trigger, for example: Initialization.\
- Click Save to save your tag.
- Click Submit and publish your workspace changes to your website.
Using the Fingerprint result in custom JavaScript code
Fingerprint data can be accessed through the GTM’sdataLayer API in your JavaScript code. It’s important to check if the result data (specified by Result custom name) is already present in the data layer.
Using the Fingerprint result in a custom variable
You can expose every property of theresult object as a user-defined variable and use it in the configuration fields of other tags. For example, you can reference the visitor_id as a variable in another tag.
- Inside Google Tag Manager, go to Variables, and click New to create a new user-defined variable.
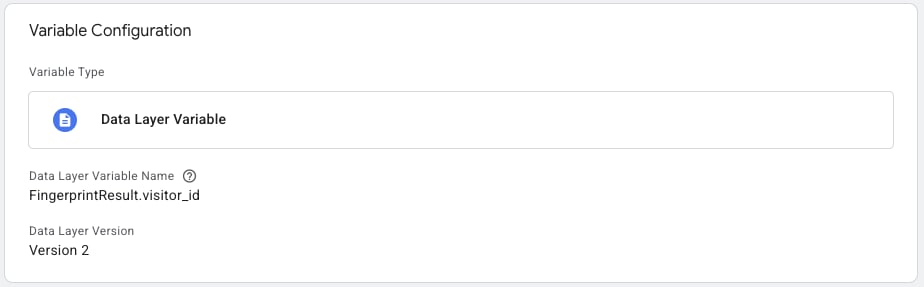
- Select the Data Layer Variable type.
-
Name your variable, for example
VisitorID. -
Set Data Layer Variable Name to
FingerprintResult.visitor_id. The data layer properties format follows the result format provided by the JavaScript agent. - Click Save to create the variable.
{{VisitorID}} variable in the configuration of 3rd party tags within your container. However, the tags need to wait for the Fingerprint result data:
- Add a new Trigger to the 3rd party tag.
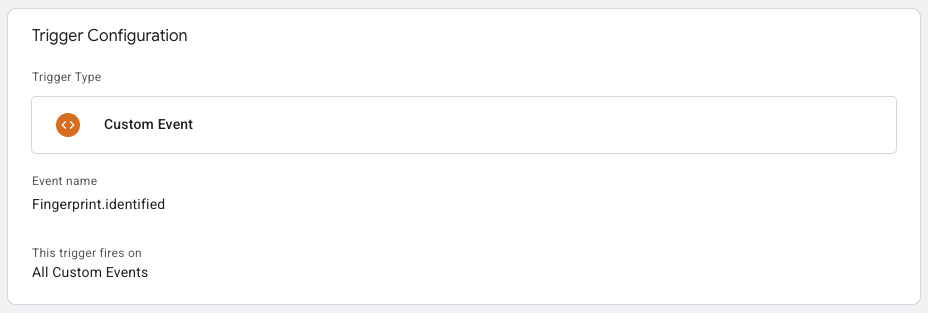
- In the tag’s configuration, add a new Firing Trigger, choose Custom Event, and enter
Fingerprint.identified.
Code and documentation
You can find the code and technical documentation in the official GitHub repository.Limitations
- Some advanced JavaScript agent properties (
storageKeyPrefix,urlHashing,cache) are not currently supported. If you need to use these features, please contact support. - Ad-blocking browser extensions such as AdBlock, uBlock Origin, etc., can block all scripts served by Google Tag Manager, including Fingerprint. If this is a problem for your use case, see Google Tag Manager documentation for Server-side tagging and Custom domain configuration.
Migration guide for Google Tag Manager integration v2.0.0
Version 2.0.0 of the Google Tag Manager integration switches from JavaScript agent v3 to JavaScript agent v4. To migrate to version 2.0.0 from version 1.1.0 and earlier, you will need to:- Update your JavaScript code using the Fingerprint result
- Update your Fingerprint tags to use the new tag template
- Update user-defined variables referencing the Fingerprint result
- Update triggers using Fingerprint custom events
- Preview, test, and publish your changes
1. Update your JavaScript code using the Fingerprint result
If you have JavaScript code that is accessing theFingerprintJSProResult, you will need to update that code to use the new dataLayer result variable, named FingerprintResult by default.
Refer to the JavaScript agent v4 reference for the result format provided by the JavaScript agent.
To allow your JavaScript code to be updated before the new tags are created and published, you can support both agent v3 results and agent v4 results with the same code, using an approach similar to the code below:
2. Update your Fingerprint tags to use the new tag template
First, follow the steps in the Import the Fingerprint GTM template section to create the tag type for the version 2.0.0 Fingerprint tag. The default name for the custom tag type,Fingerprint, differs from previous versions to avoid conflicts.
Next, update your tags by opening each tag for editing, taking note of the tags current parameter values, and then changing the tag type from the previous version, named Fingerprint Pro by default, to the new Fingerprint tag type.
Changing the tag type will reset the tag to its default state, and the parameter values you noted will need to be re-entered.
As you update your tags, you’ll need to account for the following changes to the tag type’s parameters:
- The
Tag typeparameter’s values have changed fromLoad and identifyandLoadtoStart and identifyandStart, respectively. - The
Script Url PatternandEndpointparameters have been replaced by theEndpointslist. If you are using a custom subdomain or proxy integration, add an item to theEndpointslist with the endpoint URL for the integration. - The
Extended resultparameter is no longer needed and has been removed. - The default value for the
Result custom namehas changed fromFingerprintJSProResulttoFingerprintResult. If the downstream usages of the result are not referencing individual properties, you might choose to use the previousFingerprintJSProResultname to limit the number of downstream updates you need to make.
3. Update user-defined variables referencing the Fingerprint result
Because the Fingerprint result format has changed with the migration to JavaScript agent v4, you will need to update each data layer variable that references the Fingerprint result values. To update a variable, select the variable and edit the Data Layer Variable Name to use the new name for the value from the Fingerprint result. When updating the data layer variable, take into account the value of theResult custom name parameter defined on the tag in the previous step. It defaults to FingerprintResult in version 2.0.0.