> ## Documentation Index
> Fetch the complete documentation index at: https://docs.fingerprint.com/llms.txt
> Use this file to discover all available pages before exploring further.
# (deprecated) AWS CloudFront Proxy Integration v1
> Please use CloudFront proxy integration v2 instead.
**CloudFront proxy integration v1 has been deprecated**
This is a deprecated guide for the v1 of CloudFront integration. Please use **[CloudFront Proxy Integration v2](/docs/cloudfront-proxy-integration-v2)** instead.
If you are currently using CloudFront integration v1, please see **[Migrating CloudFront proxy integration from v1 to v2](/docs/v3/cloudfront-integration-migration-from-v1-to-v2)**.
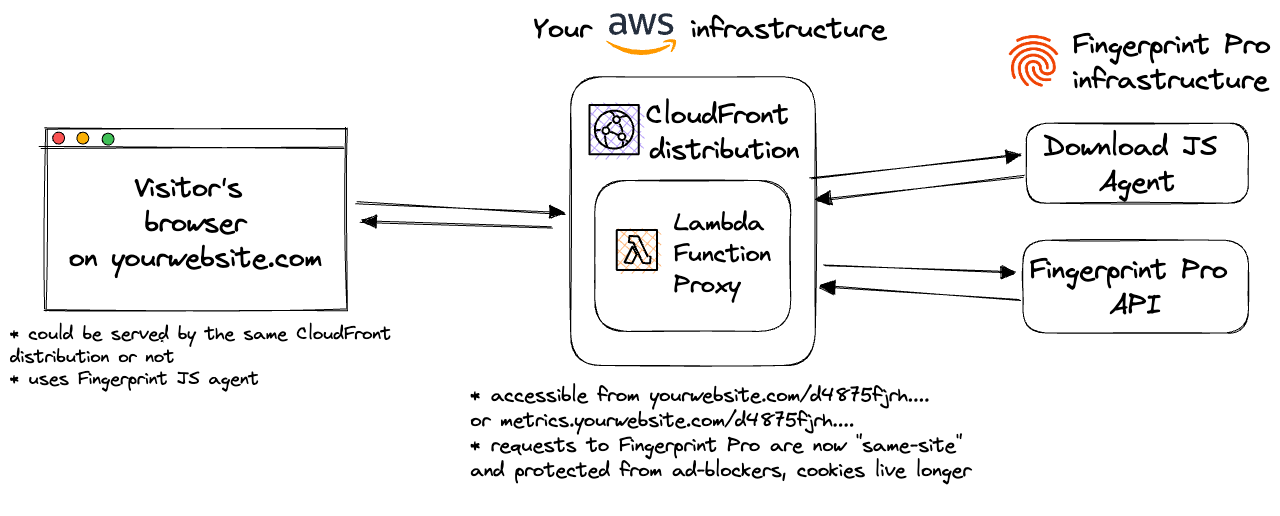
*Fingerprint CloudFront Proxy Integration* is responsible for proxying identification and agent-download requests between your website and Fingerprint through your AWS infrastructure. Your website does not strictly need to be behind CloudFront or run on AWS to use this proxy integration, although that is optimal for ease of setup and maximum accuracy benefits.
 **Limitations**
Support for the AWS CloudFront Proxy Integration is provided only to customers on the **Enterprise** Plan. Other customers are encouraged to use [Custom subdomain setup](/docs/custom-subdomain-setup) or [Cloudflare Proxy Integration](/docs/cloudflare-integration).
**Update expectations**
The underlying data contract in the identification logic can change to keep up with browser and device releases. Using the AWS CloudFront Proxy Integration might require occasional manual updates on your side. Ignoring these updates will lead to lower accuracy or service disruption.
The integration consists of several components:
* Your website, which may be running on AWS Cloudfront but it doesn't have to.
* An [AWS CloudFront](https://aws.amazon.com/cloudfront/) distribution
* If your website is already running on CloudFront, you can use the same distribution for the proxy integration. This is the recommended setup to maximize the accuracy benefits of the integration. See [Step 5](#step-5-configure-the-cloudfront-distribution) for more details.
* If your website is not running on CloudFront, you can create a new CloudFront distribution just for the proxy integration (see [Step 5](#step-5-configure-the-cloudfront-distribution)).
* [AWS Lambda@Edge Function](https://aws.amazon.com/lambda/edge/) that handles proxying requests to Fingerprint resources.
* Management Lambda function that is responsible for updating the integration.
* Additional cache behavior that enables using *Lambda\@Edge* function for proxying requests.
* Other supporting resources such as *CodeBuildServiceRole* or *Artifact Storage* that are defined in the [CloudFormation stack](https://us-east-1.console.aws.amazon.com/lambda/home#/create/app?applicationId=arn:aws:serverlessrepo:us-east-1:708050157146:applications/fingerprint-pro-cloudfront-integration).
*Fingerprint CloudFormation* stack creates a *Lambda\@Edge Function* that's available on the specific path on your site. The rest of your site is not affected.
This guide will refer to *Lambda\@Edge Function* and *Lambda* function interchangeably.
The *Lambda* function code and the whole *CloudFormation* stack are 100% open-source and available on [GitHub](https://github.com/fingerprintjs/fingerprint-pro-cloudfront-integration). Once the Fingerprint JavaScript agent is configured on your site correctly, the *Lambda* function is responsible for delivering the latest fingerprinting client-side logic as well as proxying identification requests and responses between your site and Fingerprint's APIs.
## The benefits of using the CloudFront Integration
* Ad blockers will not block our Fingerprint JavaScript agent from loading. Attempts to connect to an external URL will be stopped by most ad blockers while attempts to connect to the same site URL will be allowed.
* Significant increase in accuracy in browsers with strict privacy features such as Safari or Firefox.
* Cookies are now recognized as “first-party.” This means they can live in the browser even when third-party cookies are blocked and extend the lifetime of visitor information.
* Insight and control over the identification requests that can be combined with other AWS features like [CloudWatch](https://aws.amazon.com/cloudwatch/).
* With the CloudFront Integration, you can manage an unlimited number of subdomains and paths and provide Fingerprint services to all your customers at any scale while benefiting from all the 1st-party integration improvements.
* Cookie security: CloudFront integration drops all the cookies sent from the origin website. The lambda function code is open-source so this behavior can be transparently verified and audited.
* Easy to meet compliance and auditing requirements.
## Prerequisites
* An AWS account.
* An existing CloudFront distribution that serves the web app's content OR a new CloudFront distribution that is configured to serve content on the [same eTLD + 1 or on any of its subdomains](https://docs.aws.amazon.com/AmazonCloudFront/latest/DeveloperGuide/CNAMEs.html) - see [Step 5](#step-5-configure-the-cloudfront-distribution).
## Integration setup overview
The integration setup consists of several manual and automatic steps. Each of the following steps is discussed in detail in a separate section below.
1. Issue a *Proxy Pre-Shared Secret* in the dashboard.
2. Create path variables used by the AWS configuration and JavaScript agent configuration on your website.
3. Create a new secret in the [AWS Secrets Manager](https://aws.amazon.com/secrets-manager/) to store path variables and the *Proxy Pre-Shared Secret*.
4. Install the *CloudFormation* application containing all the necessary resources for the integration.
5. Configure the CloudFront distribution with the Lambda function and the cache behavior.
6. Configure *Fingerprint JavaScript agent* on your client side.
## Step 1 - Issue a Proxy Pre-Shared Secret
You need to issue a *Proxy Pre-Shared Secret* to authenticate requests from your Lambda\@Edge function.
1. Go to the *Fingerprint* [dashboard](https://dashboard.fingerprint.com) and select your workspace.
2. In the left menu, go to **API keys**.
3. Click *Create key* and select *Proxy Pre-Shared Secret.*
4. Click *Create*.
This *Proxy Pre-Shared Secret* value will be used later in the `FPJS_PRE_SHARED_SECRET` variable, so store it somewhere safe.
## Step 2 - Create path variables
You need to set the path variables you will use throughout your AWS configuration (Steps 3 and 5) and the JavaScript agent configuration on your website ([Step 6](#step-6-configure-the-fingerprint-javascript-agent-on-your-client)). These values are arbitrary. Just decide what your values are and write them down somewhere.
In this guide, we will use readable values corresponding to the variable names just to keep things easier to follow:
```
FPJS_BEHAVIOR_PATH="FPJS_BEHAVIOR_PATH"
FPJS_AGENT_DOWNLOAD_PATH="FPJS_AGENT_DOWNLOAD_PATH"
FPJS_GET_RESULT_PATH="FPJS_GET_RESULT_PATH"
```
However, your values used in production should look more like random strings:
```
FPJS_BEHAVIOR_PATH="ore54guier"
FPJS_AGENT_DOWNLOAD_PATH="vbcnkxb654"
FPJS_GET_RESULT_PATH="5yt489hgfj"
```
That is because some adblockers might automatically block requests from any URL containing fingerprint-related terms like "fingerprint", "fpjs", "track", etc. Random strings are the safest. So whenever you see a value like `FPJS_BEHAVIOR_PATH` in this guide, you should use your own random value instead.
## Step 3 - Create a new secret in the AWS Secrets Manager
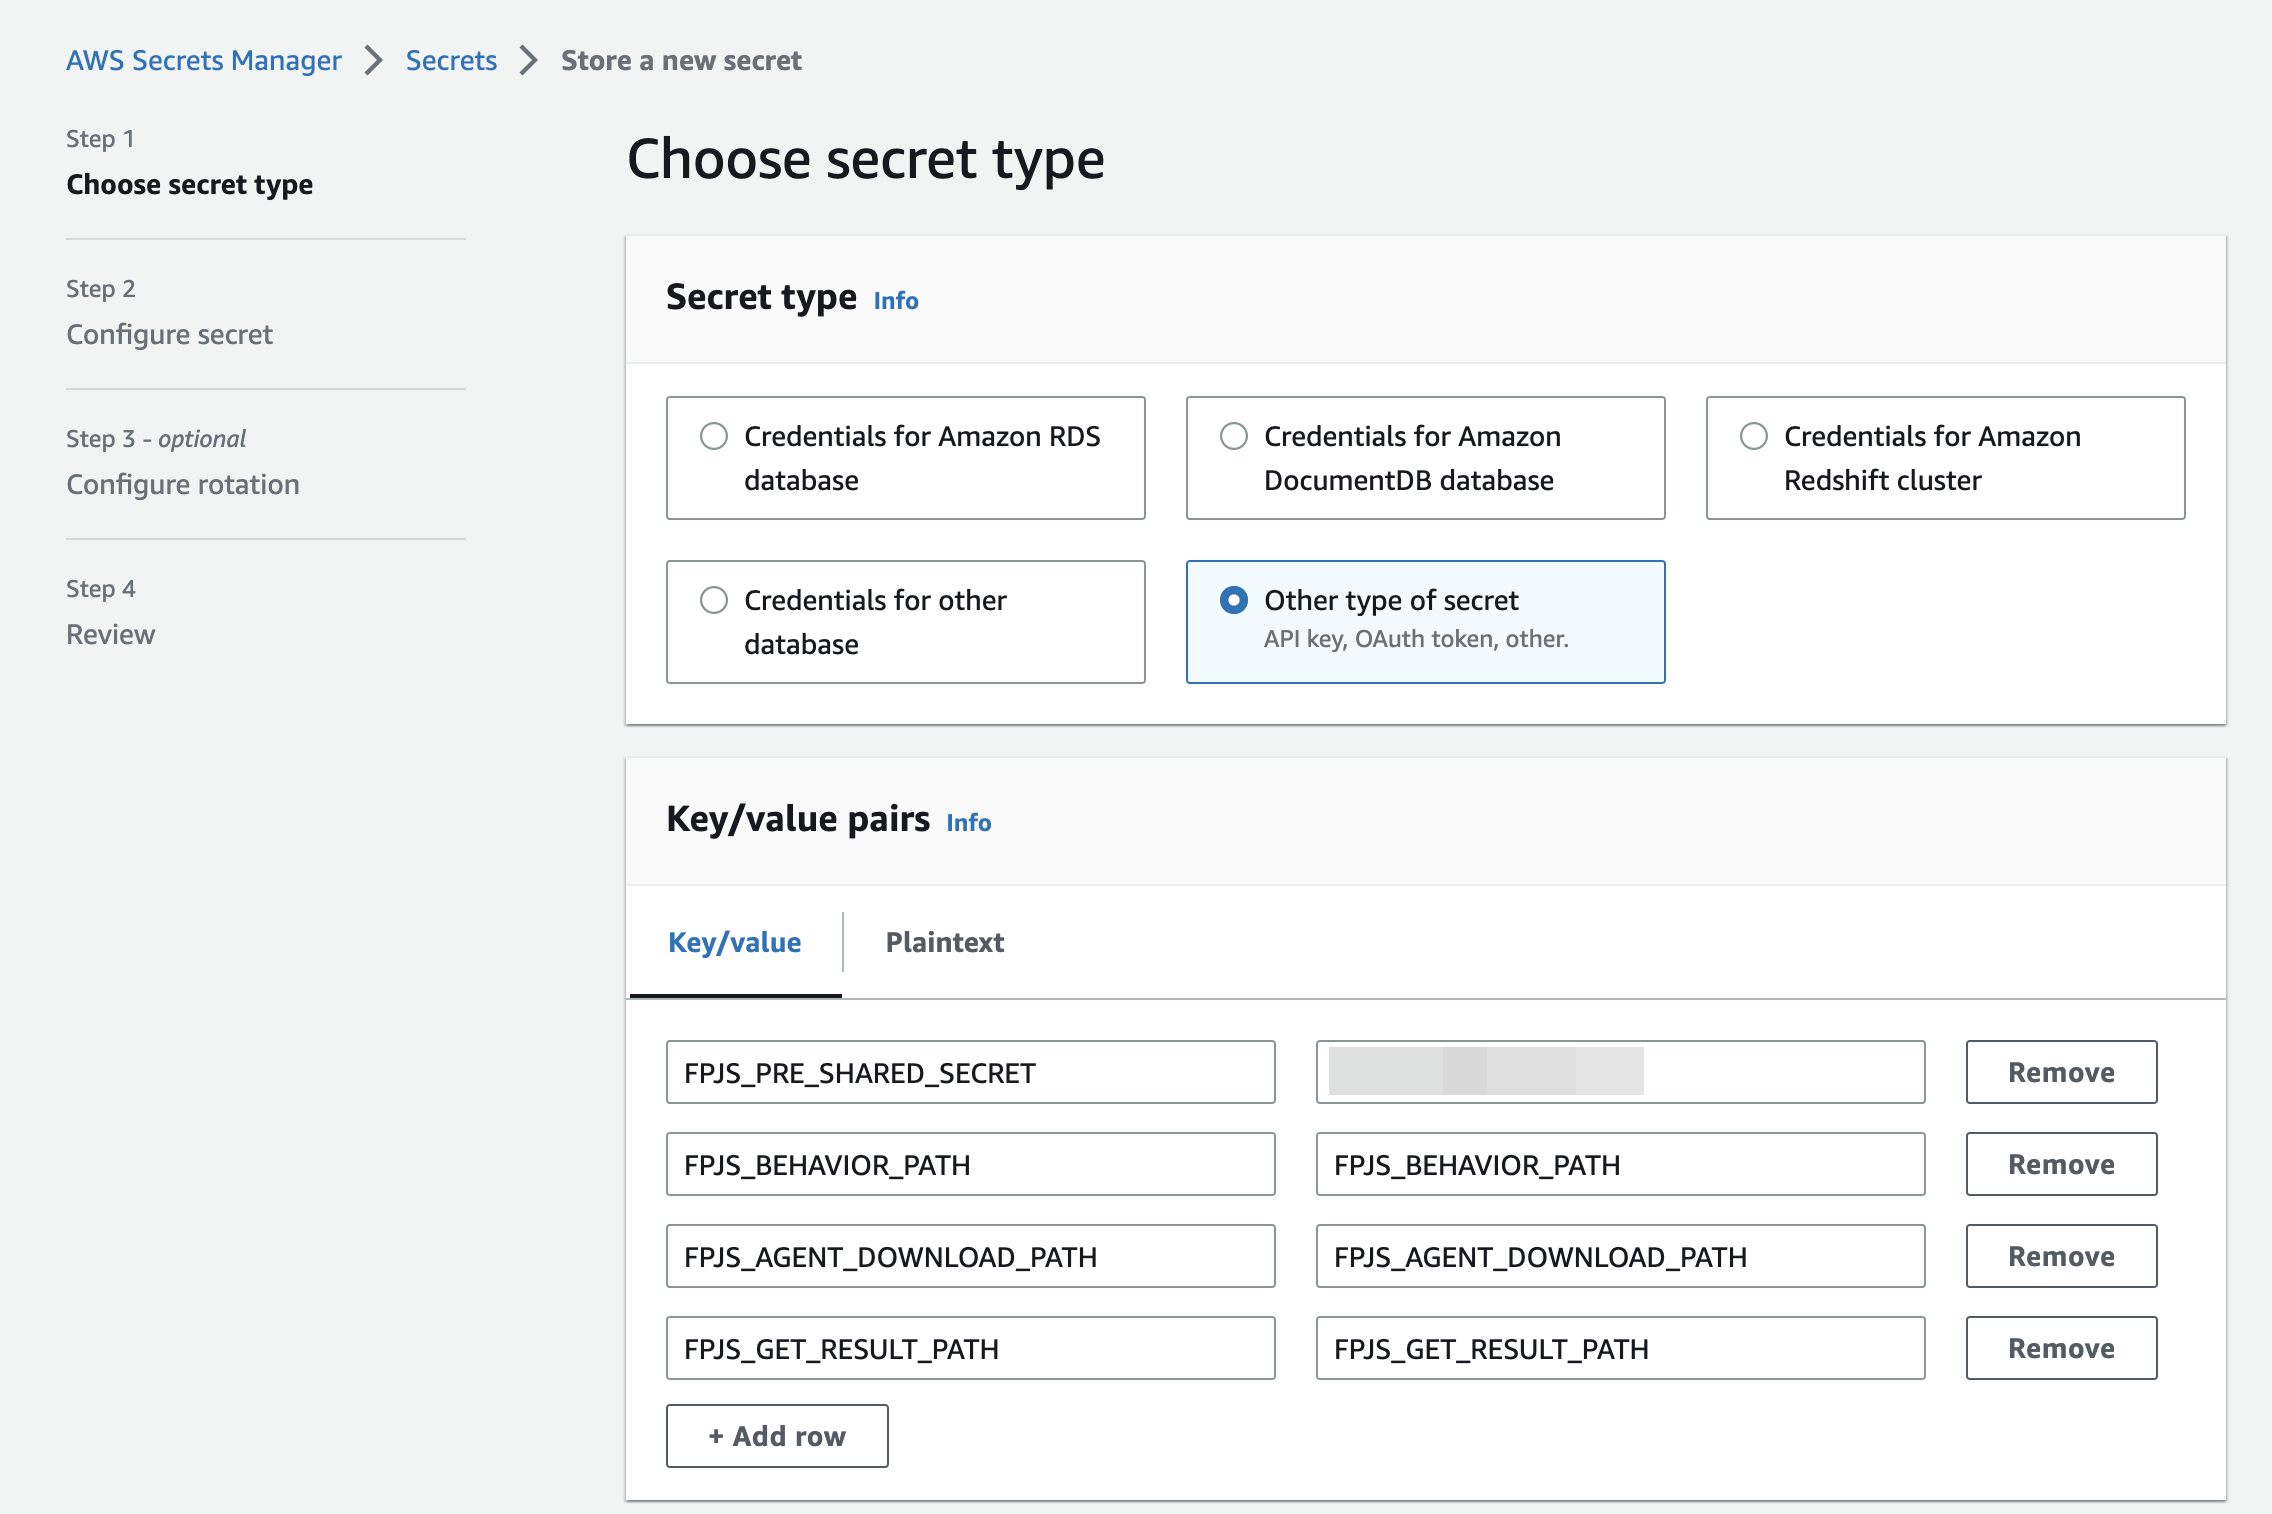
1. Go to AWS Secrets Manager and click *Store a new secret*.
2. Choose *Other type of secret* as the secret type.
3. Add the 4 required values in the *Key/value pairs* section:
* The key `FPJS_PRE_SHARED_SECRET` with value the of the `Proxy Pre-Shared Secret` which was issued in **Step 1**.
* `FPJS_BEHAVIOR_PATH`, `FPJS_AGENT_DOWNLOAD_PATH`, and `FPJS_GET_RESULT_PATH` you decided on in **Step 2**.
**Limitations**
Support for the AWS CloudFront Proxy Integration is provided only to customers on the **Enterprise** Plan. Other customers are encouraged to use [Custom subdomain setup](/docs/custom-subdomain-setup) or [Cloudflare Proxy Integration](/docs/cloudflare-integration).
**Update expectations**
The underlying data contract in the identification logic can change to keep up with browser and device releases. Using the AWS CloudFront Proxy Integration might require occasional manual updates on your side. Ignoring these updates will lead to lower accuracy or service disruption.
The integration consists of several components:
* Your website, which may be running on AWS Cloudfront but it doesn't have to.
* An [AWS CloudFront](https://aws.amazon.com/cloudfront/) distribution
* If your website is already running on CloudFront, you can use the same distribution for the proxy integration. This is the recommended setup to maximize the accuracy benefits of the integration. See [Step 5](#step-5-configure-the-cloudfront-distribution) for more details.
* If your website is not running on CloudFront, you can create a new CloudFront distribution just for the proxy integration (see [Step 5](#step-5-configure-the-cloudfront-distribution)).
* [AWS Lambda@Edge Function](https://aws.amazon.com/lambda/edge/) that handles proxying requests to Fingerprint resources.
* Management Lambda function that is responsible for updating the integration.
* Additional cache behavior that enables using *Lambda\@Edge* function for proxying requests.
* Other supporting resources such as *CodeBuildServiceRole* or *Artifact Storage* that are defined in the [CloudFormation stack](https://us-east-1.console.aws.amazon.com/lambda/home#/create/app?applicationId=arn:aws:serverlessrepo:us-east-1:708050157146:applications/fingerprint-pro-cloudfront-integration).
*Fingerprint CloudFormation* stack creates a *Lambda\@Edge Function* that's available on the specific path on your site. The rest of your site is not affected.
This guide will refer to *Lambda\@Edge Function* and *Lambda* function interchangeably.
The *Lambda* function code and the whole *CloudFormation* stack are 100% open-source and available on [GitHub](https://github.com/fingerprintjs/fingerprint-pro-cloudfront-integration). Once the Fingerprint JavaScript agent is configured on your site correctly, the *Lambda* function is responsible for delivering the latest fingerprinting client-side logic as well as proxying identification requests and responses between your site and Fingerprint's APIs.
## The benefits of using the CloudFront Integration
* Ad blockers will not block our Fingerprint JavaScript agent from loading. Attempts to connect to an external URL will be stopped by most ad blockers while attempts to connect to the same site URL will be allowed.
* Significant increase in accuracy in browsers with strict privacy features such as Safari or Firefox.
* Cookies are now recognized as “first-party.” This means they can live in the browser even when third-party cookies are blocked and extend the lifetime of visitor information.
* Insight and control over the identification requests that can be combined with other AWS features like [CloudWatch](https://aws.amazon.com/cloudwatch/).
* With the CloudFront Integration, you can manage an unlimited number of subdomains and paths and provide Fingerprint services to all your customers at any scale while benefiting from all the 1st-party integration improvements.
* Cookie security: CloudFront integration drops all the cookies sent from the origin website. The lambda function code is open-source so this behavior can be transparently verified and audited.
* Easy to meet compliance and auditing requirements.
## Prerequisites
* An AWS account.
* An existing CloudFront distribution that serves the web app's content OR a new CloudFront distribution that is configured to serve content on the [same eTLD + 1 or on any of its subdomains](https://docs.aws.amazon.com/AmazonCloudFront/latest/DeveloperGuide/CNAMEs.html) - see [Step 5](#step-5-configure-the-cloudfront-distribution).
## Integration setup overview
The integration setup consists of several manual and automatic steps. Each of the following steps is discussed in detail in a separate section below.
1. Issue a *Proxy Pre-Shared Secret* in the dashboard.
2. Create path variables used by the AWS configuration and JavaScript agent configuration on your website.
3. Create a new secret in the [AWS Secrets Manager](https://aws.amazon.com/secrets-manager/) to store path variables and the *Proxy Pre-Shared Secret*.
4. Install the *CloudFormation* application containing all the necessary resources for the integration.
5. Configure the CloudFront distribution with the Lambda function and the cache behavior.
6. Configure *Fingerprint JavaScript agent* on your client side.
## Step 1 - Issue a Proxy Pre-Shared Secret
You need to issue a *Proxy Pre-Shared Secret* to authenticate requests from your Lambda\@Edge function.
1. Go to the *Fingerprint* [dashboard](https://dashboard.fingerprint.com) and select your workspace.
2. In the left menu, go to **API keys**.
3. Click *Create key* and select *Proxy Pre-Shared Secret.*
4. Click *Create*.
This *Proxy Pre-Shared Secret* value will be used later in the `FPJS_PRE_SHARED_SECRET` variable, so store it somewhere safe.
## Step 2 - Create path variables
You need to set the path variables you will use throughout your AWS configuration (Steps 3 and 5) and the JavaScript agent configuration on your website ([Step 6](#step-6-configure-the-fingerprint-javascript-agent-on-your-client)). These values are arbitrary. Just decide what your values are and write them down somewhere.
In this guide, we will use readable values corresponding to the variable names just to keep things easier to follow:
```
FPJS_BEHAVIOR_PATH="FPJS_BEHAVIOR_PATH"
FPJS_AGENT_DOWNLOAD_PATH="FPJS_AGENT_DOWNLOAD_PATH"
FPJS_GET_RESULT_PATH="FPJS_GET_RESULT_PATH"
```
However, your values used in production should look more like random strings:
```
FPJS_BEHAVIOR_PATH="ore54guier"
FPJS_AGENT_DOWNLOAD_PATH="vbcnkxb654"
FPJS_GET_RESULT_PATH="5yt489hgfj"
```
That is because some adblockers might automatically block requests from any URL containing fingerprint-related terms like "fingerprint", "fpjs", "track", etc. Random strings are the safest. So whenever you see a value like `FPJS_BEHAVIOR_PATH` in this guide, you should use your own random value instead.
## Step 3 - Create a new secret in the AWS Secrets Manager
1. Go to AWS Secrets Manager and click *Store a new secret*.
2. Choose *Other type of secret* as the secret type.
3. Add the 4 required values in the *Key/value pairs* section:
* The key `FPJS_PRE_SHARED_SECRET` with value the of the `Proxy Pre-Shared Secret` which was issued in **Step 1**.
* `FPJS_BEHAVIOR_PATH`, `FPJS_AGENT_DOWNLOAD_PATH`, and `FPJS_GET_RESULT_PATH` you decided on in **Step 2**.
 4. Click *Next*.
5. Specify the secret name — it will be used further in the configuration. Click *Next*.
6. Leave *Automatic rotation* disabled and click *Next*.
7. Click *Store*.
8. Your secret is created. Remember the *Secret name* and which *Region* it was created in (see the upper-right corner of the screen)
## Step 4 - Install the CloudFormation application
*Lambda\@Edge* function and corresponding settings (*AWS Lambda execution role* and *cache policy* for CDN) are provided as a *CloudFormation* application. Go to the [application page](https://us-east-1.console.aws.amazon.com/lambda/home#/create/app?applicationId=arn:aws:serverlessrepo:us-east-1:708050157146:applications/fingerprint-pro-cloudfront-integration) to open the deployment dialog.
### Lambda region
Lambda\@Edge functions that are used to handle requests to CloudFront and responses from CloudFront [must be deployed](https://docs.aws.amazon.com/AmazonCloudFront/latest/DeveloperGuide/lambda-at-edge-function-restrictions.html#lambda-at-edge-restrictions-region) to the `us-east-1` region. Make sure that you’ve selected this region before deploying the application.
Fill in the required values to the application settings and deploy the application to your AWS account.
* The`DistributionId` is the identifier of your CloudFront distribution.
* The `SecretName` is the name of the secret you created in the previous step.
* The `SecretRegion` is the region where the secret is stored e.g.: `us-east-1`.
> Note: This application creates the **custom IAM roles** that allow us to modify CloudFront distribution to keep the Lambda\@Edge function up to date. You can review these policies in the [SAM template](https://github.com/fingerprintjs/fingerprint-pro-cloudfront-integration/blob/main/cloudformation/template.yml).
After deployment, you will be redirected to the application page where you can see a list of resources created by the application.
4. Click *Next*.
5. Specify the secret name — it will be used further in the configuration. Click *Next*.
6. Leave *Automatic rotation* disabled and click *Next*.
7. Click *Store*.
8. Your secret is created. Remember the *Secret name* and which *Region* it was created in (see the upper-right corner of the screen)
## Step 4 - Install the CloudFormation application
*Lambda\@Edge* function and corresponding settings (*AWS Lambda execution role* and *cache policy* for CDN) are provided as a *CloudFormation* application. Go to the [application page](https://us-east-1.console.aws.amazon.com/lambda/home#/create/app?applicationId=arn:aws:serverlessrepo:us-east-1:708050157146:applications/fingerprint-pro-cloudfront-integration) to open the deployment dialog.
### Lambda region
Lambda\@Edge functions that are used to handle requests to CloudFront and responses from CloudFront [must be deployed](https://docs.aws.amazon.com/AmazonCloudFront/latest/DeveloperGuide/lambda-at-edge-function-restrictions.html#lambda-at-edge-restrictions-region) to the `us-east-1` region. Make sure that you’ve selected this region before deploying the application.
Fill in the required values to the application settings and deploy the application to your AWS account.
* The`DistributionId` is the identifier of your CloudFront distribution.
* The `SecretName` is the name of the secret you created in the previous step.
* The `SecretRegion` is the region where the secret is stored e.g.: `us-east-1`.
> Note: This application creates the **custom IAM roles** that allow us to modify CloudFront distribution to keep the Lambda\@Edge function up to date. You can review these policies in the [SAM template](https://github.com/fingerprintjs/fingerprint-pro-cloudfront-integration/blob/main/cloudformation/template.yml).
After deployment, you will be redirected to the application page where you can see a list of resources created by the application.
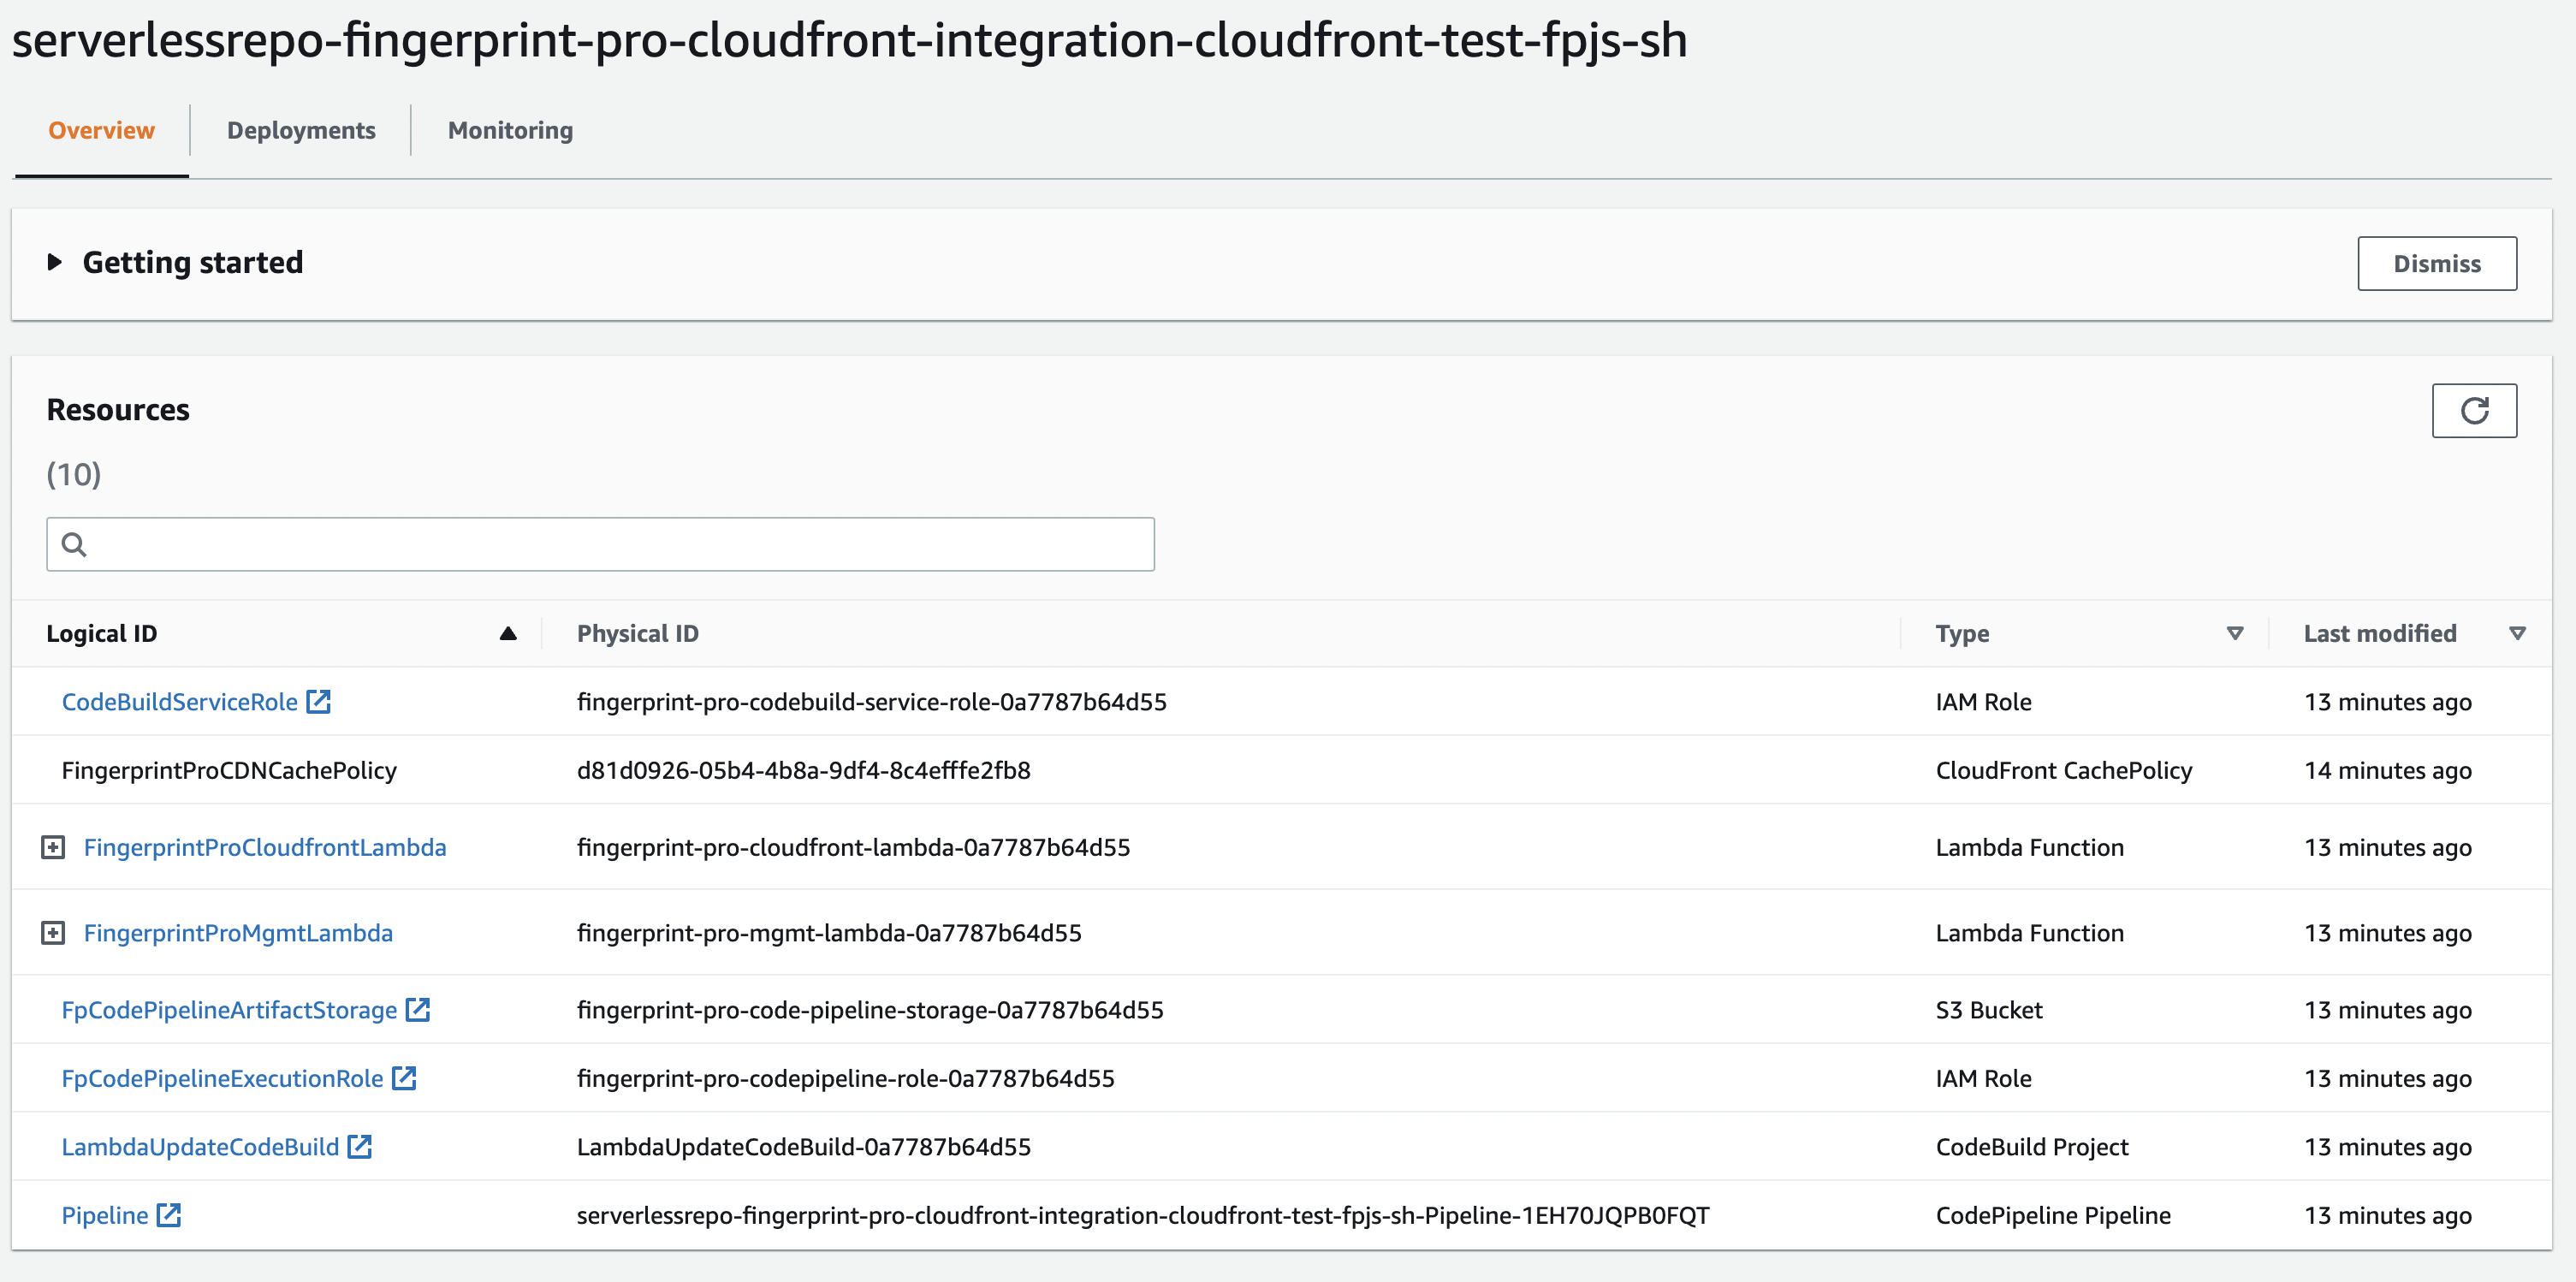 Open the Deployments tab (see the screenshot below) and wait for the `CREATE_COMPLETE` status message.
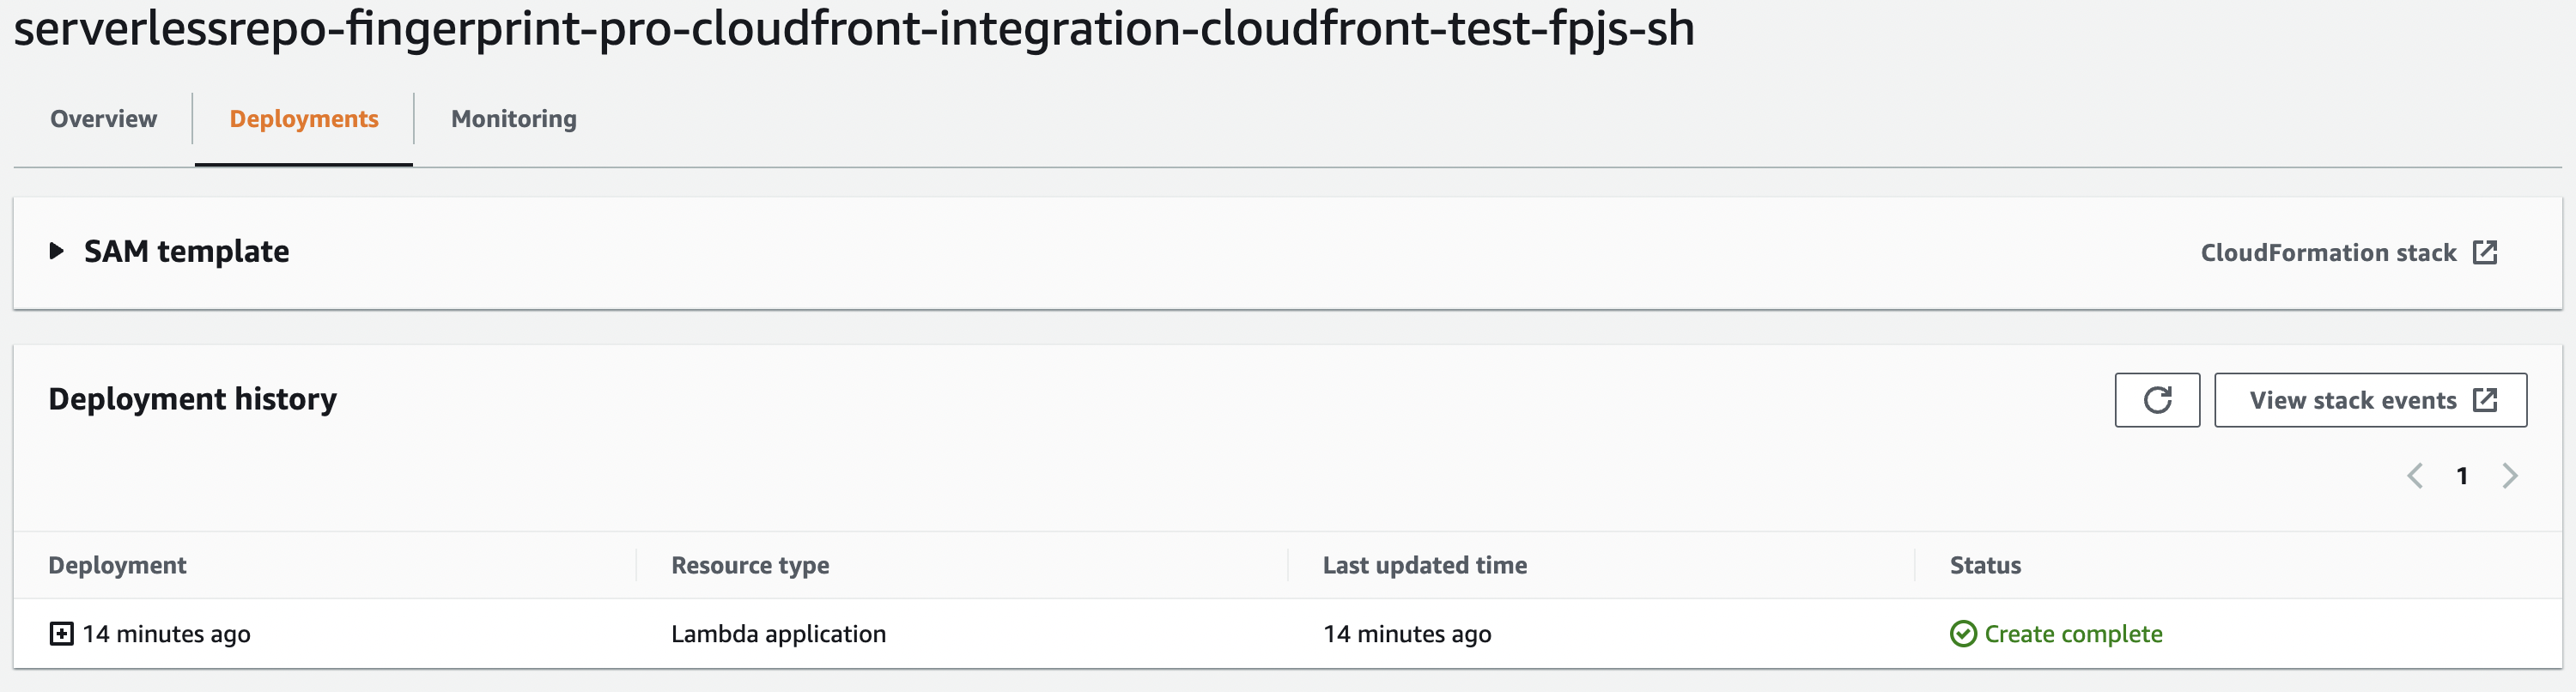 The *Status* indicates the current state of deployment. It starts from `REVIEW_IN_PROGRESS` to `CREATE_IN_PROGRESS`, and finally `CREATE_COMPLETE`. If you see a different status (`CREATE_FAILED`, `ROLLBACK_IN_PROGRESS`, `ROLLBACK_COMPLETE`, etc), please contact our [support team](mailto:support@fingerprint.com).
**Do not disrupt the management function**
The management Lambda function (`FingerprintProMgmtLambda`) deployed alongside the main proxy function is responsible for updating the integration. It makes sure visitor identification on your website keeps up with new browser releases and fingerprinting evasion techniques. An outdated integration can lead to lower accuracy or break visitor identification completely. Don't disable or delete the management function.
Once the application is fully deployed (AWS Stack has status `CREATE_COMPLETE`), you can click *CloudFormation stack*, switch to the *Outputs* tab, and find the names of created entities.
The *Status* indicates the current state of deployment. It starts from `REVIEW_IN_PROGRESS` to `CREATE_IN_PROGRESS`, and finally `CREATE_COMPLETE`. If you see a different status (`CREATE_FAILED`, `ROLLBACK_IN_PROGRESS`, `ROLLBACK_COMPLETE`, etc), please contact our [support team](mailto:support@fingerprint.com).
**Do not disrupt the management function**
The management Lambda function (`FingerprintProMgmtLambda`) deployed alongside the main proxy function is responsible for updating the integration. It makes sure visitor identification on your website keeps up with new browser releases and fingerprinting evasion techniques. An outdated integration can lead to lower accuracy or break visitor identification completely. Don't disable or delete the management function.
Once the application is fully deployed (AWS Stack has status `CREATE_COMPLETE`), you can click *CloudFormation stack*, switch to the *Outputs* tab, and find the names of created entities.
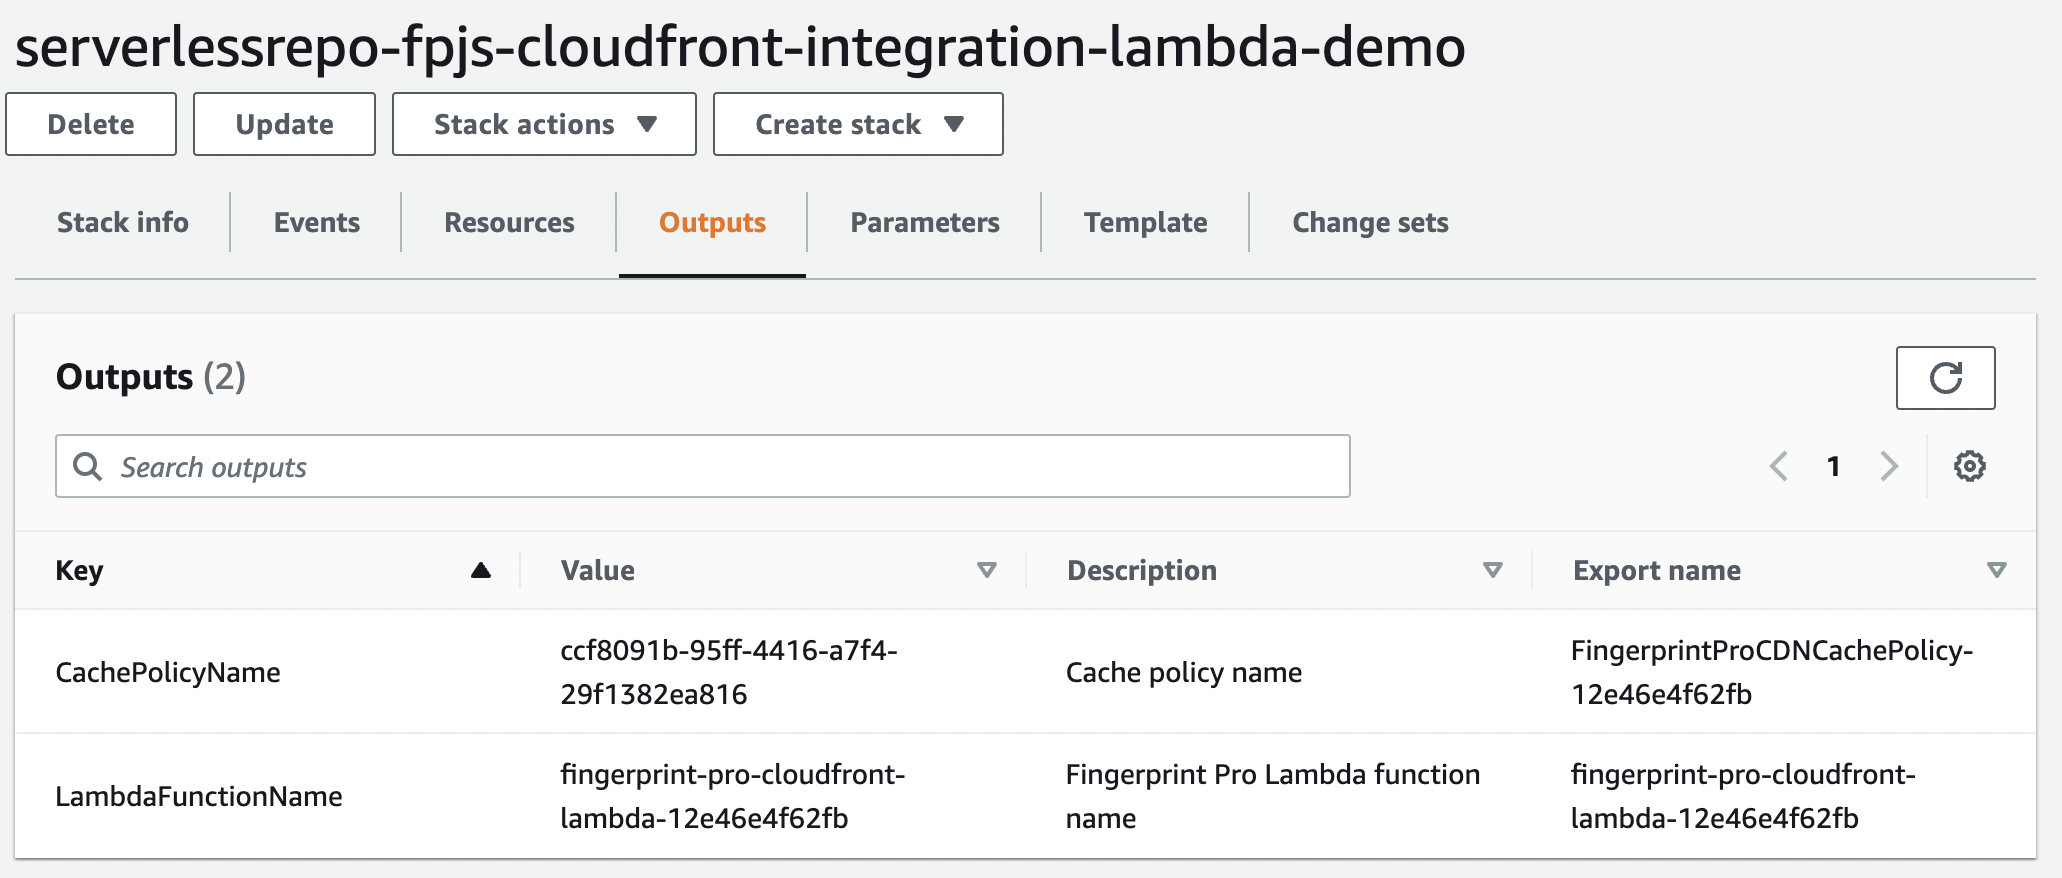 The export name of the `LambdaFunctionName` is a unique name of the created *Lambda\@Edge* function.
The export name of the `CachePolicyName` is a unique name of the *CloudFront cache policy*, which will be applied in a cache behavior for Fingerprint requests.
## Step 5 - Configure the CloudFront distribution
* If your website is already running on CloudFront, you can use the same distribution and domain for the proxy integration → Start from [Step 5.1](/docs/v3/cloudfront-proxy-integration#step-5-1-create-a-new-origin).
> Note: This is the recommended setup. Your website and the proxy function will not only share a domain but also be served by the same CDN (from IP addresses in the same range). This has implications for cookie lifetimes in Safari — they will be saved in the browser for up to one year instead of 7 days.
* If your website is not running on CloudFront, you can create a new CloudFront distribution and website subdomain just for the proxy integration → Start from [Step 5.0](/docs/v3/cloudfront-proxy-integration#step-5-0-create-a-new-cloudfront-distribution-if-necessary).
> Note: This setup results in Safari cookie lifetime being limited to 7 days, because your website and the proxy function are likely to have different IP ranges. This is still an improvement over third-party cookies getting blocked entirely by Safari, but we recommend serving your website and the proxy function using the same CloudFront distribution if possible.
### Step 5.0 - Create a new CloudFront distribution if necessary
If your website is already running on CloudFront, you can use your existing CloudFront distribution, skip the following step, and start with [Step 5.1](#step-5-1-create-a-new-origin).
If your website is not running on CloudFront, you can create a new CloudFront distribution for the proxy and set up a subdomain on your website that points to it, for example: `metrics.yourwebsite.com`
1. Go to your AWS Console and open *CloudFront*.
2. Click *Create distribution*.
3. Set up the distribution's *Origin* according to [Step 5.1](#step-5-1-create-a-new-origin) of this guide (you can then skip this step).
4. Set up the distribution's *Cache behavior* according to [Step 5.2](#step-5-2-create-a-cache-behavior) of this guide (you can then skip this step).
5. Click "Create distribution".
6. In your newly created distribution, inside *General* → *Settings*, click *Edit*.
7. Under *Alternate domain name (CNAME) - optional* click *Add item*.
8. Add an alternate domain to your distribution, for example `metrics.yourwebsite.com`. You will need to add an SSL certificate for it.
9. To create the SSL certificate, click *Request certificate*. AWS Certificate Manager will open in a new tab.
10. Set the domain name to your alternate domain, for example, `*.yourwebsite.com` or `metrics.yourwebsite.com`.
11. Keep *DNS validation* as a way to [prove ownership](https://docs.aws.amazon.com/acm/latest/userguide/domain-ownership-validation.html) of the domain.
12. Click *Request* and then *View certificate*.
13. Use the `CNAME name` and `CNAME value` to create a subdomain CNAME record in the DNS settings of your domain. Do this using your DNS provider, which could be AWS but also GoDaddy, Netlify, BlueHost, DigitalOcean, Vercel, etc...
14. It will take a while for AWS to verify the ownership of the domain and issue the certificate. Feel free to continue with the rest of the setup and come back here later.
15. Once the certificate is issued, attach it to the distribution's alternate domain and click *Save changes*.
Your CloudFront distribution is now accessible from your website's subdomain, for example, `metrics.yourwebsite.com`. You will use it in [Step 6](#step-6-configure-the-fingerprint-javascript-agent-on-your-client) to configure the Fingerprint JavaScript agent.
### Step 5.1 - Create a new origin
1. Go to your CloudFront distribution, switch to the *Origins* tab, and click *Create origin*.
2. Fill required fields in the wizard:
3. Set the origin domain to `fpcdn.io`.
4. Set the protocol to `HTTPS only`.
5. Set minimum origin SSL protocol to `TLSv1.2`.
6. Set name to `fpcdn.io`.
7. Add the following custom headers:
* `FPJS_SECRET_NAME` is the name of the secret created in step 3.
* `FPJS_SECRET_REGION` is the region where the secret is stored, for example, `us-east-1`.
6. Finally, click *Create origin*.
### Step 5.2 - Create a cache behavior
In this step, you will create a cache behavior to proxy requests to Fingerprint API.
1. Go to your CloudFront distribution.
2. Switch to the *Behaviors* tab and click *Create behavior*.
3. Fill in the required fields in the wizard
4. Set *Path pattern* to a value that matches all routes under `FPJS_BEHAVIOR_PATH`. For example, for `FPJS_BEHAVIOR_PATH=random-path` you need to use `random-path/*`.
5. Set *Origin and origin groups* to `fpcdn.io`.
6. Set the *Viewer protocol policy* to `Redirect HTTP to HTTPS`.
7. Set the *Allowed HTTP methods* to `GET, HEAD, OPTIONS, PUT, POST, PATCH, DELETE`.
8. Set *Cache key and origin requests* to `Cache policy and origin request policy (recommended)`.
9. Set *Cache policy* to a *Custom* policy named `FingerprintProCDNCachePolicy-{id}` (you can find the name of your cache policy on the *AWS Stack’s* output of the application).
10. Set *Origin request policy* to `AllViewer`.
11. Click *Create behavior*.
**Do not change the provided Cache Policy.** It is intentionally configured with the minimum TTL of `0`. Misconfiguring the policy could disrupt visitor identification and increase false positives (assigning the same visitor ID to different browsers).
### Step 5.3 - Attach the Lambda function to the cache behavior
1. Go to your AWS [Lambda Applications](https://us-east-1.console.aws.amazon.com/lambda/home?region=us-east-1#/applications) and open the newly created application.
2. On the *Overview* tab, scroll down to *Resources* a click `FingerprintProCloudfrontLambda`.
The export name of the `LambdaFunctionName` is a unique name of the created *Lambda\@Edge* function.
The export name of the `CachePolicyName` is a unique name of the *CloudFront cache policy*, which will be applied in a cache behavior for Fingerprint requests.
## Step 5 - Configure the CloudFront distribution
* If your website is already running on CloudFront, you can use the same distribution and domain for the proxy integration → Start from [Step 5.1](/docs/v3/cloudfront-proxy-integration#step-5-1-create-a-new-origin).
> Note: This is the recommended setup. Your website and the proxy function will not only share a domain but also be served by the same CDN (from IP addresses in the same range). This has implications for cookie lifetimes in Safari — they will be saved in the browser for up to one year instead of 7 days.
* If your website is not running on CloudFront, you can create a new CloudFront distribution and website subdomain just for the proxy integration → Start from [Step 5.0](/docs/v3/cloudfront-proxy-integration#step-5-0-create-a-new-cloudfront-distribution-if-necessary).
> Note: This setup results in Safari cookie lifetime being limited to 7 days, because your website and the proxy function are likely to have different IP ranges. This is still an improvement over third-party cookies getting blocked entirely by Safari, but we recommend serving your website and the proxy function using the same CloudFront distribution if possible.
### Step 5.0 - Create a new CloudFront distribution if necessary
If your website is already running on CloudFront, you can use your existing CloudFront distribution, skip the following step, and start with [Step 5.1](#step-5-1-create-a-new-origin).
If your website is not running on CloudFront, you can create a new CloudFront distribution for the proxy and set up a subdomain on your website that points to it, for example: `metrics.yourwebsite.com`
1. Go to your AWS Console and open *CloudFront*.
2. Click *Create distribution*.
3. Set up the distribution's *Origin* according to [Step 5.1](#step-5-1-create-a-new-origin) of this guide (you can then skip this step).
4. Set up the distribution's *Cache behavior* according to [Step 5.2](#step-5-2-create-a-cache-behavior) of this guide (you can then skip this step).
5. Click "Create distribution".
6. In your newly created distribution, inside *General* → *Settings*, click *Edit*.
7. Under *Alternate domain name (CNAME) - optional* click *Add item*.
8. Add an alternate domain to your distribution, for example `metrics.yourwebsite.com`. You will need to add an SSL certificate for it.
9. To create the SSL certificate, click *Request certificate*. AWS Certificate Manager will open in a new tab.
10. Set the domain name to your alternate domain, for example, `*.yourwebsite.com` or `metrics.yourwebsite.com`.
11. Keep *DNS validation* as a way to [prove ownership](https://docs.aws.amazon.com/acm/latest/userguide/domain-ownership-validation.html) of the domain.
12. Click *Request* and then *View certificate*.
13. Use the `CNAME name` and `CNAME value` to create a subdomain CNAME record in the DNS settings of your domain. Do this using your DNS provider, which could be AWS but also GoDaddy, Netlify, BlueHost, DigitalOcean, Vercel, etc...
14. It will take a while for AWS to verify the ownership of the domain and issue the certificate. Feel free to continue with the rest of the setup and come back here later.
15. Once the certificate is issued, attach it to the distribution's alternate domain and click *Save changes*.
Your CloudFront distribution is now accessible from your website's subdomain, for example, `metrics.yourwebsite.com`. You will use it in [Step 6](#step-6-configure-the-fingerprint-javascript-agent-on-your-client) to configure the Fingerprint JavaScript agent.
### Step 5.1 - Create a new origin
1. Go to your CloudFront distribution, switch to the *Origins* tab, and click *Create origin*.
2. Fill required fields in the wizard:
3. Set the origin domain to `fpcdn.io`.
4. Set the protocol to `HTTPS only`.
5. Set minimum origin SSL protocol to `TLSv1.2`.
6. Set name to `fpcdn.io`.
7. Add the following custom headers:
* `FPJS_SECRET_NAME` is the name of the secret created in step 3.
* `FPJS_SECRET_REGION` is the region where the secret is stored, for example, `us-east-1`.
6. Finally, click *Create origin*.
### Step 5.2 - Create a cache behavior
In this step, you will create a cache behavior to proxy requests to Fingerprint API.
1. Go to your CloudFront distribution.
2. Switch to the *Behaviors* tab and click *Create behavior*.
3. Fill in the required fields in the wizard
4. Set *Path pattern* to a value that matches all routes under `FPJS_BEHAVIOR_PATH`. For example, for `FPJS_BEHAVIOR_PATH=random-path` you need to use `random-path/*`.
5. Set *Origin and origin groups* to `fpcdn.io`.
6. Set the *Viewer protocol policy* to `Redirect HTTP to HTTPS`.
7. Set the *Allowed HTTP methods* to `GET, HEAD, OPTIONS, PUT, POST, PATCH, DELETE`.
8. Set *Cache key and origin requests* to `Cache policy and origin request policy (recommended)`.
9. Set *Cache policy* to a *Custom* policy named `FingerprintProCDNCachePolicy-{id}` (you can find the name of your cache policy on the *AWS Stack’s* output of the application).
10. Set *Origin request policy* to `AllViewer`.
11. Click *Create behavior*.
**Do not change the provided Cache Policy.** It is intentionally configured with the minimum TTL of `0`. Misconfiguring the policy could disrupt visitor identification and increase false positives (assigning the same visitor ID to different browsers).
### Step 5.3 - Attach the Lambda function to the cache behavior
1. Go to your AWS [Lambda Applications](https://us-east-1.console.aws.amazon.com/lambda/home?region=us-east-1#/applications) and open the newly created application.
2. On the *Overview* tab, scroll down to *Resources* a click `FingerprintProCloudfrontLambda`.
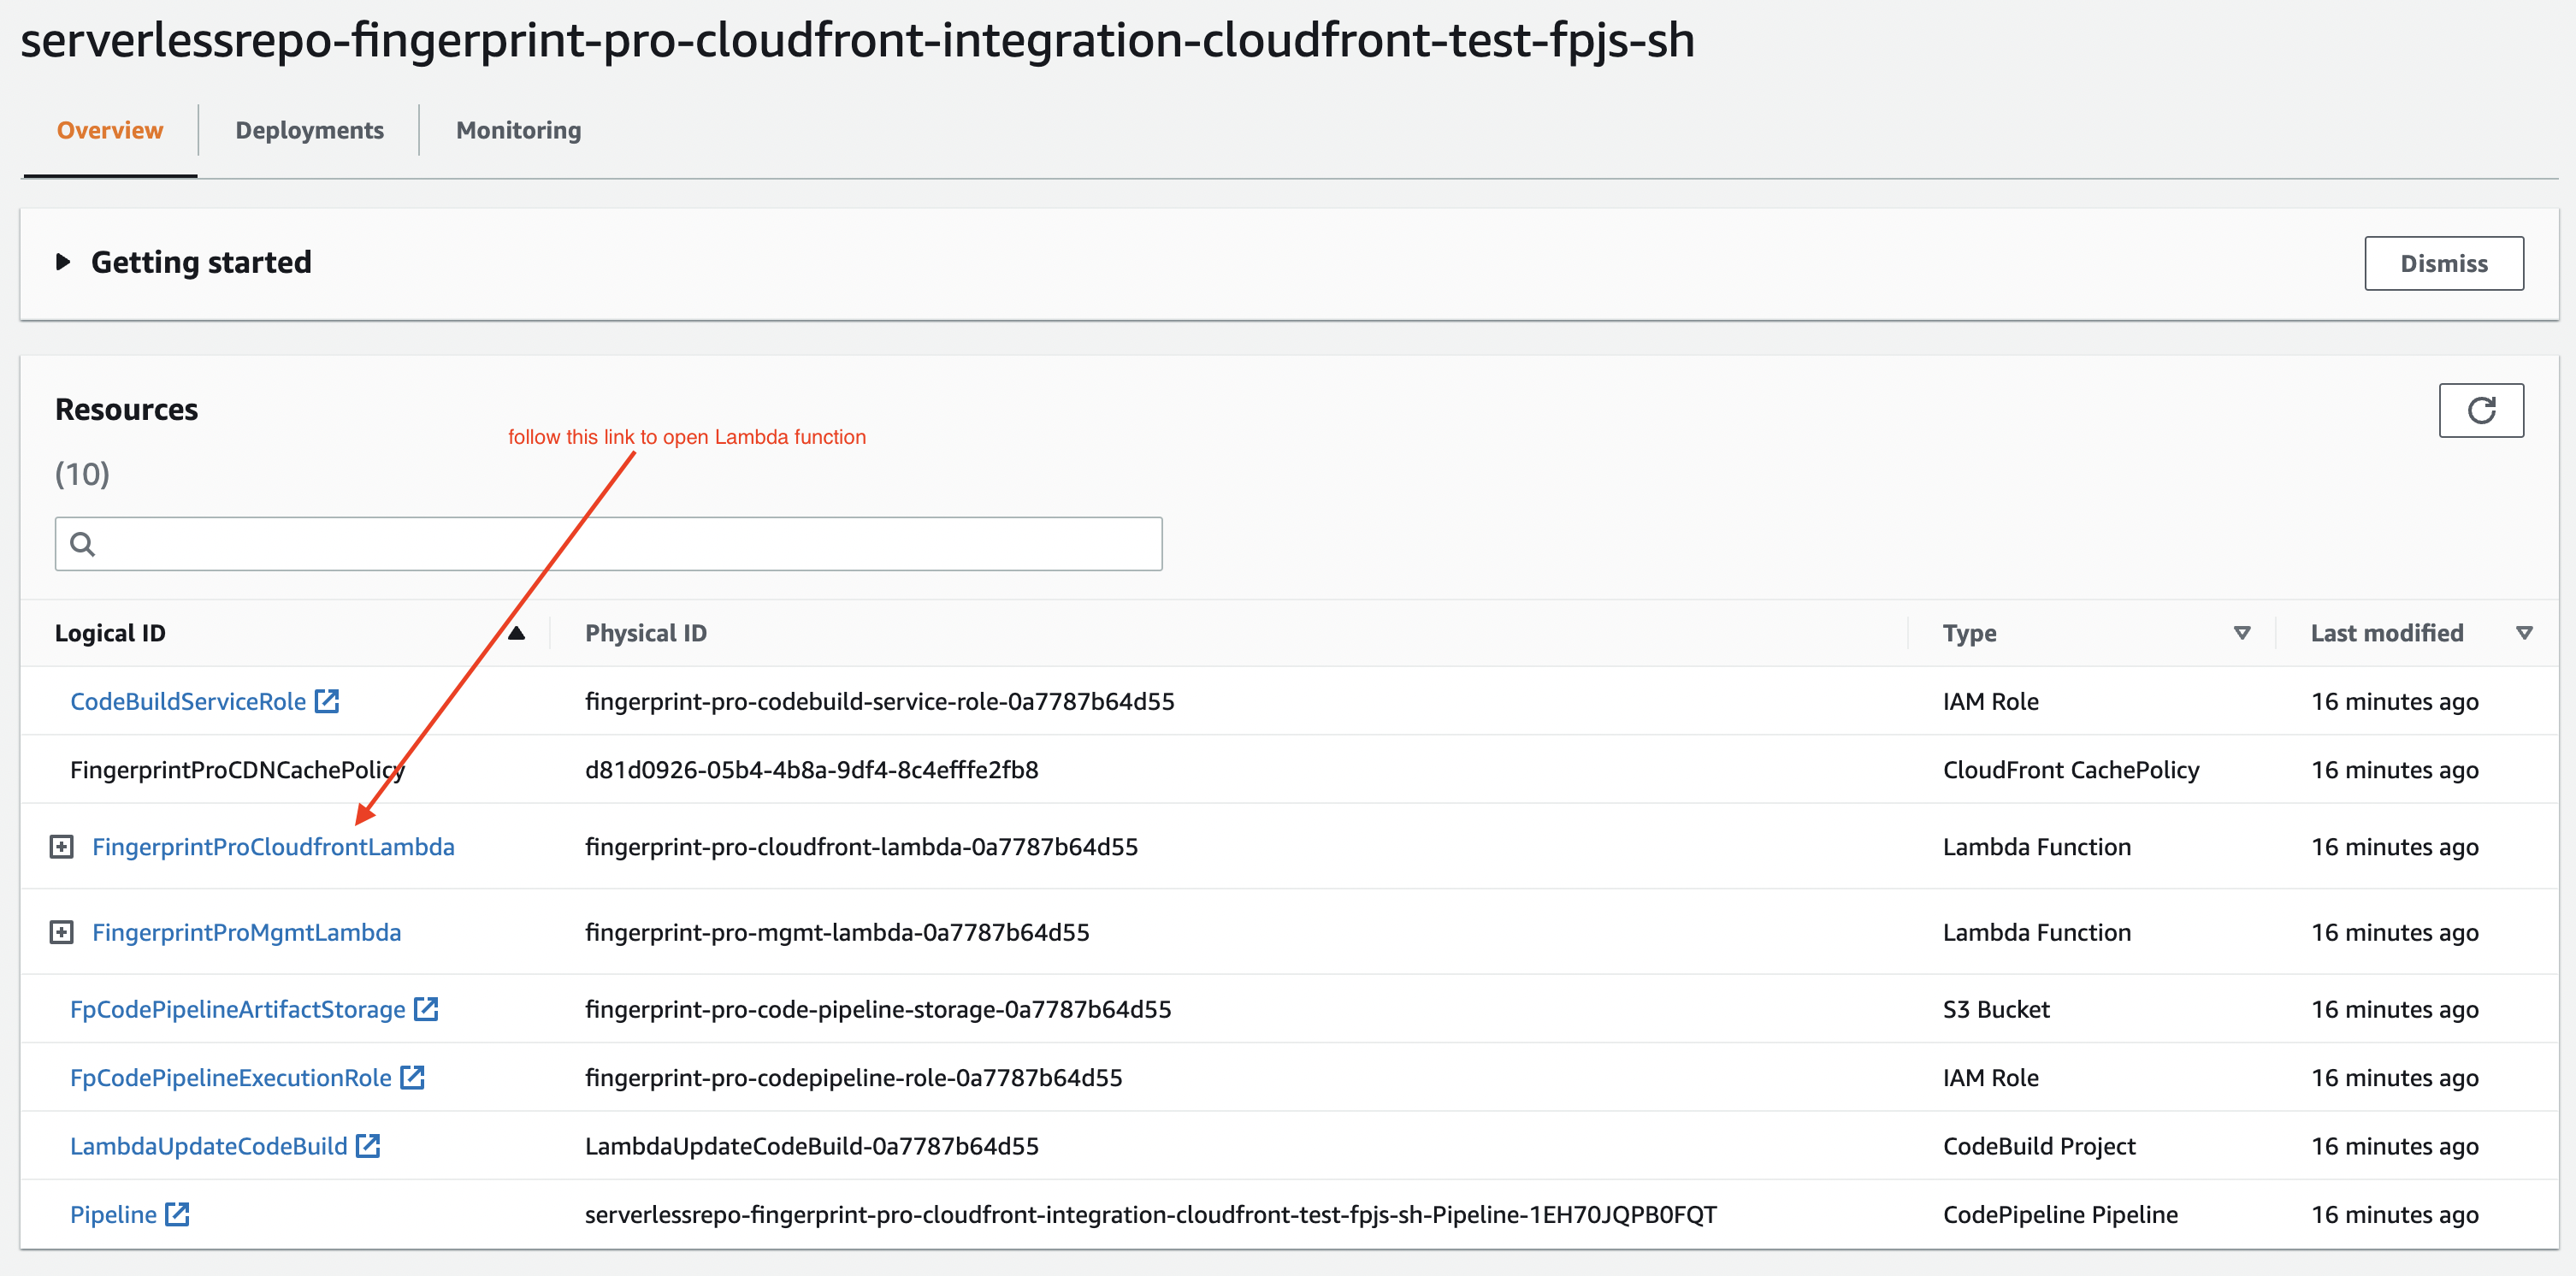 3. Scroll down and switch to the *Configuration* tab.
4. On the left, click *Triggers*, then click *Add trigger*.
5. Select `CloudFront` as the source and click *Deploy to Lambda\@Edge*.
3. Scroll down and switch to the *Configuration* tab.
4. On the left, click *Triggers*, then click *Add trigger*.
5. Select `CloudFront` as the source and click *Deploy to Lambda\@Edge*.
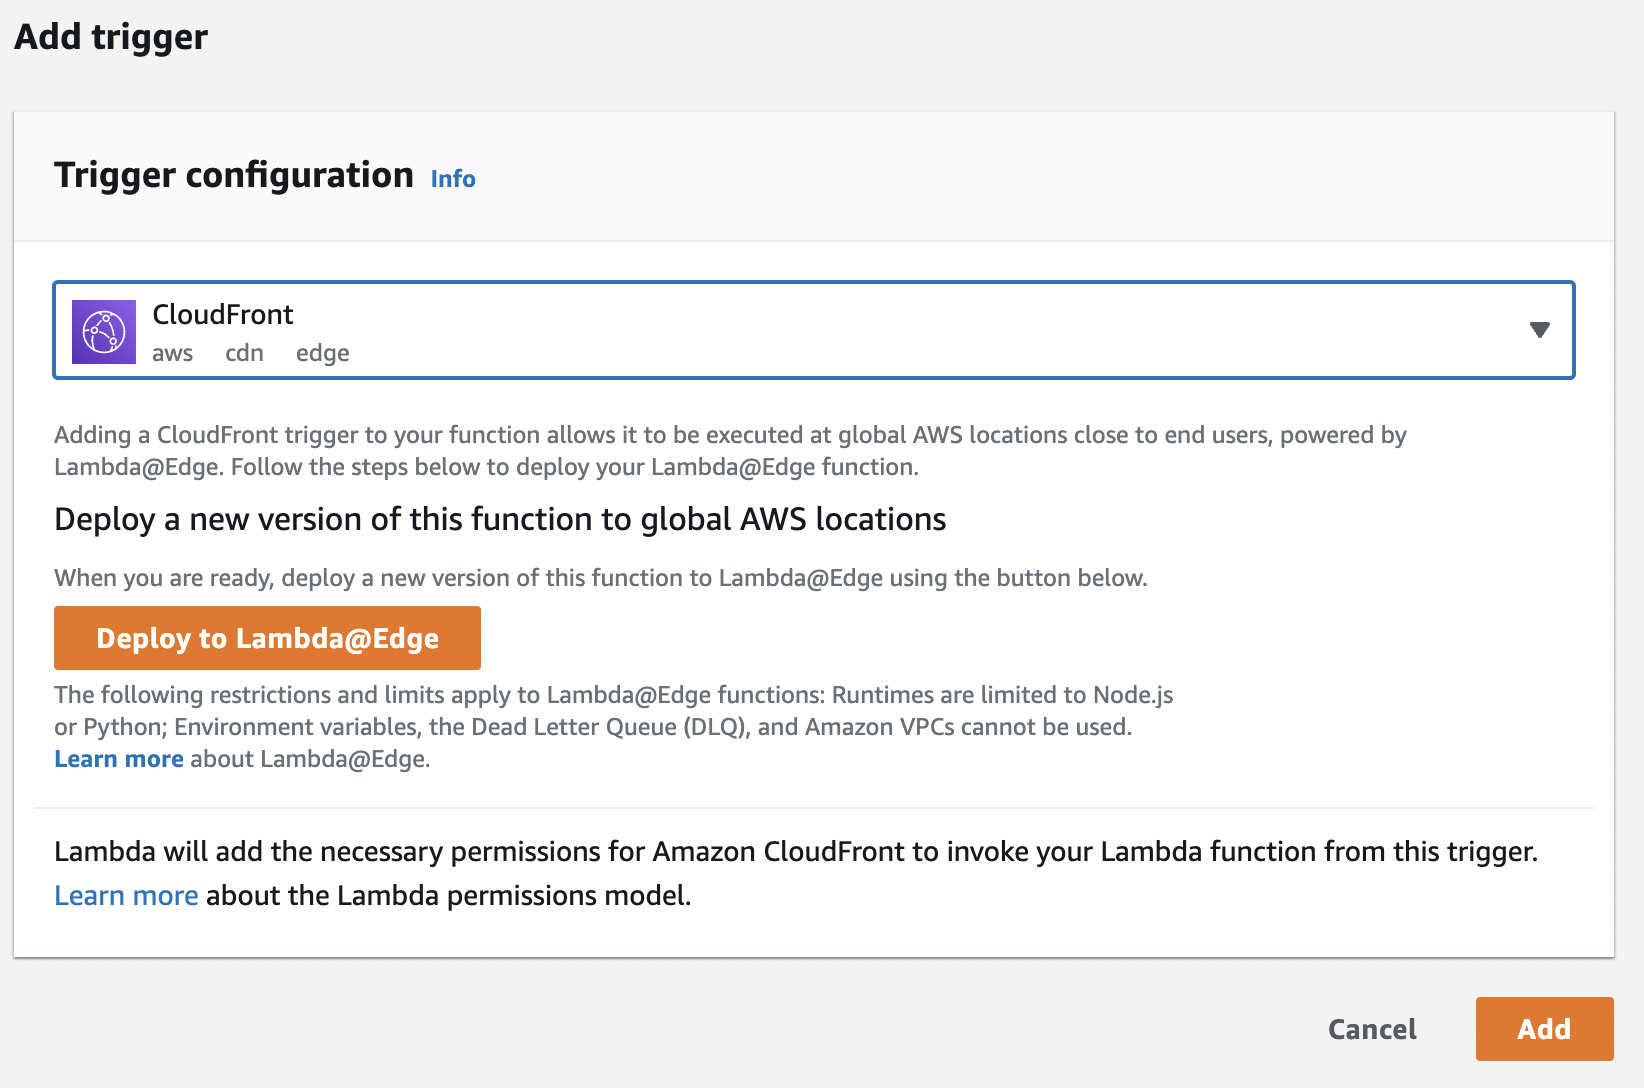 6. Select an option to *Configure new CloudFront trigger.*
7. Select your distribution.
8. Select the cache behavior you created in the previous step.
9. Set *CloudFront event* to `Origin Request`.
10. Check *Include body*.
11. Check *Confirm deploy to Lambda\@Edge*.
12. Click *Deploy*.
It may take up to several minutes to add a trigger to the CloudFront distribution. Go to the *General* tab of your CloudFront distribution and check the *Last modified* time.
## Step 6 - Configure the Fingerprint JavaScript agent on your client
Use the path variables created in [Step 2](#step-2-create-path-variables) to construct the agent-download and result-endpoint URLs.
If your website and the proxy are behind the same CloudFront distribution, the JavaScript agent configuration will use randomized URLs inside your domain, for example:
```typescript NPM package theme={"theme":"github-dark-dimmed"}
import * as FingerprintJS from '@fingerprintjs/fingerprintjs-pro'
// Initialize the agent at application startup.
const fpPromise = FingerprintJS.load({
apiKey: 'PUBLIC_API_KEY',
scriptUrlPattern: [
'https://yourwebsite.com/FPJS_BEHAVIOR_PATH/FPJS_AGENT_DOWNLOAD_PATH?apiKey=&version=&loaderVersion=',
FingerprintJS.defaultScriptUrlPattern, // Fallback to default CDN in case of error
],
endpoint: [
'https://yourwebsite.com/FPJS_BEHAVIOR_PATH/FPJS_GET_RESULT_PATH?region=us',
FingerprintJS.defaultEndpoint // Fallback to default endpoint in case of error
],
});
```
```javascript CDN theme={"theme":"github-dark-dimmed"}
const url = 'https://yourwebsite.com/FPJS_BEHAVIOR_PATH/FPJS_AGENT_DOWNLOAD_PATH?apiKey=PUBLIC_API_KEY';
const fpPromise = import(url)
.then(FingerprintJS => FingerprintJS.load({
endpoint: [
'https://yourwebsite.com/FPJS_BEHAVIOR_PATH/FPJS_GET_RESULT_PATH?region=us',
FingerprintJS.defaultEndpoint // Fallback to default endpoint in case of error
]
}));
```
If your website is not behind CloudFront and you have set up CloudFront distribution on your subdomain according to [Step 5.0](#step-5-0-create-a-new-cloudfront-distribution-if-necessary), the JavaScript agent configuration will use that subdomain to interact with Fingerprint, for example:
```typescript NPM package theme={"theme":"github-dark-dimmed"}
import * as FingerprintJS from '@fingerprintjs/fingerprintjs-pro'
// Initialize the agent at application startup.
const fpPromise = FingerprintJS.load({
apiKey: 'PUBLIC_API_KEY',
scriptUrlPattern: [
'https://metrics.yourwebsite.com/FPJS_BEHAVIOR_PATH/FPJS_AGENT_DOWNLOAD_PATH?apiKey=&version=&loaderVersion=',
FingerprintJS.defaultScriptUrlPattern, // Fallback to default CDN in case of error
],
endpoint: [
'https://metrics.yourwebsite.com/FPJS_BEHAVIOR_PATH/FPJS_GET_RESULT_PATH?region=us',
FingerprintJS.defaultEndpoint // Fallback to default endpoint in case of error
],
});
```
```javascript CDN theme={"theme":"github-dark-dimmed"}
const url = 'https://metrics.yourwebsite.com/FPJS_BEHAVIOR_PATH/FPJS_AGENT_DOWNLOAD_PATH?apiKey=PUBLIC_API_KEY';
const fpPromise = import(url)
.then(FingerprintJS => FingerprintJS.load({
endpoint: [
'https://metrics.yourwebsite.com/FPJS_BEHAVIOR_PATH/FPJS_GET_RESULT_PATH?region=us',
FingerprintJS.defaultEndpoint // Fallback to default endpoint in case of error
]
}));
```
### Parameter URL nuances
* Note that the import `url` for the CDN installation method and `scriptUrlPattern` used by the NPM package are similar but different and **cannot be used interchangeably**.
* Pay attention to differences in query parameters:
* **Pass region** to the `endpoint` parameters in the following format: `?region=eu`. The value needs to reflect the [region](/docs/regions) of you application.
* **Leave the`scriptUrlParam` parameter as displayed here**: `?apiKey=&version=&loaderVersion=`. The `apiKey` `version` and `loaderVersion` parameters will be replaced by the values in the NPM package automatically. Do not alter them manually.
## Monitoring and troubleshooting the integration
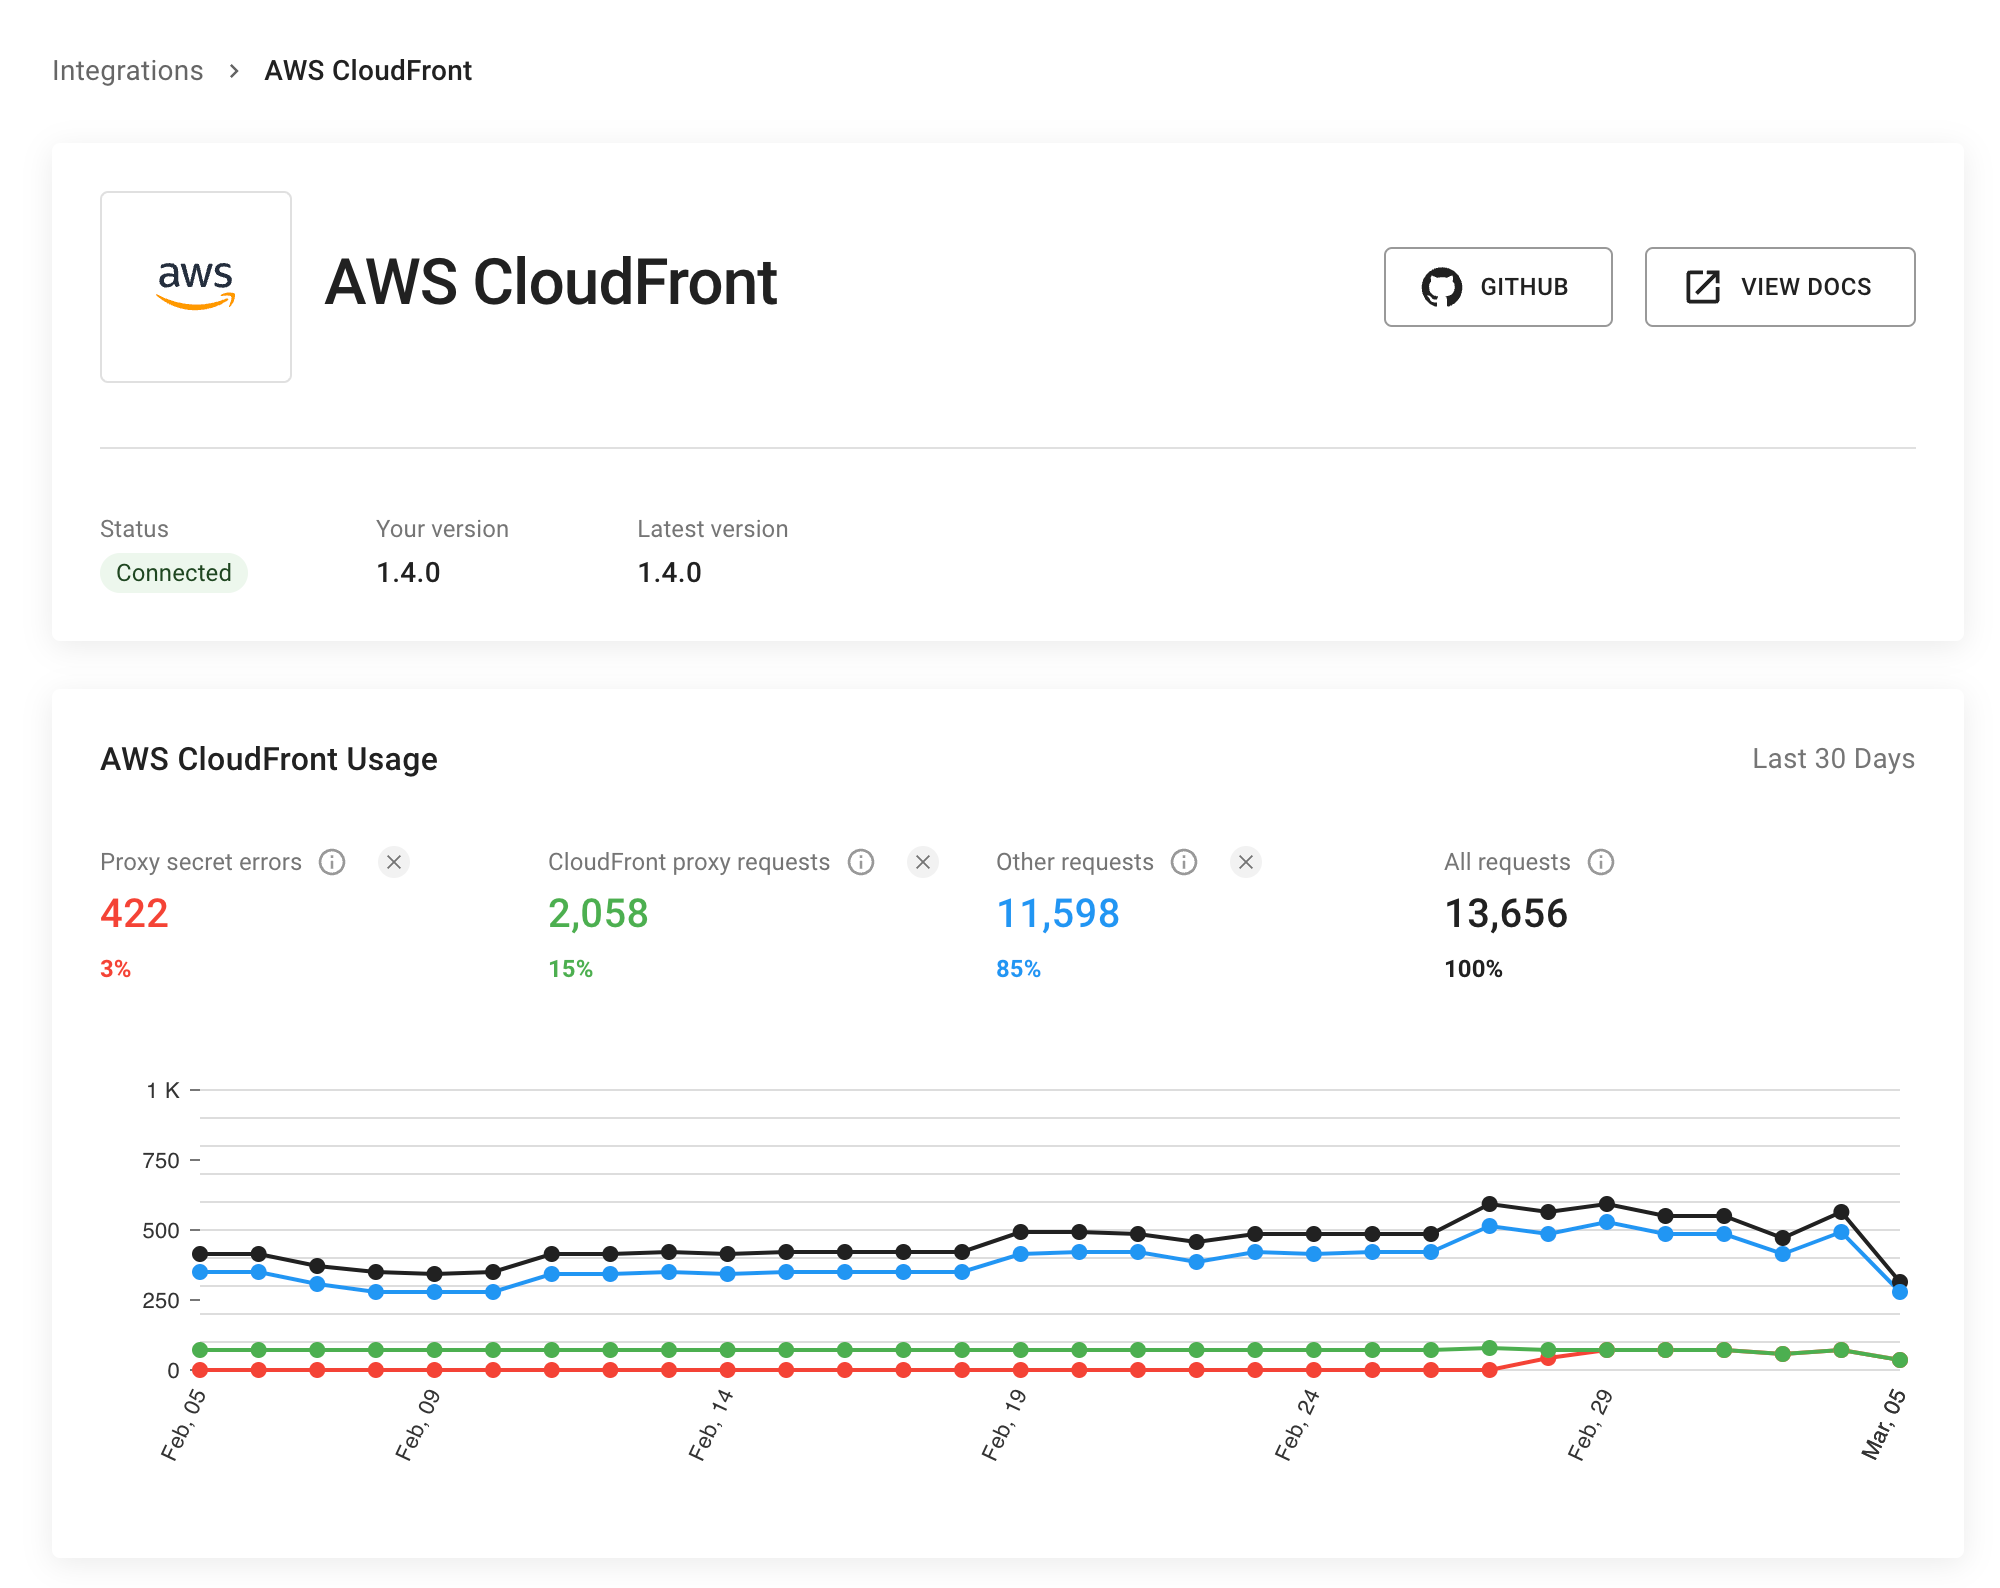
Go to **Dashboard** > [**SDKs & integrations**](https://dashboard.fingerprint.com/integrations) > **AWS Cloudfront** to see the status of your integration. Here you can monitor:
* If the integration is connected.
* If the integration is up to date.
* How many identification requests are coming through the integration (and how many are not).
* The error rate of proxied identification requests (caused by missing or incorrect proxy secret).
The information on the status page is cached so allow a few minutes for the latest data points to be reflected.
6. Select an option to *Configure new CloudFront trigger.*
7. Select your distribution.
8. Select the cache behavior you created in the previous step.
9. Set *CloudFront event* to `Origin Request`.
10. Check *Include body*.
11. Check *Confirm deploy to Lambda\@Edge*.
12. Click *Deploy*.
It may take up to several minutes to add a trigger to the CloudFront distribution. Go to the *General* tab of your CloudFront distribution and check the *Last modified* time.
## Step 6 - Configure the Fingerprint JavaScript agent on your client
Use the path variables created in [Step 2](#step-2-create-path-variables) to construct the agent-download and result-endpoint URLs.
If your website and the proxy are behind the same CloudFront distribution, the JavaScript agent configuration will use randomized URLs inside your domain, for example:
```typescript NPM package theme={"theme":"github-dark-dimmed"}
import * as FingerprintJS from '@fingerprintjs/fingerprintjs-pro'
// Initialize the agent at application startup.
const fpPromise = FingerprintJS.load({
apiKey: 'PUBLIC_API_KEY',
scriptUrlPattern: [
'https://yourwebsite.com/FPJS_BEHAVIOR_PATH/FPJS_AGENT_DOWNLOAD_PATH?apiKey=&version=&loaderVersion=',
FingerprintJS.defaultScriptUrlPattern, // Fallback to default CDN in case of error
],
endpoint: [
'https://yourwebsite.com/FPJS_BEHAVIOR_PATH/FPJS_GET_RESULT_PATH?region=us',
FingerprintJS.defaultEndpoint // Fallback to default endpoint in case of error
],
});
```
```javascript CDN theme={"theme":"github-dark-dimmed"}
const url = 'https://yourwebsite.com/FPJS_BEHAVIOR_PATH/FPJS_AGENT_DOWNLOAD_PATH?apiKey=PUBLIC_API_KEY';
const fpPromise = import(url)
.then(FingerprintJS => FingerprintJS.load({
endpoint: [
'https://yourwebsite.com/FPJS_BEHAVIOR_PATH/FPJS_GET_RESULT_PATH?region=us',
FingerprintJS.defaultEndpoint // Fallback to default endpoint in case of error
]
}));
```
If your website is not behind CloudFront and you have set up CloudFront distribution on your subdomain according to [Step 5.0](#step-5-0-create-a-new-cloudfront-distribution-if-necessary), the JavaScript agent configuration will use that subdomain to interact with Fingerprint, for example:
```typescript NPM package theme={"theme":"github-dark-dimmed"}
import * as FingerprintJS from '@fingerprintjs/fingerprintjs-pro'
// Initialize the agent at application startup.
const fpPromise = FingerprintJS.load({
apiKey: 'PUBLIC_API_KEY',
scriptUrlPattern: [
'https://metrics.yourwebsite.com/FPJS_BEHAVIOR_PATH/FPJS_AGENT_DOWNLOAD_PATH?apiKey=&version=&loaderVersion=',
FingerprintJS.defaultScriptUrlPattern, // Fallback to default CDN in case of error
],
endpoint: [
'https://metrics.yourwebsite.com/FPJS_BEHAVIOR_PATH/FPJS_GET_RESULT_PATH?region=us',
FingerprintJS.defaultEndpoint // Fallback to default endpoint in case of error
],
});
```
```javascript CDN theme={"theme":"github-dark-dimmed"}
const url = 'https://metrics.yourwebsite.com/FPJS_BEHAVIOR_PATH/FPJS_AGENT_DOWNLOAD_PATH?apiKey=PUBLIC_API_KEY';
const fpPromise = import(url)
.then(FingerprintJS => FingerprintJS.load({
endpoint: [
'https://metrics.yourwebsite.com/FPJS_BEHAVIOR_PATH/FPJS_GET_RESULT_PATH?region=us',
FingerprintJS.defaultEndpoint // Fallback to default endpoint in case of error
]
}));
```
### Parameter URL nuances
* Note that the import `url` for the CDN installation method and `scriptUrlPattern` used by the NPM package are similar but different and **cannot be used interchangeably**.
* Pay attention to differences in query parameters:
* **Pass region** to the `endpoint` parameters in the following format: `?region=eu`. The value needs to reflect the [region](/docs/regions) of you application.
* **Leave the`scriptUrlParam` parameter as displayed here**: `?apiKey=&version=&loaderVersion=`. The `apiKey` `version` and `loaderVersion` parameters will be replaced by the values in the NPM package automatically. Do not alter them manually.
## Monitoring and troubleshooting the integration
Go to **Dashboard** > [**SDKs & integrations**](https://dashboard.fingerprint.com/integrations) > **AWS Cloudfront** to see the status of your integration. Here you can monitor:
* If the integration is connected.
* If the integration is up to date.
* How many identification requests are coming through the integration (and how many are not).
* The error rate of proxied identification requests (caused by missing or incorrect proxy secret).
The information on the status page is cached so allow a few minutes for the latest data points to be reflected.
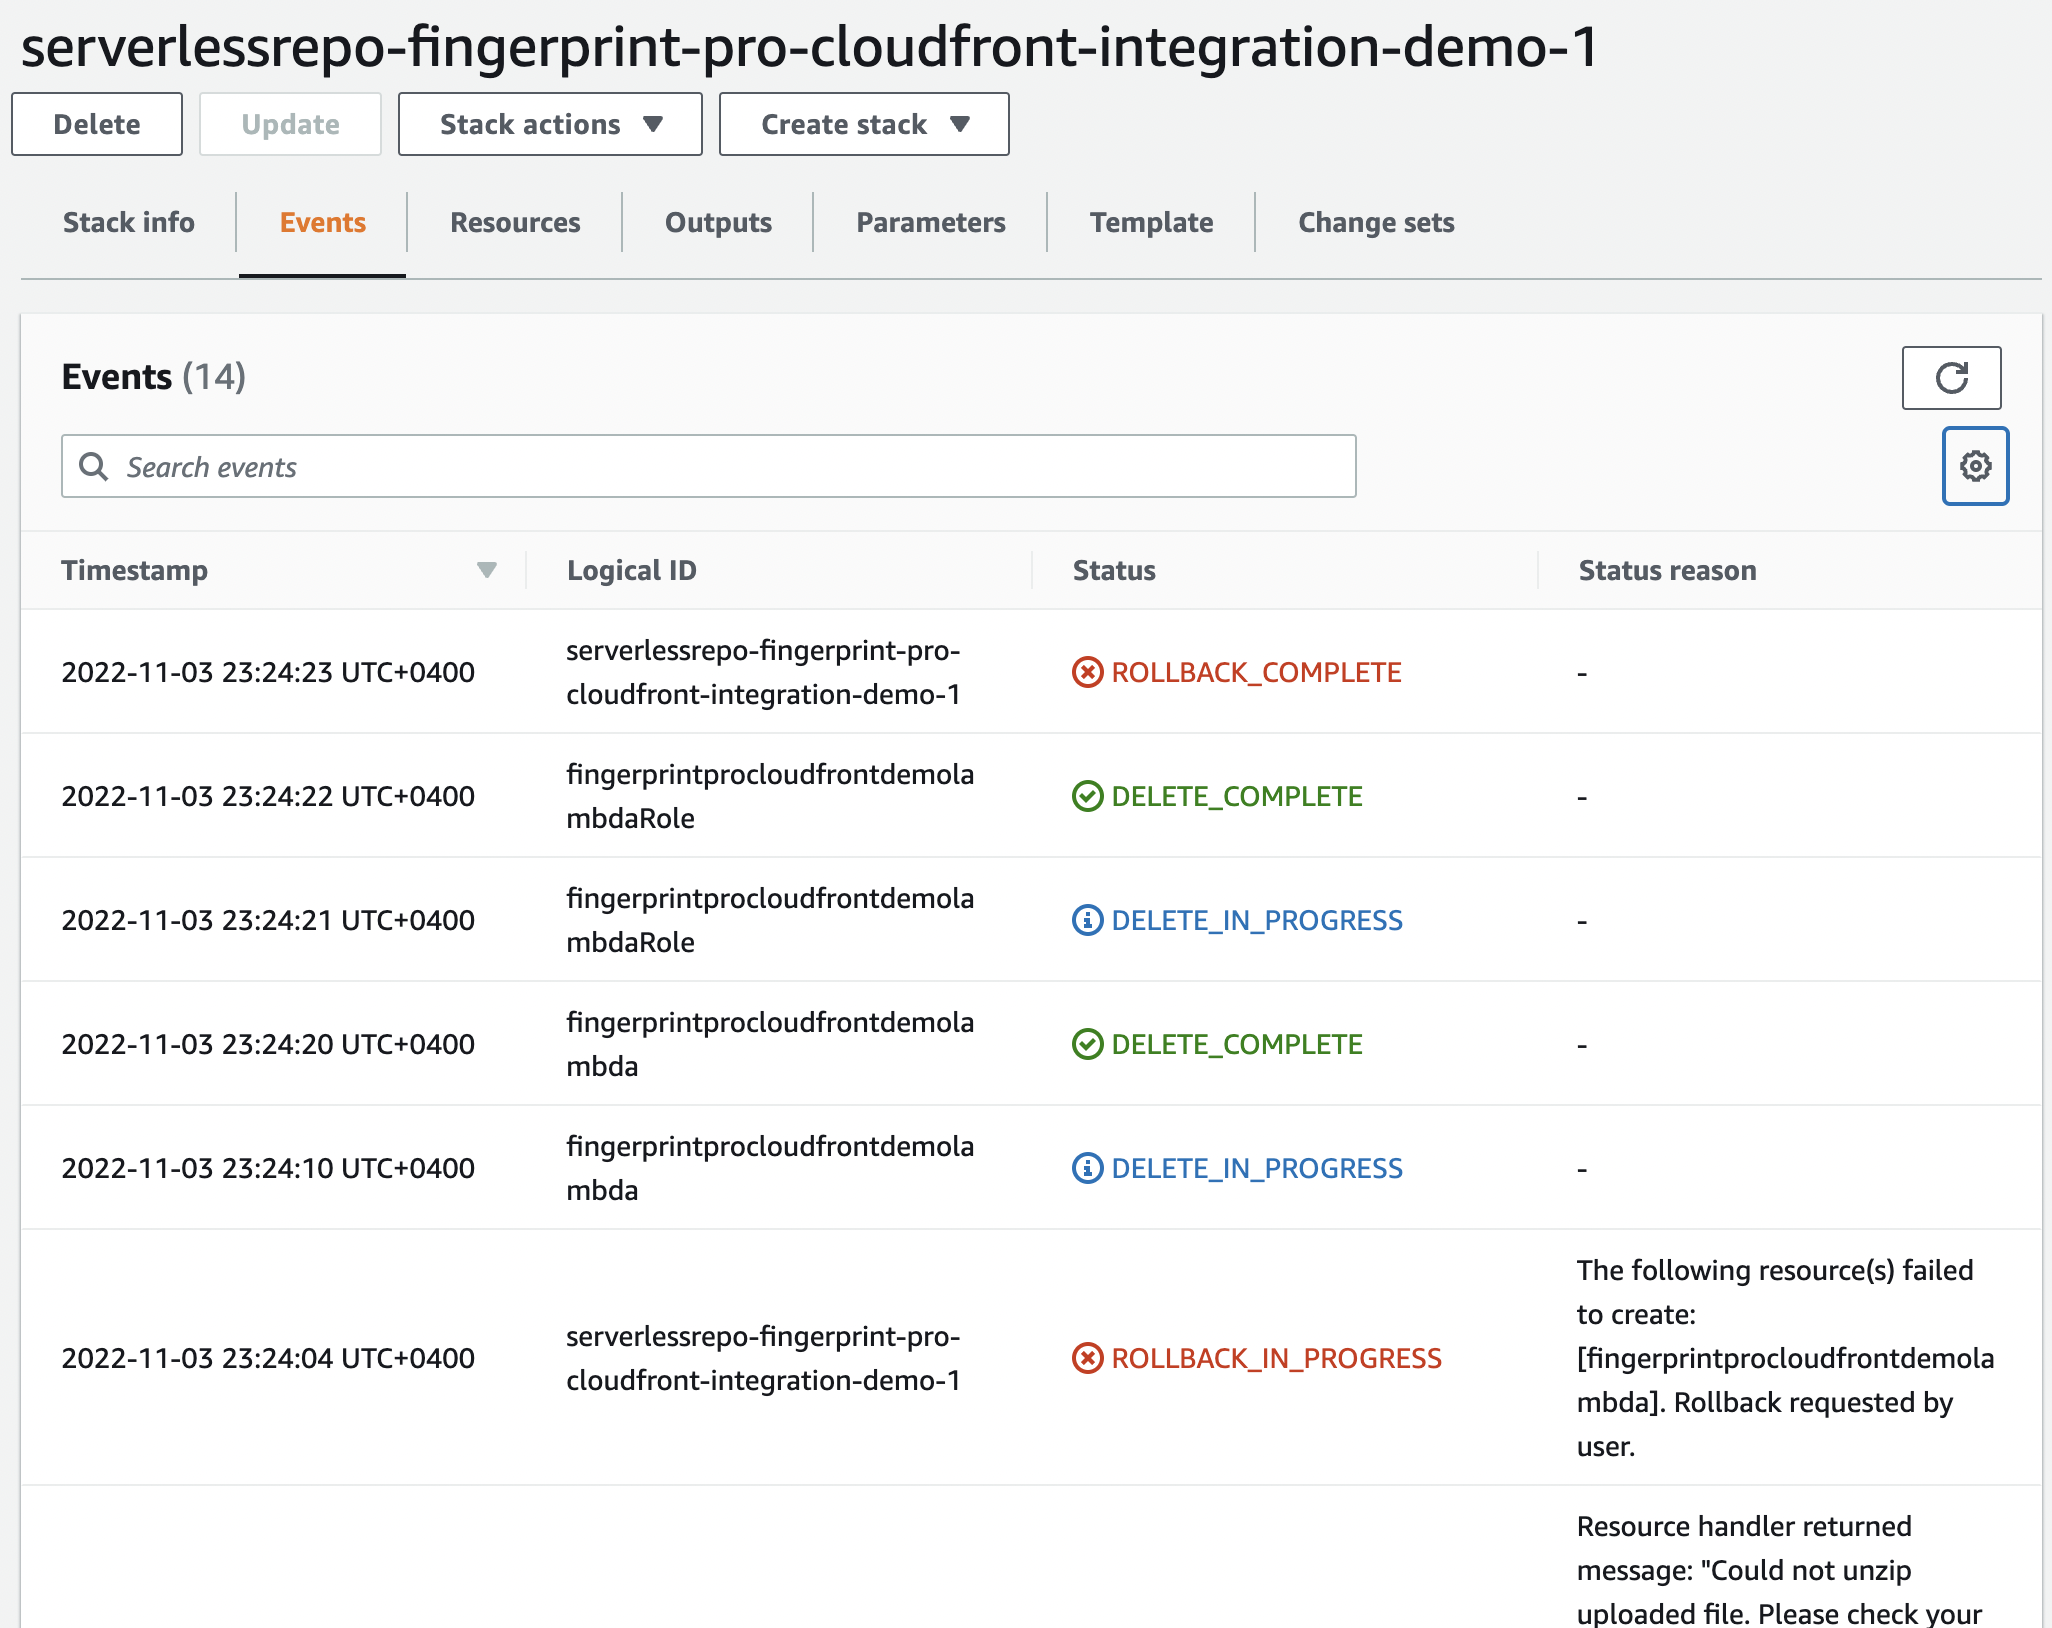
 Please provide our support team with the following information when troubleshooting the integration:
1. Open your CloudFormation stack.
2. Go to the *Events* tab, and copy the contents of the *Status reason* column for any failed statuses.
Please provide our support team with the following information when troubleshooting the integration:
1. Open your CloudFormation stack.
2. Go to the *Events* tab, and copy the contents of the *Status reason* column for any failed statuses.
 ## Cost calculation for AWS
You can use [AWS Calculator](https://calculator.aws/) to estimate your expenses.
**Lambda\@Edge service**
* The **number of requests** is roughly equal to visitor identification events multiplied by two. There are up to 2 requests for each visitor identification. The first request downloads the agent script, and the second calls the identification endpoint. The download agent request is cached. Caching the identification request is up to you, but most of our [frontend libraries](/docs/frontend-libraries) have a caching mechanism built-in.
* The **duration of each request** depends on your CloudFront availability settings. The typical duration of the agent download request is 200ms, for identification requests it is 500ms.
* The **amount of memory allocated** is 128MB.
**Secrets Manager**
* The **number of secrets** is 1.
* The **number of API calls** is approximately 12 calls per hour per each used AWS region.
**Additional costs for the CloudFront distribution**
* Data transfer **from** CloudFront distribution to clients:
* The agent’s size is about 36kB.
* The identification request result is up to 1kB per request.
* Data transfer from clients **to** the CloudFront distribution:
* The payload size for the identification requests is approximately 5-10kB.
## Cost calculation for AWS
You can use [AWS Calculator](https://calculator.aws/) to estimate your expenses.
**Lambda\@Edge service**
* The **number of requests** is roughly equal to visitor identification events multiplied by two. There are up to 2 requests for each visitor identification. The first request downloads the agent script, and the second calls the identification endpoint. The download agent request is cached. Caching the identification request is up to you, but most of our [frontend libraries](/docs/frontend-libraries) have a caching mechanism built-in.
* The **duration of each request** depends on your CloudFront availability settings. The typical duration of the agent download request is 200ms, for identification requests it is 500ms.
* The **amount of memory allocated** is 128MB.
**Secrets Manager**
* The **number of secrets** is 1.
* The **number of API calls** is approximately 12 calls per hour per each used AWS region.
**Additional costs for the CloudFront distribution**
* Data transfer **from** CloudFront distribution to clients:
* The agent’s size is about 36kB.
* The identification request result is up to 1kB per request.
* Data transfer from clients **to** the CloudFront distribution:
* The payload size for the identification requests is approximately 5-10kB.