> ## Documentation Index
> Fetch the complete documentation index at: https://docs.fingerprint.com/llms.txt
> Use this file to discover all available pages before exploring further.
# Overview
> Fingerprint JavaScript agent v3.6.0 or later is required.
Fingerprint Cloudflare Proxy Integration is responsible for proxying identification and agent-download requests between your website and Fingerprint through Cloudflare. Your website does not strictly need to be behind Cloudflare to use this proxy integration, although that is optimal for ease of setup and maximum accuracy benefits.
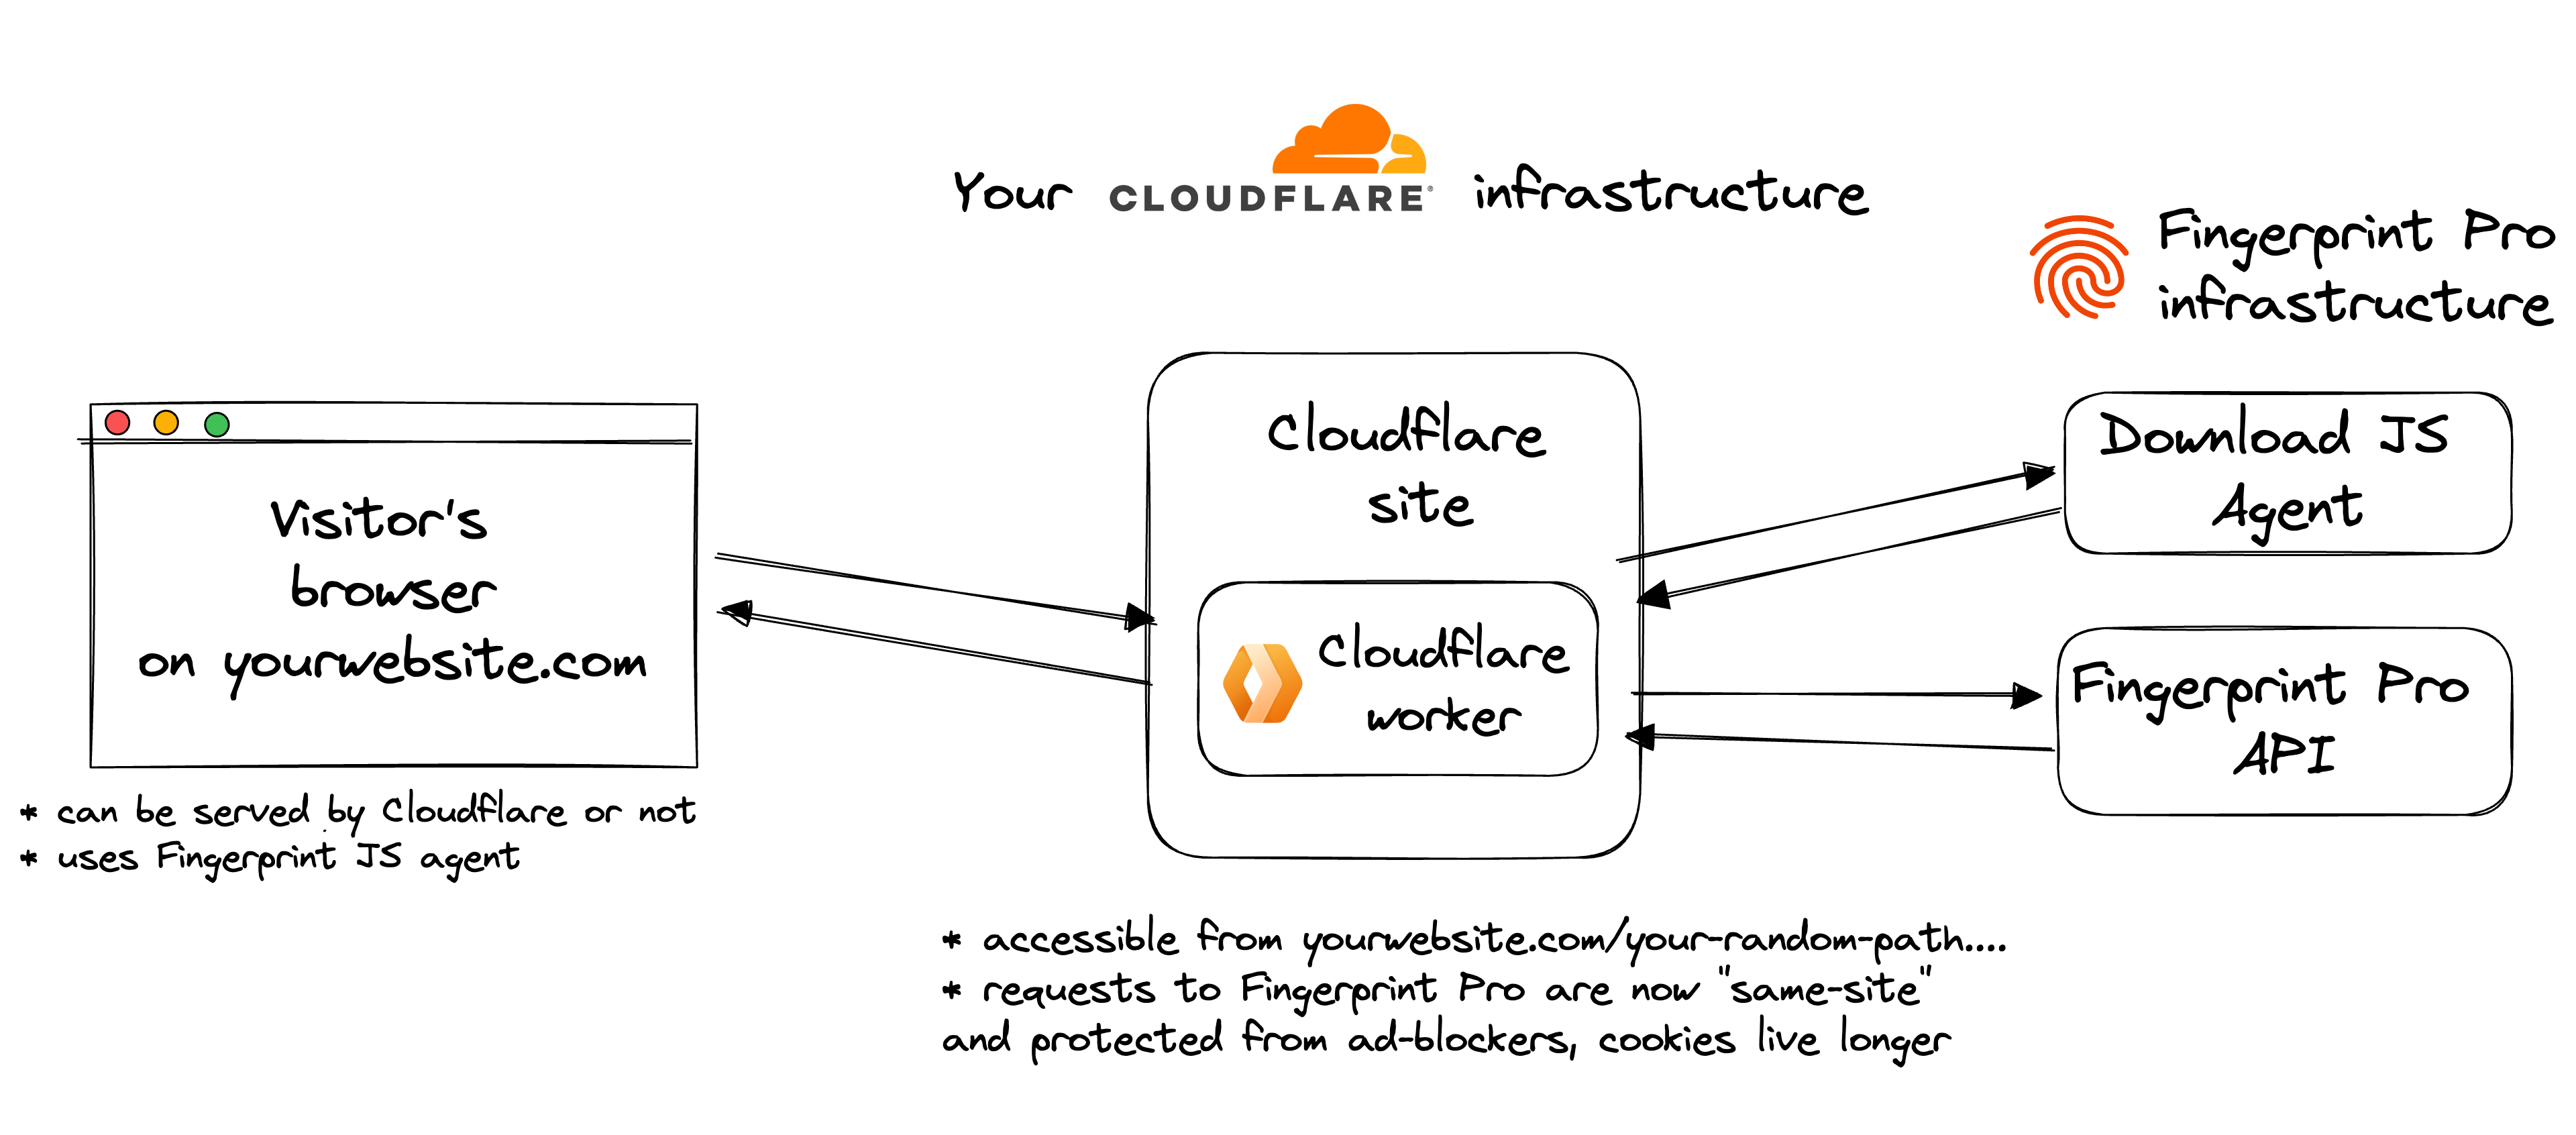 The integration consists of three fundamental components:
* Fingerprint infrastructure.
* Cloudflare worker — created and managed by Fingerprint, but running in your Cloudflare account.
* Fingerprint JavaScript agent installed on your website.
Fingerprint creates a [Cloudflare Worker](https://workers.cloudflare.com/) that's available on a specific path on your site. The rest of your site is not affected.
Cloudflare worker code is 100% open-source and available [on GitHub](https://github.com/fingerprintjs/fingerprintjs-pro-cloudflare-worker). Once the Fingerprint JavaScript agent is configured on your site correctly, the worker is responsible for delivering the latest fingerprinting client-side logic as well as proxying identification requests and responses between your site and Fingerprint's APIs.
## The benefits of using the Cloudflare Integration
* Significant increase in accuracy in browsers with strict privacy features such as Safari or Firefox.
* Cookies are now recognized as “first-party.” This means they can live longer in the browser and extend the lifetime of visitor IDs.
* Ad blockers will not block our Fingerprint JavaScript agent from loading. Attempts to connect to an external URL will be stopped by most ad blockers while attempts to connect to the same site URL will be allowed.
* Ad blockers will not block our identification requests since they are sent to the specific path or subdomain that belongs to the same site.
* Insight and control over the identification requests that can be combined with other Cloudflare features like WAF or Analytics.
* With the Cloudflare Integration, you can manage unlimited subdomains and paths and provide Fingerprint services to all your customers at any scale while benefiting from all the 1st-party integration improvements.
* Cookie security: Cloudflare integration drops all the cookies sent from the origin website. The worker code is open-source so this behavior can be transparently verified and audited.
* Easy to meet compliance and auditing requirements.
## Setup
The Cloudflare configuration guide on the Fingerprint [dashboard](https://dashboard.fingerprint.com/) will help you set everything up step by step. You can start the guide by going to **SDKs & integrations**.
**Prerequisites**
* Only users with the **Admin** or **Owner** roles can launch the Cloudflare configuration guide in the dashboard.
* Cloudflare Integration makes use of the Cloudflare Workers [Custom Routes](https://developers.cloudflare.com/workers/platform/triggers/routes) feature. Therefore, your site needs to be [added to Cloudflare](https://developers.cloudflare.com/fundamentals/get-started/setup/add-site/) and needs to be [proxied](https://developers.cloudflare.com/dns/manage-dns-records/reference/proxied-dns-records/) (not DNS-only) through Cloudflare. If you can only add your domain to Cloudflare without proxying (DNS-only), take a look at [Alternative worker subdomain setup (for DNS-only domains)](#alternative-worker-subdomain-setup-for-dns-only-domains).
### Step 1: Follow the Cloudflare configuration wizard
1. Navigate to **SDKs & integrations**, then select **Cloudflare**.
The integration consists of three fundamental components:
* Fingerprint infrastructure.
* Cloudflare worker — created and managed by Fingerprint, but running in your Cloudflare account.
* Fingerprint JavaScript agent installed on your website.
Fingerprint creates a [Cloudflare Worker](https://workers.cloudflare.com/) that's available on a specific path on your site. The rest of your site is not affected.
Cloudflare worker code is 100% open-source and available [on GitHub](https://github.com/fingerprintjs/fingerprintjs-pro-cloudflare-worker). Once the Fingerprint JavaScript agent is configured on your site correctly, the worker is responsible for delivering the latest fingerprinting client-side logic as well as proxying identification requests and responses between your site and Fingerprint's APIs.
## The benefits of using the Cloudflare Integration
* Significant increase in accuracy in browsers with strict privacy features such as Safari or Firefox.
* Cookies are now recognized as “first-party.” This means they can live longer in the browser and extend the lifetime of visitor IDs.
* Ad blockers will not block our Fingerprint JavaScript agent from loading. Attempts to connect to an external URL will be stopped by most ad blockers while attempts to connect to the same site URL will be allowed.
* Ad blockers will not block our identification requests since they are sent to the specific path or subdomain that belongs to the same site.
* Insight and control over the identification requests that can be combined with other Cloudflare features like WAF or Analytics.
* With the Cloudflare Integration, you can manage unlimited subdomains and paths and provide Fingerprint services to all your customers at any scale while benefiting from all the 1st-party integration improvements.
* Cookie security: Cloudflare integration drops all the cookies sent from the origin website. The worker code is open-source so this behavior can be transparently verified and audited.
* Easy to meet compliance and auditing requirements.
## Setup
The Cloudflare configuration guide on the Fingerprint [dashboard](https://dashboard.fingerprint.com/) will help you set everything up step by step. You can start the guide by going to **SDKs & integrations**.
**Prerequisites**
* Only users with the **Admin** or **Owner** roles can launch the Cloudflare configuration guide in the dashboard.
* Cloudflare Integration makes use of the Cloudflare Workers [Custom Routes](https://developers.cloudflare.com/workers/platform/triggers/routes) feature. Therefore, your site needs to be [added to Cloudflare](https://developers.cloudflare.com/fundamentals/get-started/setup/add-site/) and needs to be [proxied](https://developers.cloudflare.com/dns/manage-dns-records/reference/proxied-dns-records/) (not DNS-only) through Cloudflare. If you can only add your domain to Cloudflare without proxying (DNS-only), take a look at [Alternative worker subdomain setup (for DNS-only domains)](#alternative-worker-subdomain-setup-for-dns-only-domains).
### Step 1: Follow the Cloudflare configuration wizard
1. Navigate to **SDKs & integrations**, then select **Cloudflare**.
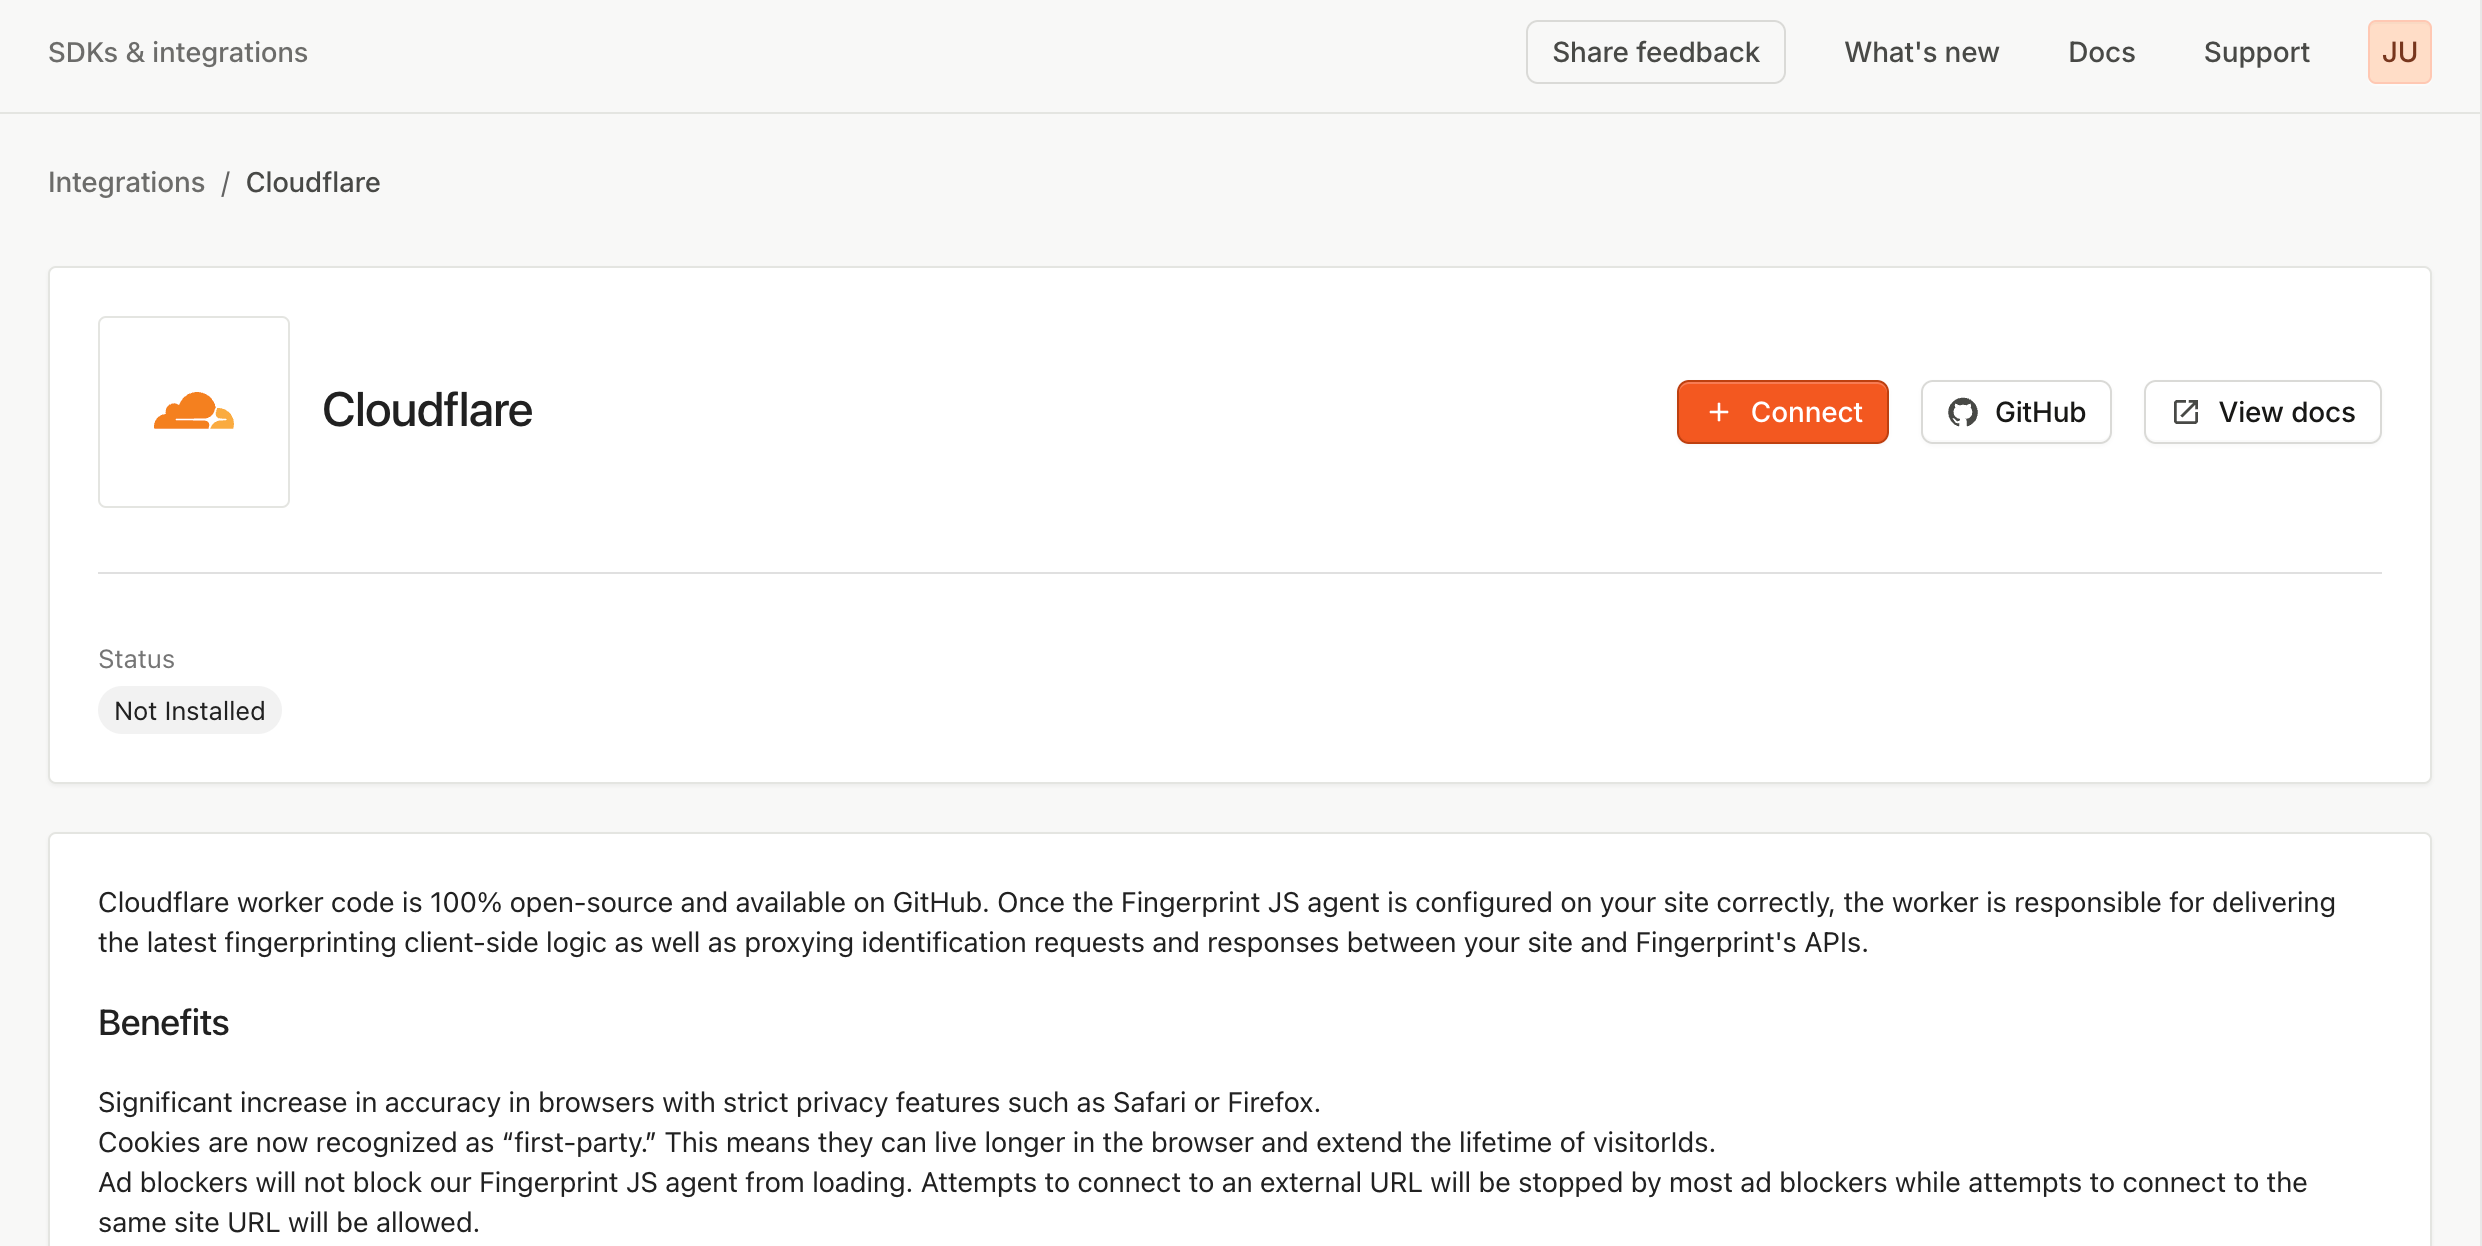
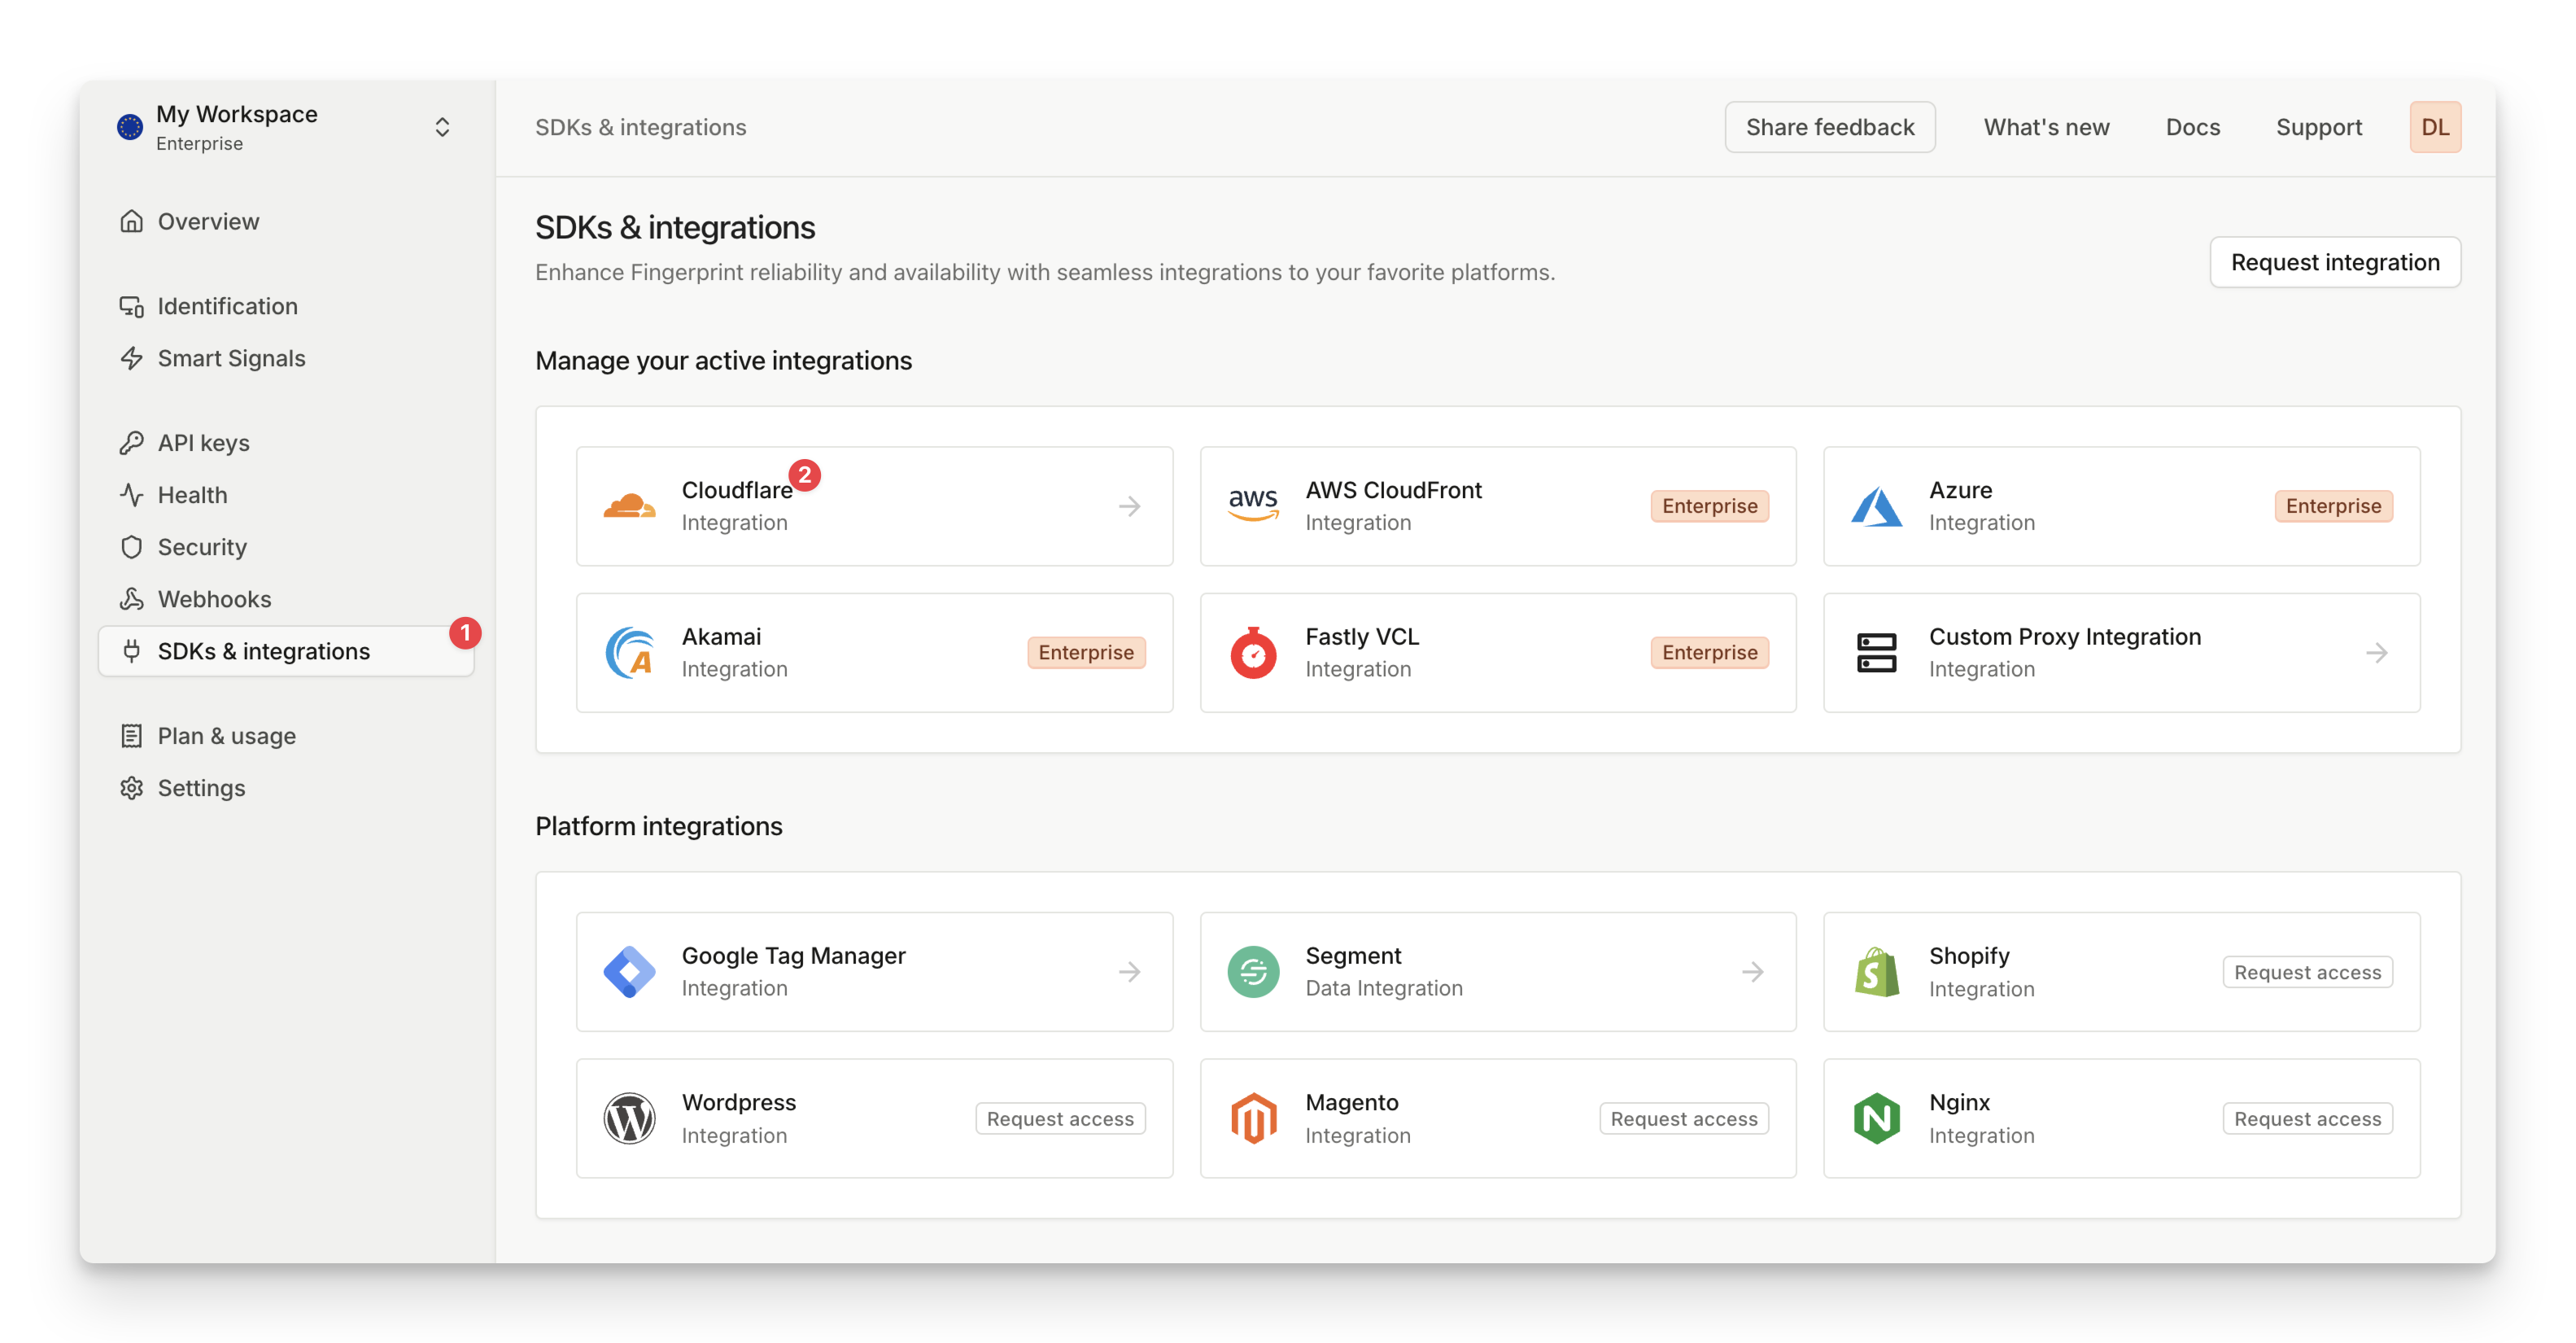 2. After opening the Cloudflare configuration guide, click **Connect**.
 3. Optionally, you can [scope the integration to a specific environment](/docs/v3/multiple-environments#proxy-integrations-and-proxy-secrets).
* By default, the integration works for all environments in your workspace.
* If you choose to scope the integration to a specific environment, the integration will only proxy identification requests made with public API keys from that environment.
4. Add information about your Cloudflare account.
3. Optionally, you can [scope the integration to a specific environment](/docs/v3/multiple-environments#proxy-integrations-and-proxy-secrets).
* By default, the integration works for all environments in your workspace.
* If you choose to scope the integration to a specific environment, the integration will only proxy identification requests made with public API keys from that environment.
4. Add information about your Cloudflare account.
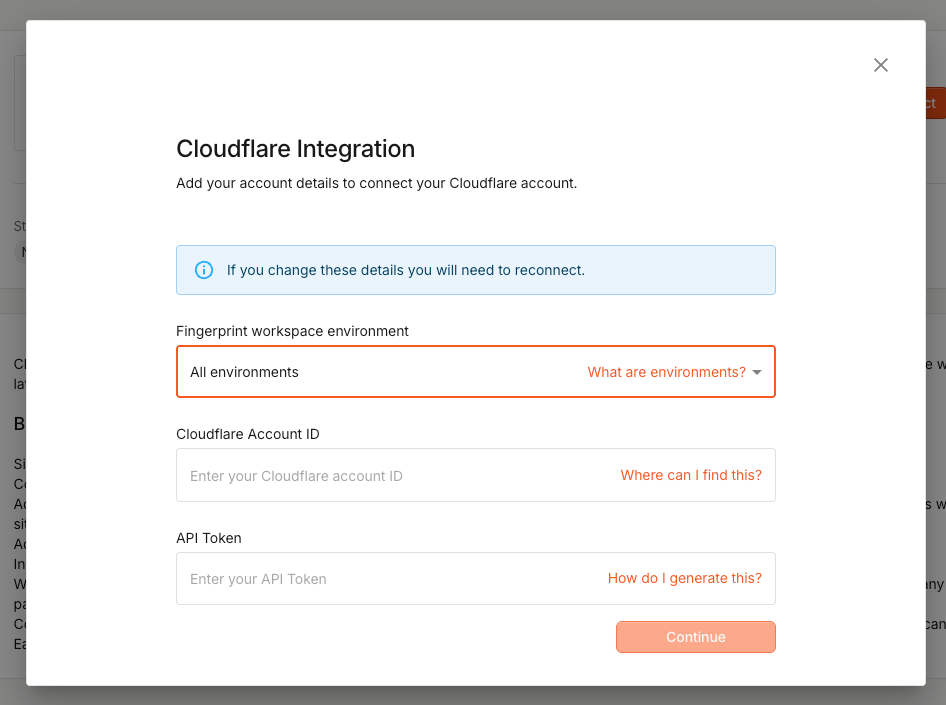
| Name | Example | Short description |
| :-------------------- | :--------------------------------------- | :-------------------------------------------------------------------------------------------------------------------------- |
| Cloudflare Account ID | 88e2a7348d589a61edd0918e57fb136f | The Account ID obtained from the [Cloudflare Dashboard](https://dash.cloudflare.com/). |
| Cloudflare API Token | YQSnnxWAQiiEh9qM58wZNnyQS7FUdoqGIUAbrh7T | API Token generated from the Cloudflare's [User Profile 'API Tokens' page](https://dash.cloudflare.com/profile/api-tokens). |
#### Cloudflare Account ID
The *Account ID* is required to deploy workers. Go to [Cloudflare Workers](https://dash.cloudflare.com/?to=/:account/workers) and copy the *Account ID*.
#### Cloudflare API Token
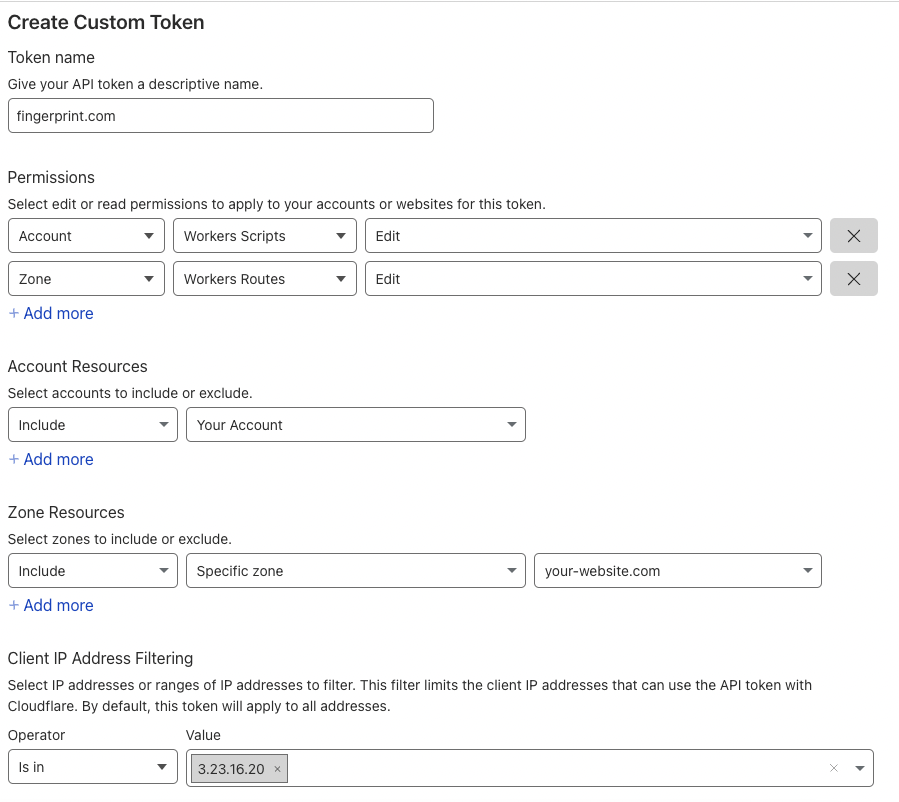
The *API Token* is required to deploy workers. Go to the [*API Tokens* page](https://dash.cloudflare.com/profile/api-tokens), select [*Create Custom Token*](https://dash.cloudflare.com/profile/api-tokens?permissionGroupKeys=%5B%7B"key"%3A"workers_routes"%2C"type"%3A"edit"%7D%2C%7B"key"%3A"workers_scripts"%2C"type"%3A"edit"%7D%5D\&name=fingerprint.com), and follow the steps below.
* Type `fingerprint.com` in the name field.
* *Add Account* > *Workers Scripts* > *Edit* permission.
* *Add Zone* > *Workers Routes* > *Edit* permission.
* Select the account in the *Account Resources*.
* *Select Specific zone* > *yourwebsite* in the *Zone Resources*.
* *Add IP Filtering* > *3.23.16.20*.
* Do not set any TTL.
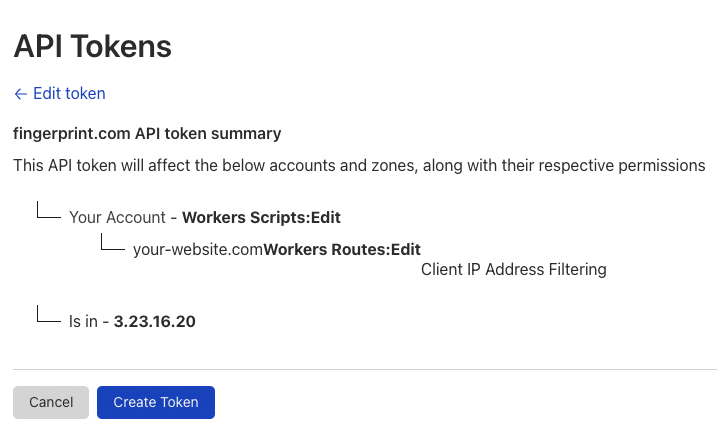
 In the next step, see the summary and click **Create Token**.
 **API Token Safety**
When creating an API Token, it is considered best practice to grant it as few privileges as possible. In the example above, the API Token has permissions to only manage workers in your account. Fingerprint will use your API Token for managing the Fingerprint Cloudflare Worker and nothing else.
Fingerprint always encrypts customer data, including API tokens and configuration items. This guarantees that the data we get from our customers is securely transmitted and stored. The Client IP Address Filtering functionality adds an additional layer of security. Safelisting our public Cloudflare service IP address ensures that the API Token can only be used by Fingerprint services and no one else.
4. After entering *Account ID* and *API Token*, proceed to the next step.
**API Token Safety**
When creating an API Token, it is considered best practice to grant it as few privileges as possible. In the example above, the API Token has permissions to only manage workers in your account. Fingerprint will use your API Token for managing the Fingerprint Cloudflare Worker and nothing else.
Fingerprint always encrypts customer data, including API tokens and configuration items. This guarantees that the data we get from our customers is securely transmitted and stored. The Client IP Address Filtering functionality adds an additional layer of security. Safelisting our public Cloudflare service IP address ensures that the API Token can only be used by Fingerprint services and no one else.
4. After entering *Account ID* and *API Token*, proceed to the next step.
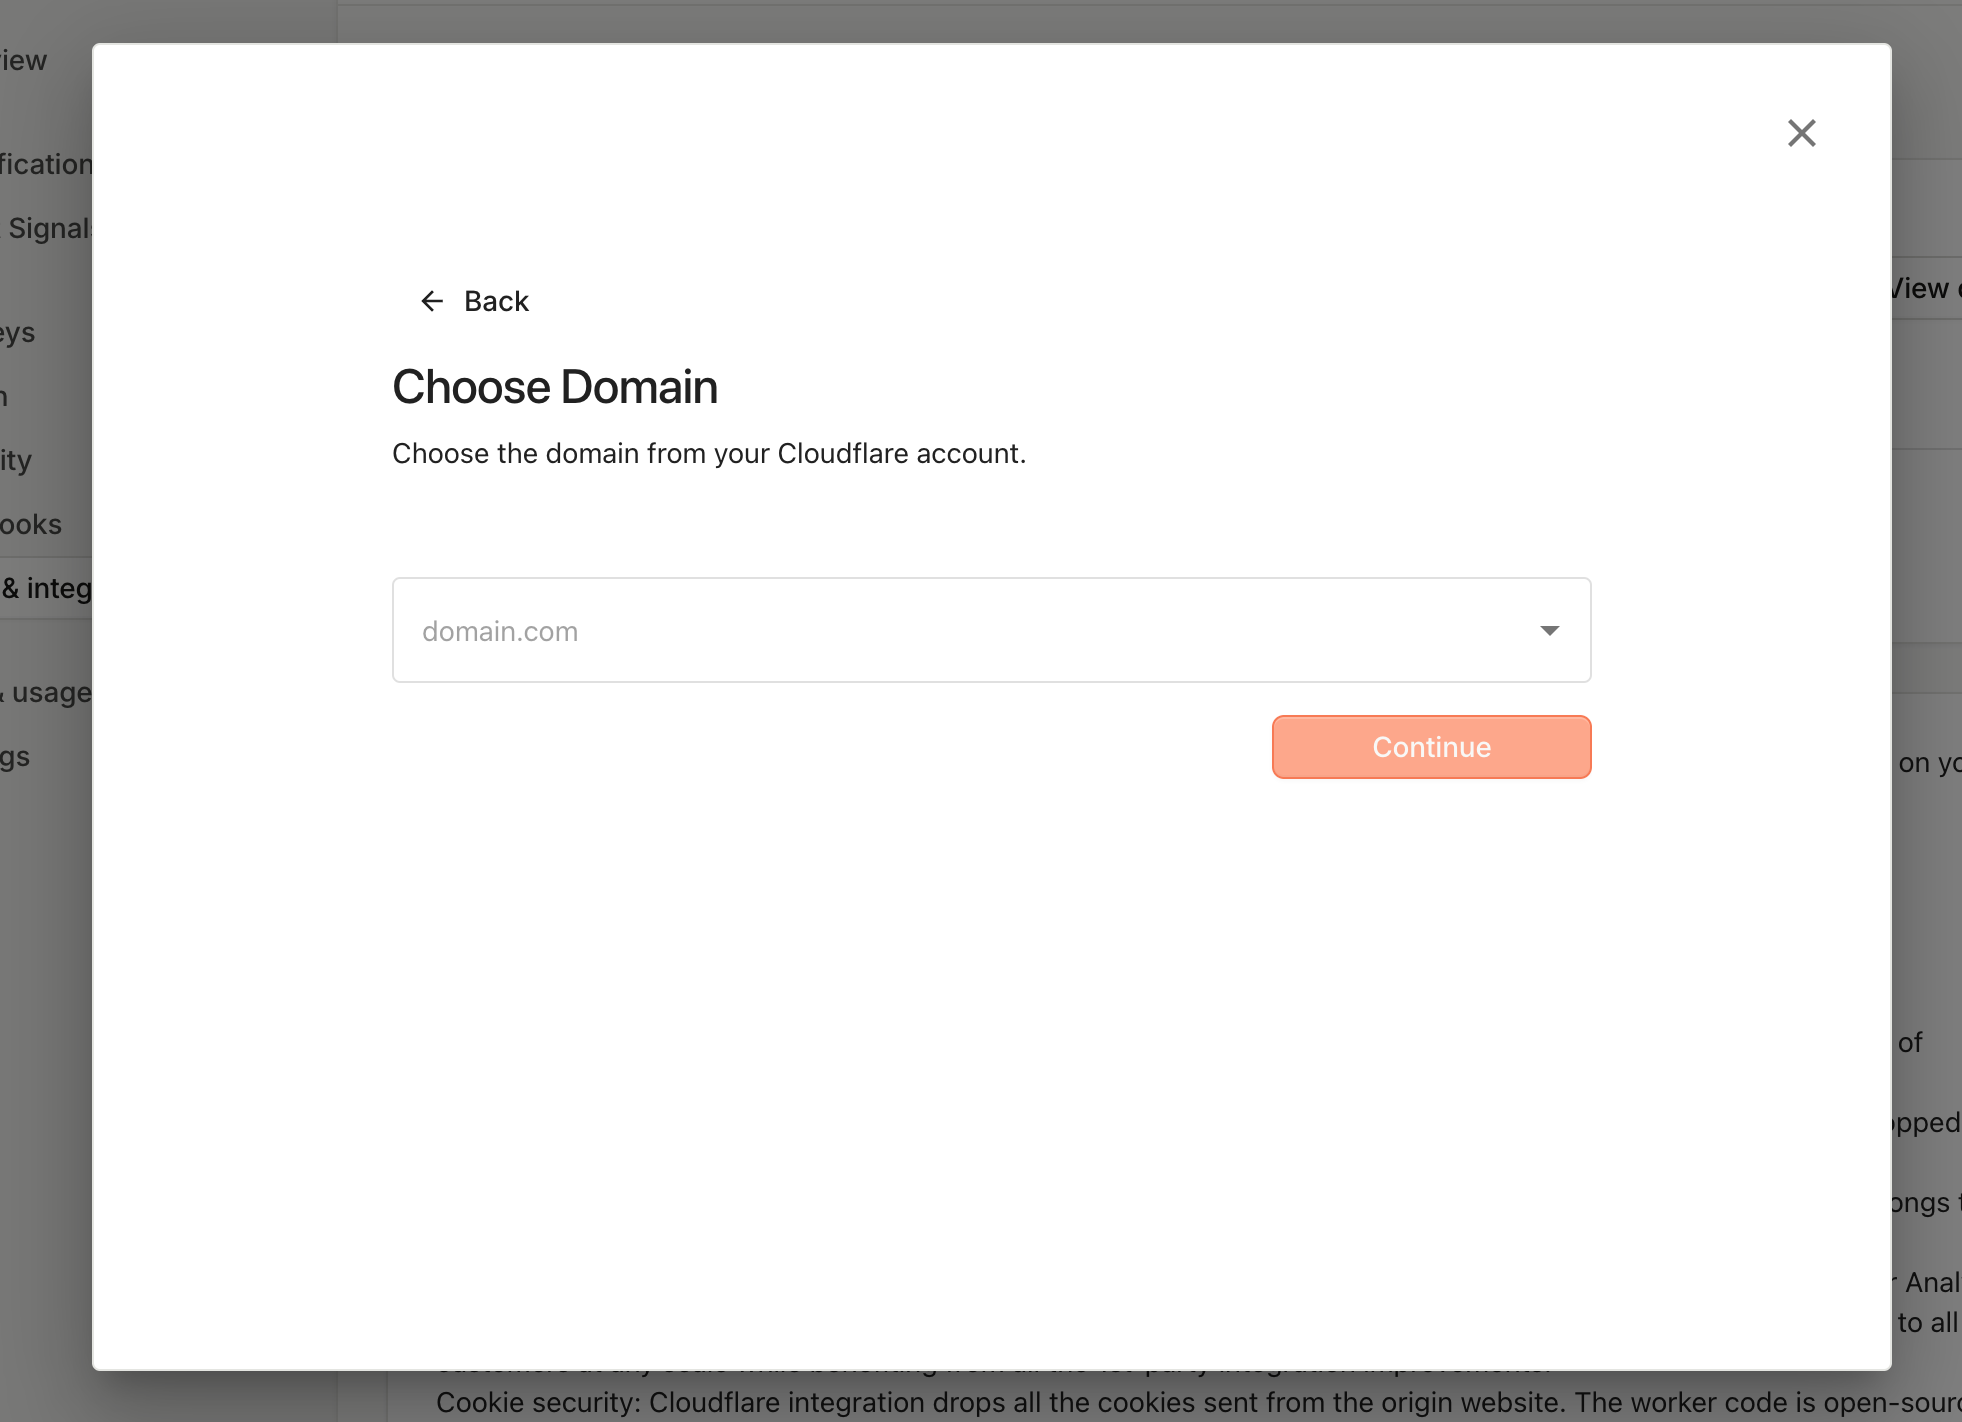 5. Select the same domain you had created the API Token for before from the dropdown menu. If you don't see the domain you wish to use, please contact our [support team](https://fingerprint.com/support).
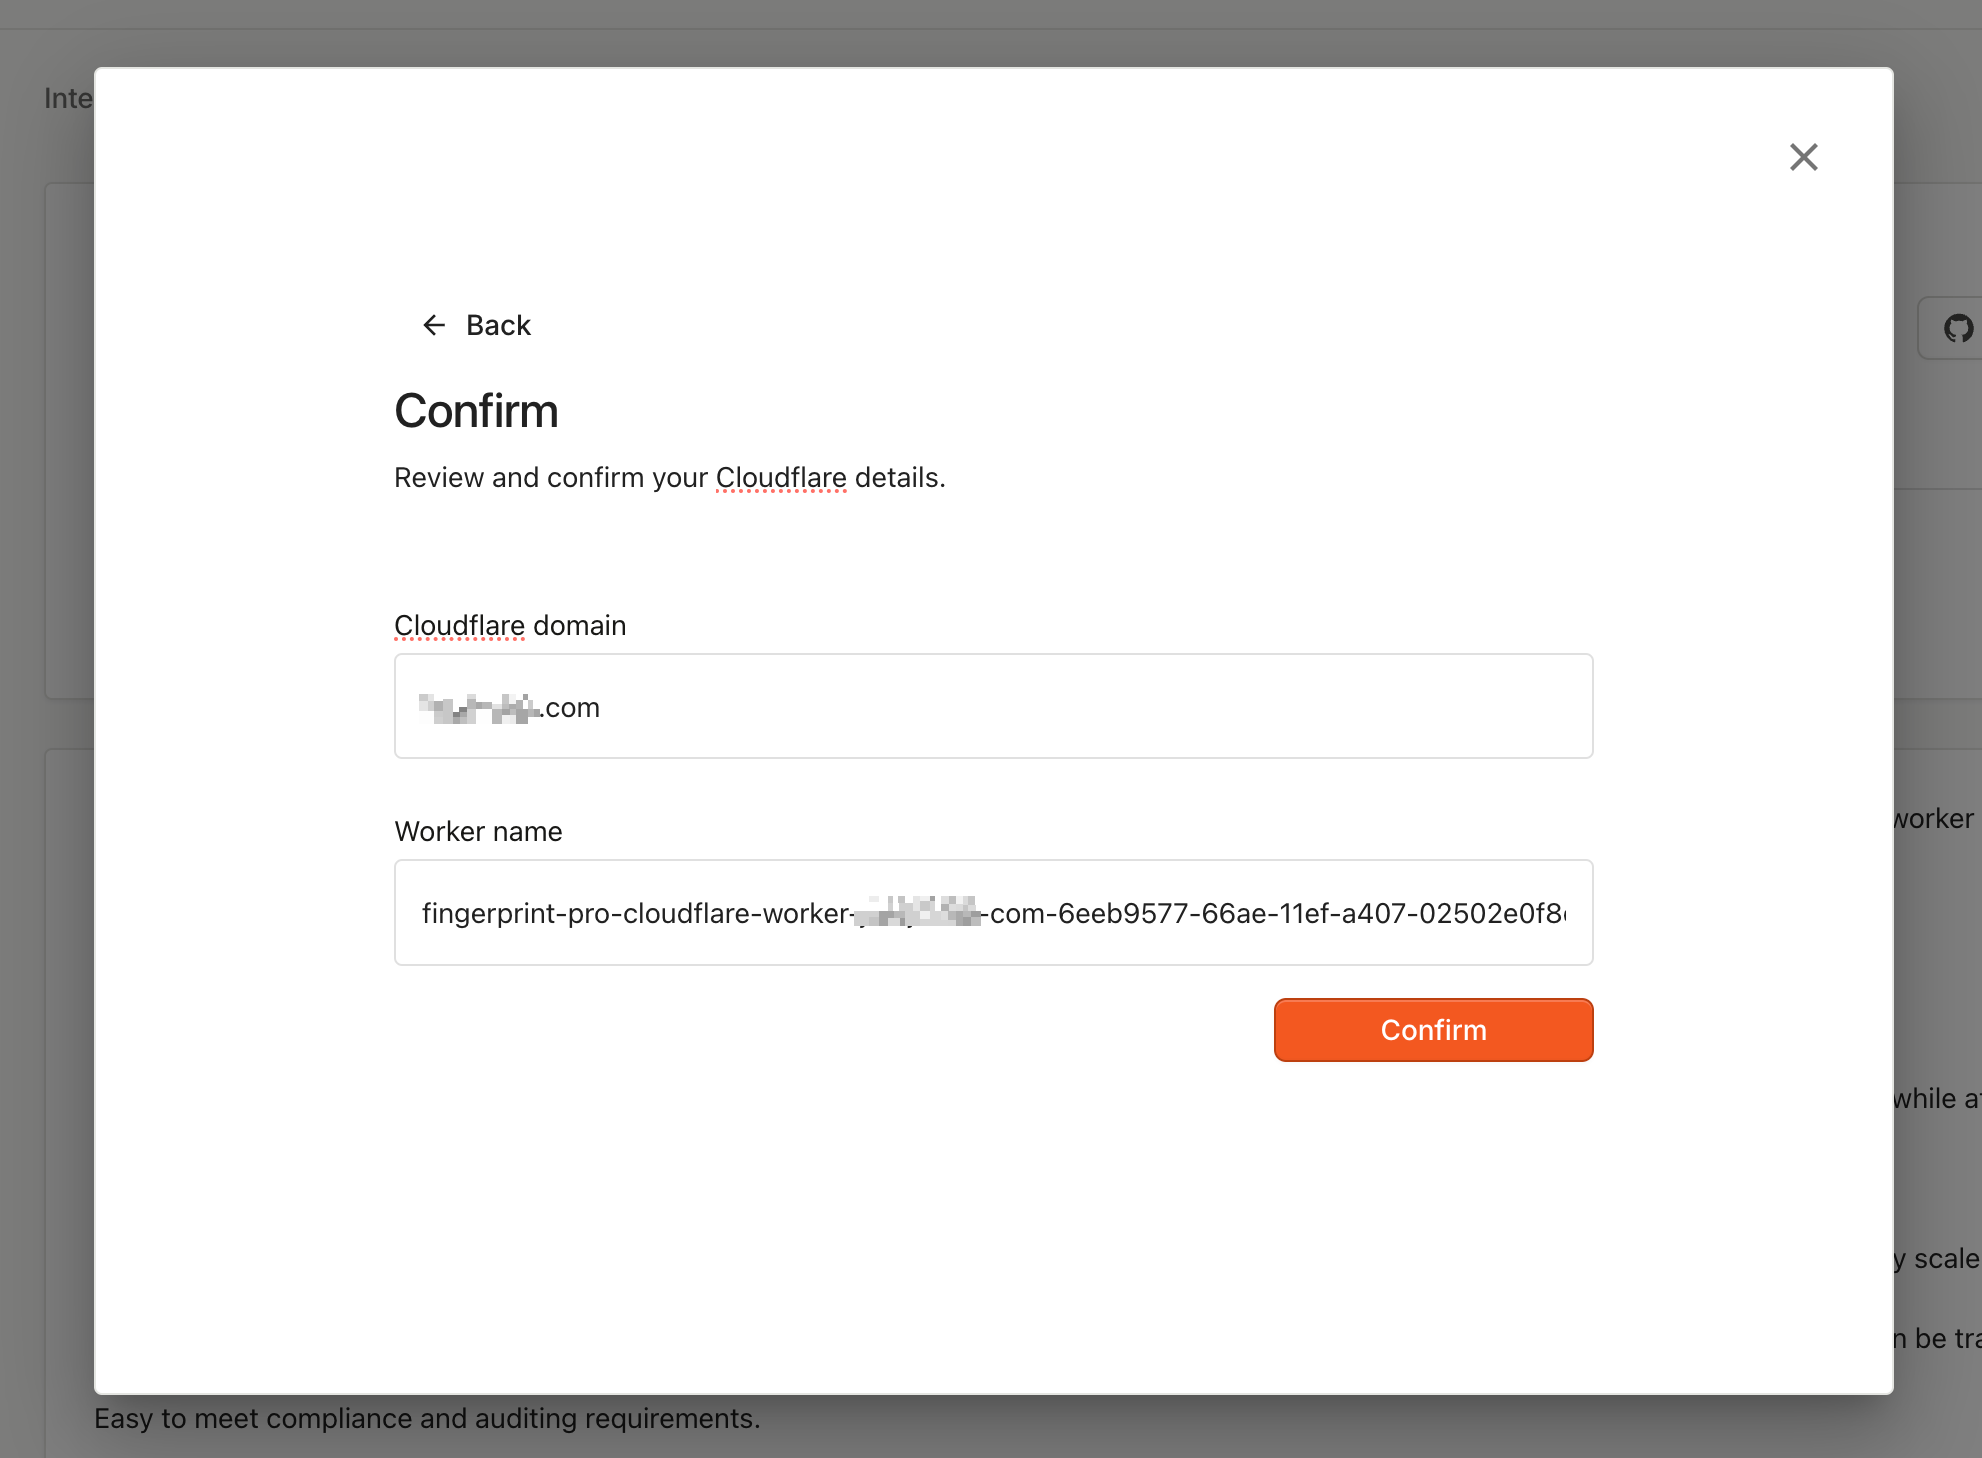 6. Confirm to start the deployment process. This process may take several minutes.
 When you provide the integration wizard with the information above, we will create a Cloudflare Worker in your Cloudflare account. Cloudflare Worker will be named *fingerprint-pro-cloudflare-worker-your-website-com-random-id*, and you will be able to see it in [Cloudflare Workers Dashboard](https://dash.cloudflare.com/?to=/:account/workers/overview) once it is deployed.
**Do not disrupt worker authentication or updates**
The integration wizard creates a proxy secret in your Fingerprint dashboard and passes it to your Cloudflare worker's environment variables.
* Don't delete the proxy secret in either place. Proxied identification requests without a valid proxy secret will result in an authentication error and not receive identification results.
We are responsible for updating your Cloudflare Worker to ensure visitor identification on your website runs smoothly and keeps up with new browser releases and fingerprinting evasion techniques. Outdated worker configuration can lead to lower accuracy or break visitor identification completely. Don't make any changes that would prevent us from updating your worker:
* Don't reduce the API Token permissions or revoke it.
* Don't change the name of the worker (worker names are used as IDs).
* Don't change the original worker route and configuration.
### Step 2: Configure your JavaScript agent
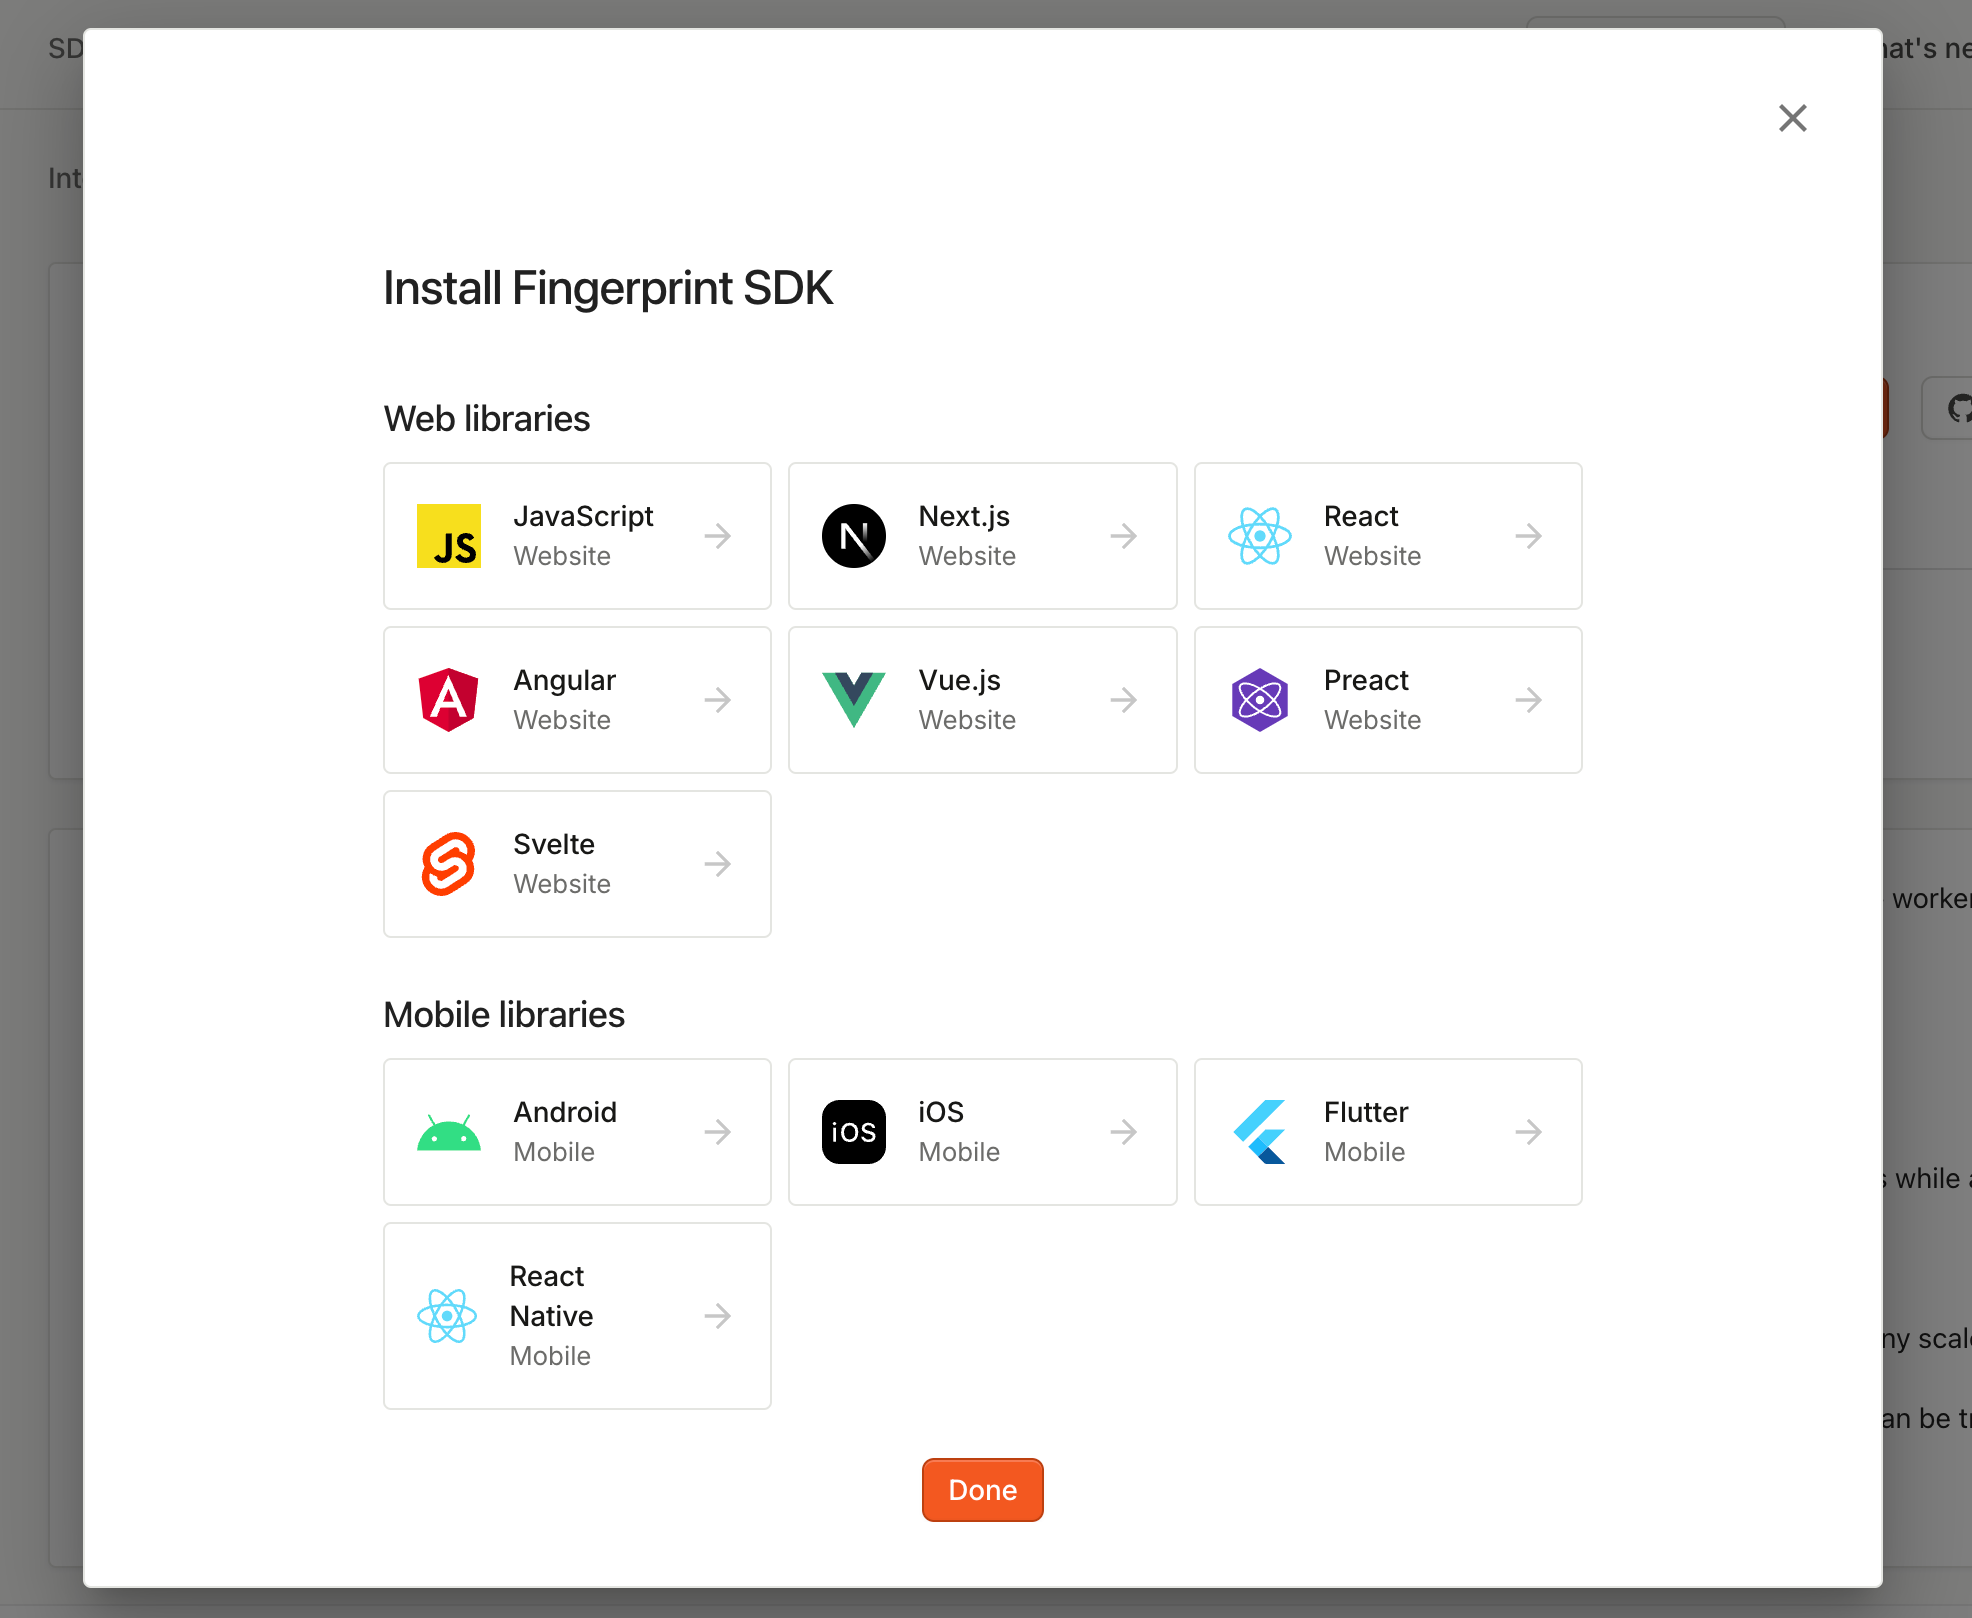
Once the worker is deployed, you need to configure your client-side application accordingly. In this step, you can choose from a variety of frameworks, platforms, and approaches. You can always come back to **SDKs & integrations** to find code snippets for different frameworks that reflect your Cloudflare configuration setup.
When you provide the integration wizard with the information above, we will create a Cloudflare Worker in your Cloudflare account. Cloudflare Worker will be named *fingerprint-pro-cloudflare-worker-your-website-com-random-id*, and you will be able to see it in [Cloudflare Workers Dashboard](https://dash.cloudflare.com/?to=/:account/workers/overview) once it is deployed.
**Do not disrupt worker authentication or updates**
The integration wizard creates a proxy secret in your Fingerprint dashboard and passes it to your Cloudflare worker's environment variables.
* Don't delete the proxy secret in either place. Proxied identification requests without a valid proxy secret will result in an authentication error and not receive identification results.
We are responsible for updating your Cloudflare Worker to ensure visitor identification on your website runs smoothly and keeps up with new browser releases and fingerprinting evasion techniques. Outdated worker configuration can lead to lower accuracy or break visitor identification completely. Don't make any changes that would prevent us from updating your worker:
* Don't reduce the API Token permissions or revoke it.
* Don't change the name of the worker (worker names are used as IDs).
* Don't change the original worker route and configuration.
### Step 2: Configure your JavaScript agent
Once the worker is deployed, you need to configure your client-side application accordingly. In this step, you can choose from a variety of frameworks, platforms, and approaches. You can always come back to **SDKs & integrations** to find code snippets for different frameworks that reflect your Cloudflare configuration setup.
 #### JavaScript agent configuration example
```javascript NPM package theme={"theme":"github-dark-dimmed"}
// The same pattern applies to React SDK, Vue SDK, etc.
import * as FingerprintJS from "@fingerprintjs/fingerprintjs-pro";
const fpPromise = FingerprintJS.load({
apiKey: PUBLIC_API_KEY,
scriptUrlPattern: [
"https://yourwebsite.com/AGENT_SCRIPT_DOWNLOAD_PATH?apiKey=&version=&loaderVersion=",
FingerprintJS.defaultScriptUrlPattern, // Fallback to default CDN in case of error
],
endpoint: [
"https://yourwebsite.com/GET_RESULT_PATH?region=us",
FingerprintJS.defaultEndpoint, // Fallback to default endpoint in case of error
],
});
fpPromise.then((fp) => fp.get()).then((result) => console.log(result.visitorId));
```
```javascript CDN installation theme={"theme":"github-dark-dimmed"}
const fpPromise = import(
"https://yourwebsite.com/AGENT_SCRIPT_DOWNLOAD_PATH?apiKey=PUBLIC_API_KEY"
).then((FingerprintJS) =>
FingerprintJS.load({
endpoint: [
"https://yourwebsite.com/GET_RESULT_PATH?region=us",
FingerprintJS.defaultEndpoint, // Fallback to default endpoint in case of error
],
}),
);
fpPromise.then((fp) => fp.get()).then((result) => console.log(result.visitorId));
```
**URL nuances**
* Note that the import `url` for the CDN installation method and `scriptUrlPattern` used by NPM packages are similar but different and **cannot be used interchangeably**.
* Pay close attention to the query parameters:
* **Include the region** in the `endpoint` parameters using the following format: `?region=REGION`. The `REGION` value needs to be replaced with the [region](/docs/v3/regions) of your application.
* **Use this exact query string in the `scriptUrlPattern`:** `?apiKey=&version=&loaderVersion=`. The `apiKey` `version` and `loaderVersion` parameters will be replaced by the values in the NPM package automatically. Do not alter them manually.
### Using Multiple Worker Routes
Cloudflare Integration uses Cloudflare Workers, which supports [multiple routes](https://developers.cloudflare.com/workers/platform/triggers/routes/). You can add more routes if you need to but don't change the original worker route and configuration created by Fingerprint.
## Monitoring and troubleshooting the integration
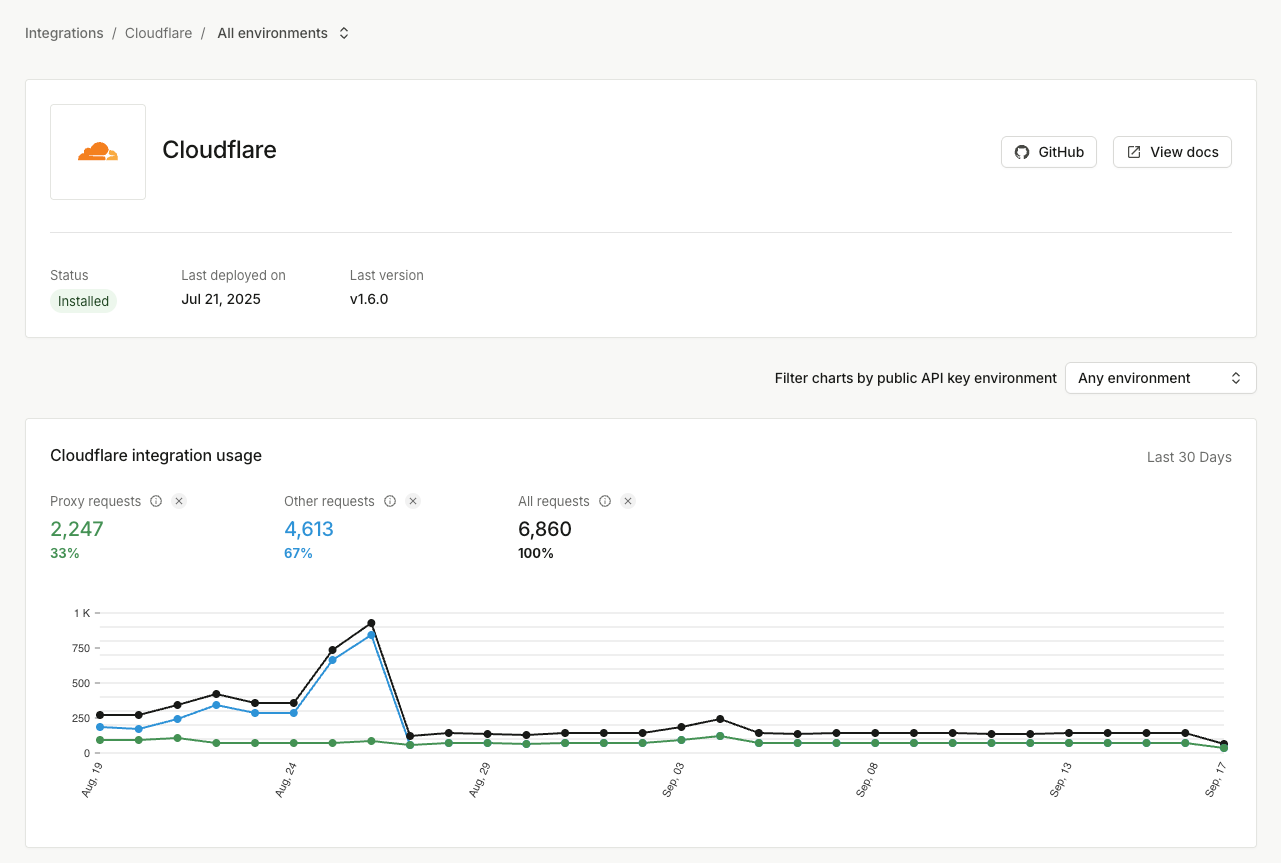
You can go to **Dashboard** > [**SDKs & integrations**](https://dashboard.fingerprint.com/integrations) > **Cloudflare** to see the integration status, usage statistics, and configuration. You can monitor:
* If the integration is up to date.
* How many identification requests are coming through the integration (and how many are not).
* The error rate of proxied identification requests (caused by a missing or incorrect proxy secret).
The information on the status page is cached so allow a few minutes for the latest data points to be reflected.
#### JavaScript agent configuration example
```javascript NPM package theme={"theme":"github-dark-dimmed"}
// The same pattern applies to React SDK, Vue SDK, etc.
import * as FingerprintJS from "@fingerprintjs/fingerprintjs-pro";
const fpPromise = FingerprintJS.load({
apiKey: PUBLIC_API_KEY,
scriptUrlPattern: [
"https://yourwebsite.com/AGENT_SCRIPT_DOWNLOAD_PATH?apiKey=&version=&loaderVersion=",
FingerprintJS.defaultScriptUrlPattern, // Fallback to default CDN in case of error
],
endpoint: [
"https://yourwebsite.com/GET_RESULT_PATH?region=us",
FingerprintJS.defaultEndpoint, // Fallback to default endpoint in case of error
],
});
fpPromise.then((fp) => fp.get()).then((result) => console.log(result.visitorId));
```
```javascript CDN installation theme={"theme":"github-dark-dimmed"}
const fpPromise = import(
"https://yourwebsite.com/AGENT_SCRIPT_DOWNLOAD_PATH?apiKey=PUBLIC_API_KEY"
).then((FingerprintJS) =>
FingerprintJS.load({
endpoint: [
"https://yourwebsite.com/GET_RESULT_PATH?region=us",
FingerprintJS.defaultEndpoint, // Fallback to default endpoint in case of error
],
}),
);
fpPromise.then((fp) => fp.get()).then((result) => console.log(result.visitorId));
```
**URL nuances**
* Note that the import `url` for the CDN installation method and `scriptUrlPattern` used by NPM packages are similar but different and **cannot be used interchangeably**.
* Pay close attention to the query parameters:
* **Include the region** in the `endpoint` parameters using the following format: `?region=REGION`. The `REGION` value needs to be replaced with the [region](/docs/v3/regions) of your application.
* **Use this exact query string in the `scriptUrlPattern`:** `?apiKey=&version=&loaderVersion=`. The `apiKey` `version` and `loaderVersion` parameters will be replaced by the values in the NPM package automatically. Do not alter them manually.
### Using Multiple Worker Routes
Cloudflare Integration uses Cloudflare Workers, which supports [multiple routes](https://developers.cloudflare.com/workers/platform/triggers/routes/). You can add more routes if you need to but don't change the original worker route and configuration created by Fingerprint.
## Monitoring and troubleshooting the integration
You can go to **Dashboard** > [**SDKs & integrations**](https://dashboard.fingerprint.com/integrations) > **Cloudflare** to see the integration status, usage statistics, and configuration. You can monitor:
* If the integration is up to date.
* How many identification requests are coming through the integration (and how many are not).
* The error rate of proxied identification requests (caused by a missing or incorrect proxy secret).
The information on the status page is cached so allow a few minutes for the latest data points to be reflected.
 The Cloudflare integration has limited visibility into your Cloudflare environment. If you run into issues, please verify that one of your existing Firewall rules, rate limiting rules, or other Cloudflare restrictions is not disrupting the Fingerprint worker and its path. Get in touch with our [support team](https://fingerprint.com/support/) if necessary.
### Updating the Cloudflare token
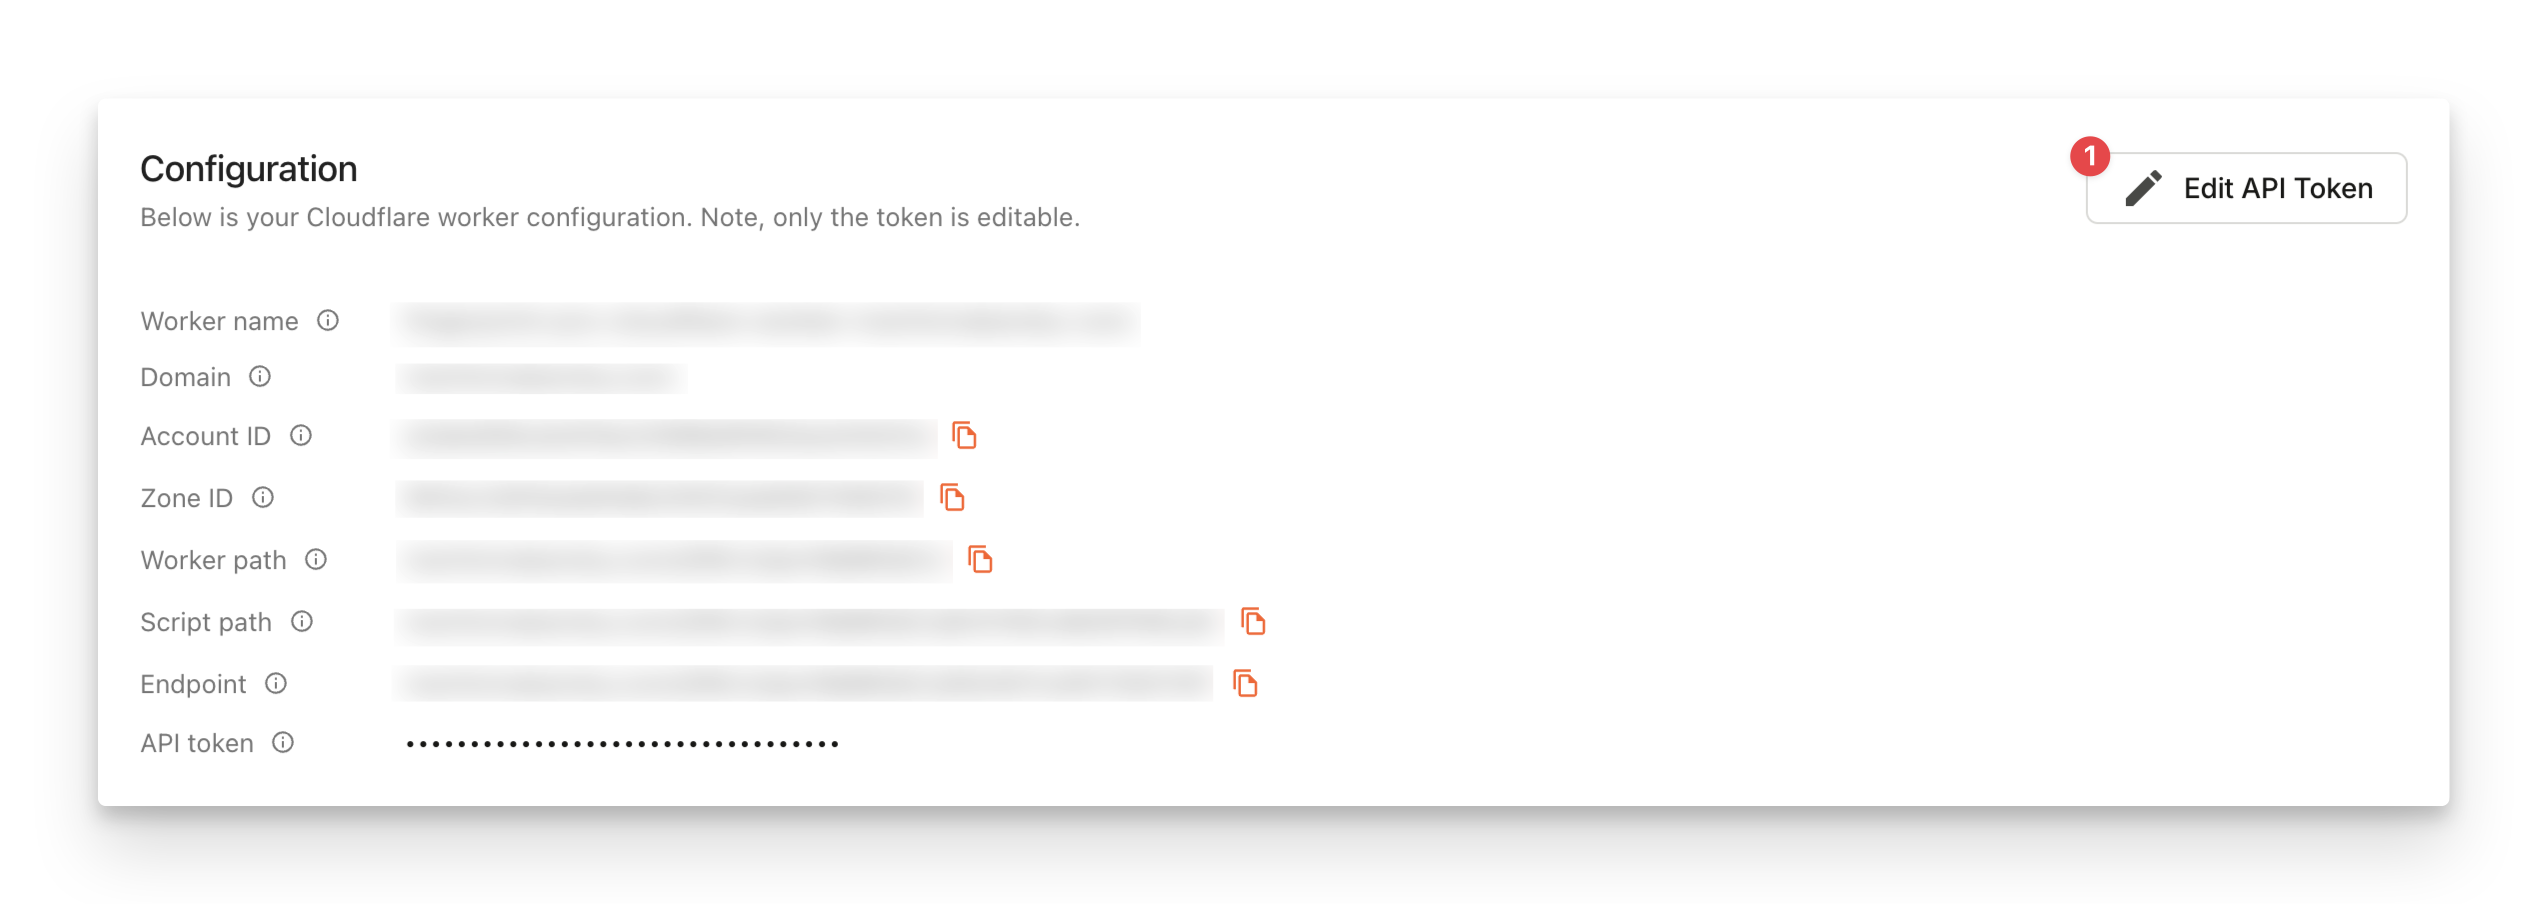
If you accidentally delete the Cloudflare API token you provided us with, you can update it inside the Fingerprint dashboard.
* Go to [**SDKs & integrations**](https://dashboard.fingerprint.com/integrations) > **Cloudflare** and click **Edit API token**.
The Cloudflare integration has limited visibility into your Cloudflare environment. If you run into issues, please verify that one of your existing Firewall rules, rate limiting rules, or other Cloudflare restrictions is not disrupting the Fingerprint worker and its path. Get in touch with our [support team](https://fingerprint.com/support/) if necessary.
### Updating the Cloudflare token
If you accidentally delete the Cloudflare API token you provided us with, you can update it inside the Fingerprint dashboard.
* Go to [**SDKs & integrations**](https://dashboard.fingerprint.com/integrations) > **Cloudflare** and click **Edit API token**.
 ### Deleting the integration
If something goes irreversibly wrong with your integration or Cloudflare worker configuration, you can delete everything and create a new integration from scratch.
1. Make sure your Fingerprint JavaScript agent is not using the integration URLs you are about to delete.
2. Go to [**SDKs & integrations**](https://dashboard.fingerprint.com/integrations) > **Cloudflare** and click **Delete integration** at the bottom of the page.
This will delete the Cloudflare worker and all associated records.
## Alternative worker subdomain setup (for DNS-only domains)
The Cloudflare configuration guide above assumes your website is added to Cloudflare and [proxied through Cloudflare](https://developers.cloudflare.com/dns/manage-dns-records/reference/proxied-dns-records/) (not DNS-only). If your website proxy status is DNS-only, the worker will not be accessible on the generated path and the provided code snippets will not work.
### Deleting the integration
If something goes irreversibly wrong with your integration or Cloudflare worker configuration, you can delete everything and create a new integration from scratch.
1. Make sure your Fingerprint JavaScript agent is not using the integration URLs you are about to delete.
2. Go to [**SDKs & integrations**](https://dashboard.fingerprint.com/integrations) > **Cloudflare** and click **Delete integration** at the bottom of the page.
This will delete the Cloudflare worker and all associated records.
## Alternative worker subdomain setup (for DNS-only domains)
The Cloudflare configuration guide above assumes your website is added to Cloudflare and [proxied through Cloudflare](https://developers.cloudflare.com/dns/manage-dns-records/reference/proxied-dns-records/) (not DNS-only). If your website proxy status is DNS-only, the worker will not be accessible on the generated path and the provided code snippets will not work.
 If you can't proxy your primary domain through Cloudflare, you can work around this issue by hosting the Fingerprint worker on a subdomain. This still requires that your website is [added to Cloudflare](https://developers.cloudflare.com/fundamentals/setup/manage-domains/add-site/) without proxying (in DNS-only mode).
1. Follow the installation steps above to deploy the proxy integration worker in your Cloudflare account.
2. Go to your [Cloudflare dashboard](https://dash.cloudflare.com/).
3. In the left-hand navigation, click **Workers & Pages**.
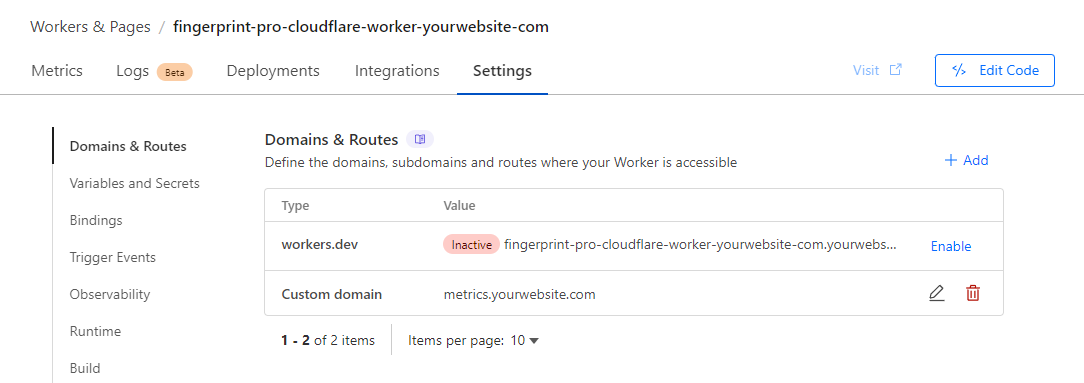
4. Click on your Fingerprint Cloudflare worker. It will be named like **fingerprint-pro-cloudflare-worker-yourwebsite-com**.
5. At the top, click **Settings**, then look for **Domains & Routes**.
6. Click **+ Add** and select **Custom domain**.
7. Enter a subdomain like `metrics.yourwebsite.com` and click **Add domain** to confirm. Avoid terms commonly blocked by ad-blockers like `fingerprint`, `fpjs`, `track`, etc.
If you can't proxy your primary domain through Cloudflare, you can work around this issue by hosting the Fingerprint worker on a subdomain. This still requires that your website is [added to Cloudflare](https://developers.cloudflare.com/fundamentals/setup/manage-domains/add-site/) without proxying (in DNS-only mode).
1. Follow the installation steps above to deploy the proxy integration worker in your Cloudflare account.
2. Go to your [Cloudflare dashboard](https://dash.cloudflare.com/).
3. In the left-hand navigation, click **Workers & Pages**.
4. Click on your Fingerprint Cloudflare worker. It will be named like **fingerprint-pro-cloudflare-worker-yourwebsite-com**.
5. At the top, click **Settings**, then look for **Domains & Routes**.
6. Click **+ Add** and select **Custom domain**.
7. Enter a subdomain like `metrics.yourwebsite.com` and click **Add domain** to confirm. Avoid terms commonly blocked by ad-blockers like `fingerprint`, `fpjs`, `track`, etc.
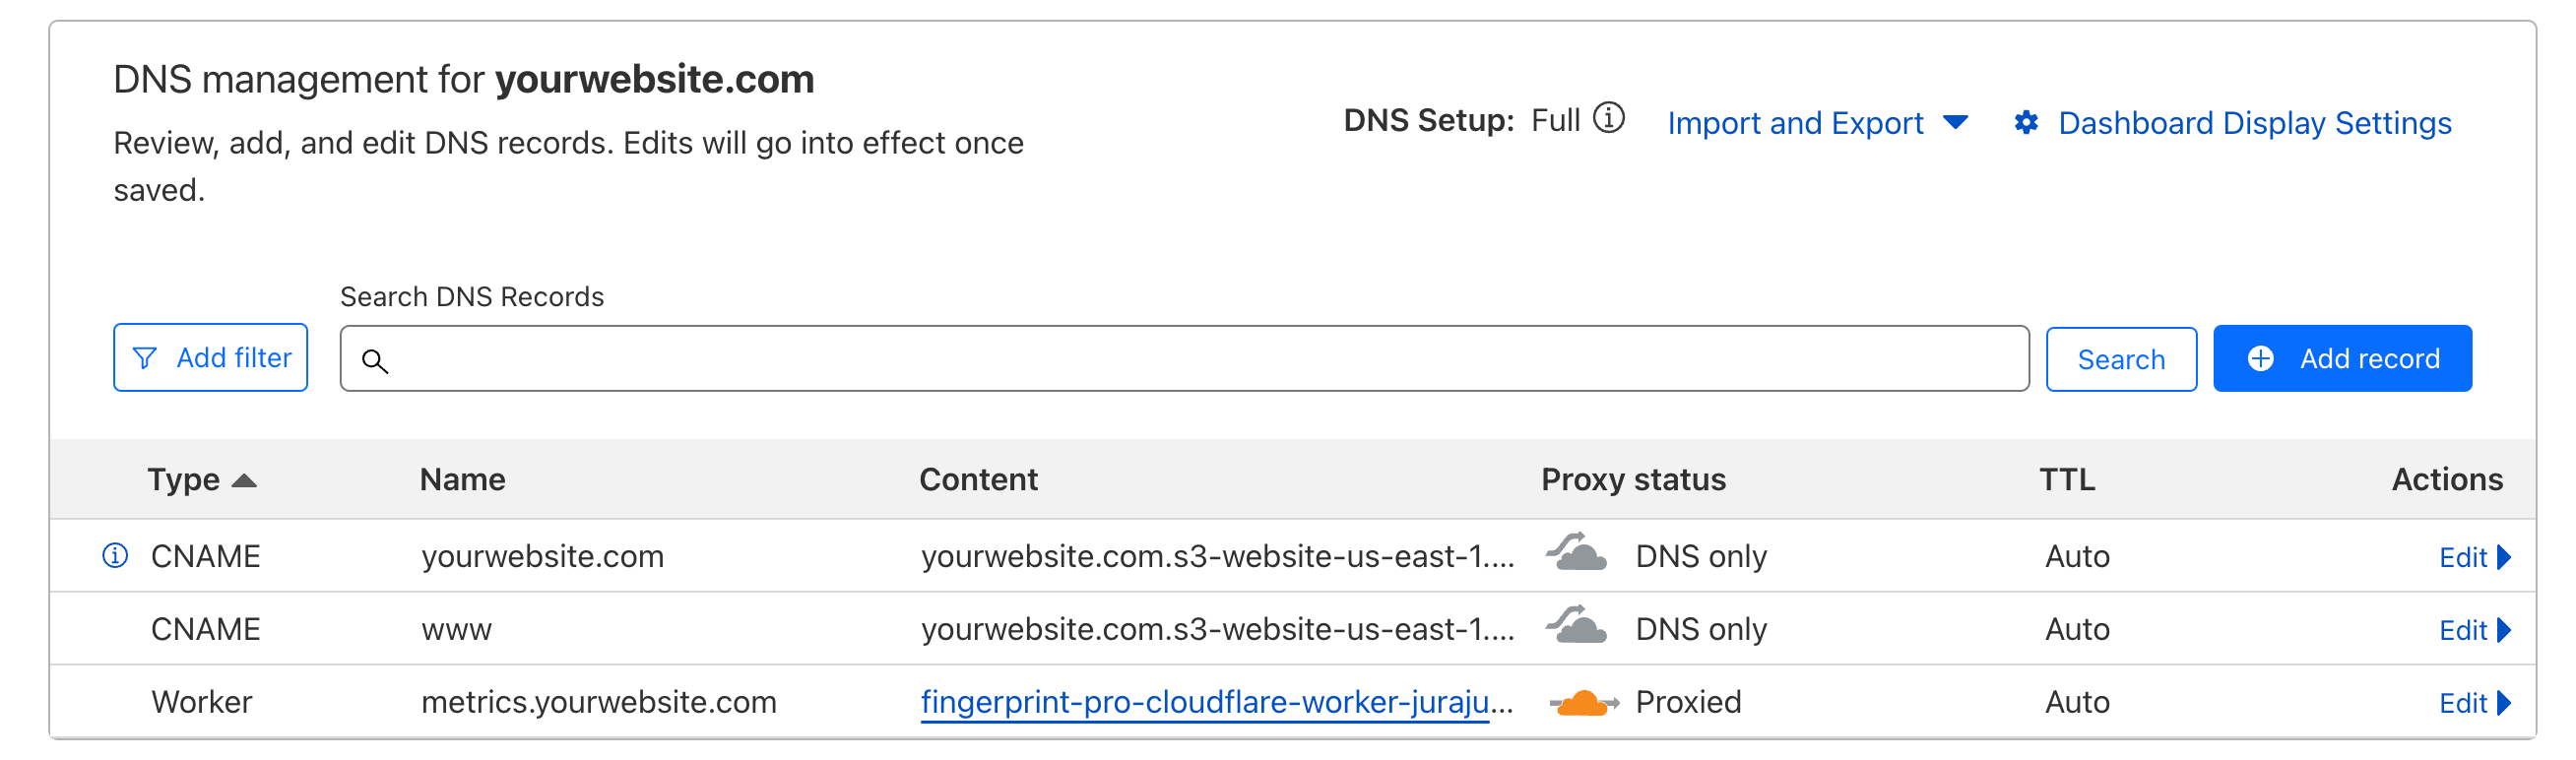
 Your new subdomain will be proxied through Cloudflare, even though your primary domain is not:
 Your Fingerprint worker is now accessible on your chosen subdomain. You need to adjust the code snippets provided on the
[**SDKs & integrations**](https://dashboard.fingerprint.com/integrations) page accordingly. For example:
`endpoint: https://yourwebsite.com/VWmFUKL1dfIjc8gg/SjM9xGRJcN3lZycu` becomes
`endpoint: https://metrics.yourwebsite.com/VWmFUKL1dfIjc8gg/SjM9xGRJcN3lZycu`.
Your Fingerprint worker is now accessible on your chosen subdomain. You need to adjust the code snippets provided on the
[**SDKs & integrations**](https://dashboard.fingerprint.com/integrations) page accordingly. For example:
`endpoint: https://yourwebsite.com/VWmFUKL1dfIjc8gg/SjM9xGRJcN3lZycu` becomes
`endpoint: https://metrics.yourwebsite.com/VWmFUKL1dfIjc8gg/SjM9xGRJcN3lZycu`.