> ## Documentation Index
> Fetch the complete documentation index at: https://docs.fingerprint.com/llms.txt
> Use this file to discover all available pages before exploring further.
# Install CloudFront Integration using CloudFormation
**Before you start: Read the general CloudFront guide**
This document only covers deploying the Fingerprint Cloudfront proxy integration to your AWS account using a CloudFormation template. It assumes you have already read the [general AWS CloudFront Proxy Integration v2 guide](/docs/cloudfront-proxy-integration-v2) and completed the following steps:
* [Step 1](/docs/cloudfront-proxy-integration-v2#step-1-issue-a-proxy-secret): You have issued a proxy secret in the Fingerprint Dashboard (`FPJS_PRE_SHARED_SECRET`).
* [Step 2](/docs/cloudfront-proxy-integration-v2#step-2-create-path-variable): You have defined a path variable for the integration (`FPJS_BEHAVIOR_PATH`)
If want to use Terraform instead of CloudFormation to install the integration, see [Install CloudFront integration using Terraform](/docs/aws-cloudfront-integration-via-terraform).
**Limitations**
This integration is exclusively supported for customers on the **Enterprise** Plan. Other customers are encouraged to use [Custom subdomain setup](/docs/custom-subdomain-setup) or [Cloudflare Proxy Integration](/docs/cloudflare-integration).
## Step 3: Install the CloudFormation application
The Lambda proxy function and associated resources are provided as a CloudFormation template.
### Step 3.1: Create CloudFormation stack
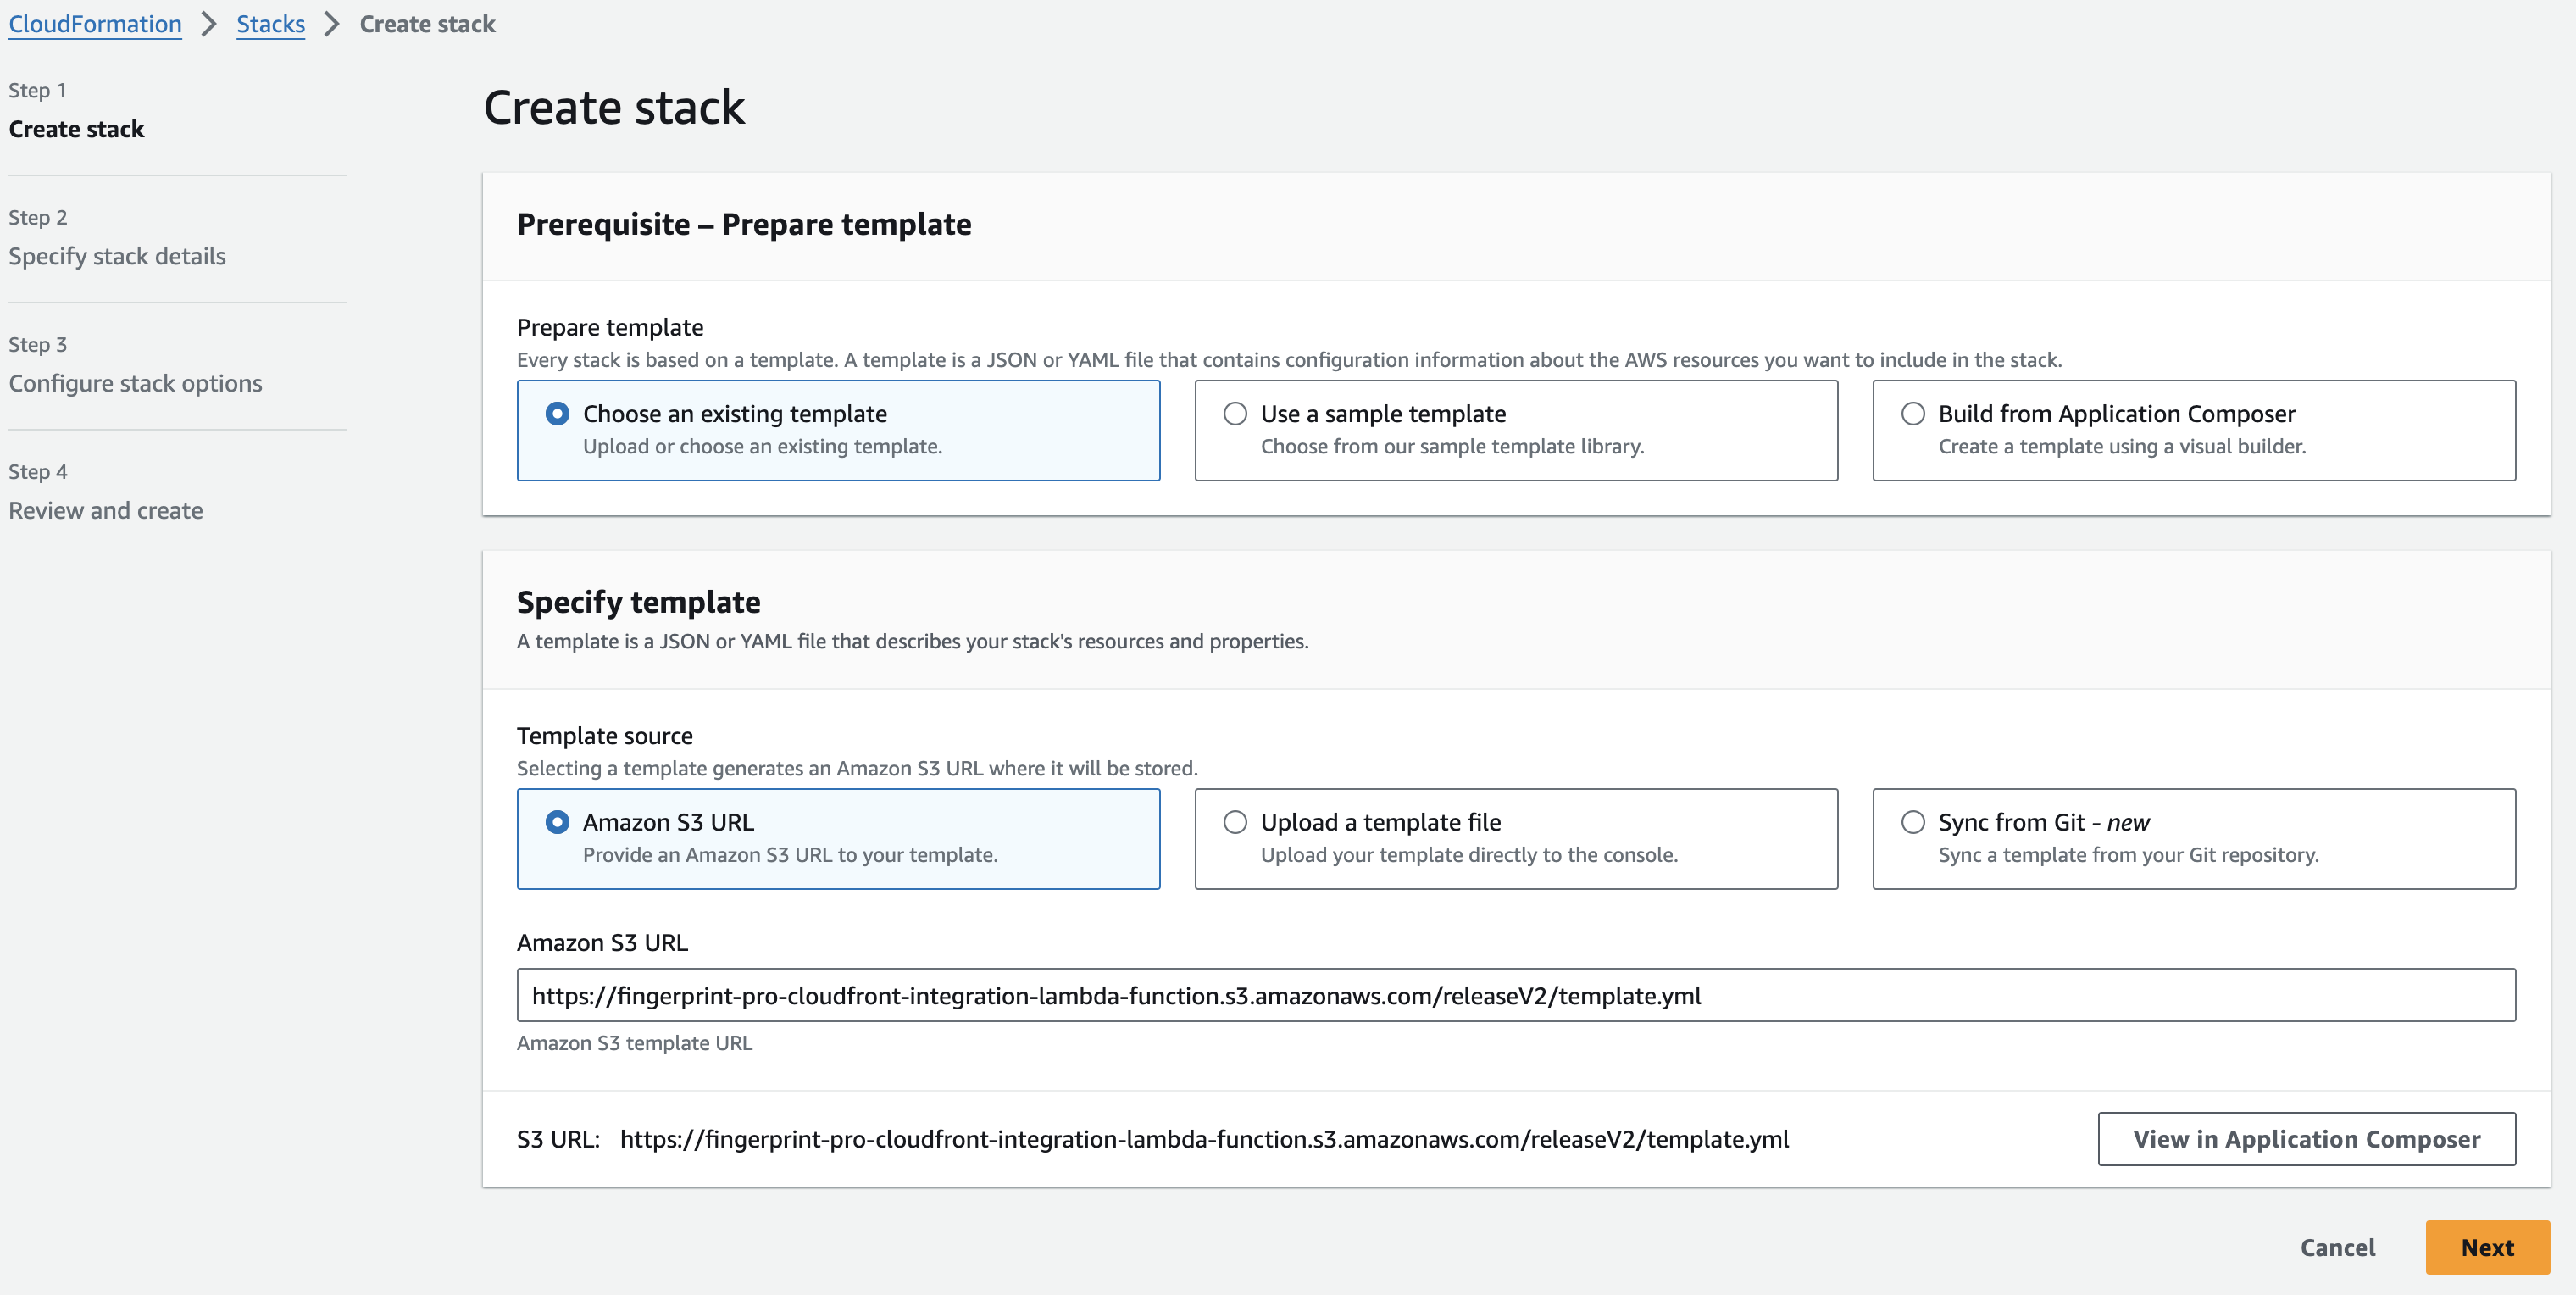
1. Go to the [CloudFormation installation wizard](https://us-east-1.console.aws.amazon.com/cloudformation/home?region=us-east-1#/stacks/new?stackName=Fingerprint-Pro-CloudFront-Integration-v2\&templateURL=https://fingerprint-pro-cloudfront-integration.s3.amazonaws.com/v2/template.yml) to open the deployment dialog.
2. Select the `us-east-1` region in your AWS console before deploying the application. Due to [AWS limitations](https://docs.aws.amazon.com/AmazonCloudFront/latest/DeveloperGuide/lambda-at-edge-function-restrictions.html#lambda-at-edge-restrictions-region), the Lambda proxy function, and therefore the entire CloudFormation stack, must be deployed to the `us-east-1` region.
3. Keep predefined settings:
1. **Prepare template** is `Choose an existing template`.
2. **Specify template** is `Amazon S3 URL`.
3. **Amazon S3 URL** is `https://fingerprint-pro-cloudfront-integration.s3.amazonaws.com/v2/template.yml`
4. Click **Next**.
 ### Step 3.2: Specify stack details
Provide a stack name and fill in the required template parameters.
* Set **FpjsPreSharedSecret** to the `FPJS_PRE_SHARED_SECRET` value you created in Step 1.
The following parameters, **FpjsAgentDownloadPath** and **FpjsGetResultPath**, can be left at
their default values because they are only required for JavaScript Agent v3.
**Note: Proxy secret required**
Proxied identification requests without a valid proxy secret will result in an authentication error and not receive identification results.
In this step, you need to choose between using an existing CloudFront distribution or creating a new one.
#### A) Use an existing CloudFront distribution (recommended)
If your website is already running on CloudFront, you can use the same distribution and domain for the proxy integration.
This is the recommended setup. Your website and the proxy function will be same-site, served from the same IP address or IP address range. Having the same or similar IP improves cookie lifetimes in Safari — they will be stored in the browser for up to one year instead of 7 days.
* Set **DistributionId** to the identifier of your existing CloudFront distribution.
#### B) Create a new CloudFront distribution
If your website is not running on CloudFront, you can create a new CloudFront distribution and website subdomain just for the proxy integration.
This setup limits Safari cookie lifetime to 7 days. Because your website and the Lambda proxy function will likely have [different IP ranges](https://github.com/WebKit/WebKit/pull/5347), Safari will apply the same cookie lifetime cap as for third-party CNAME cloaking. This is still an improvement over third-party cookies getting blocked entirely by Safari. But we recommend serving your website and the proxy integration using the same CloudFront distribution if possible (option A above).
* Leave **DistributionId** *empty*. The template will create and configure a new CloudFront distribution for you.
* If you want to attach an alternate domain name and custom SSL certificate to the new CloudFront distribution, fill in these parameters:
* Set **ACMCertificateARN** to the ARN identifier of your SSL certificate in the AWS Certificate Manager.
* Set **DomainNames** to a list of plus-separated domain names, for example: `domain1.com` or `domain1.com+domain2.com`. These will be attached to the created CloudFront distribution.
The deployment will fail if any of the domain names is not covered by the certificate or if it is already used as an alternate name for another CloudFront distribution.
Once you have made your choice, click **Next**.
> Note: This application creates the custom IAM roles that allow us to modify CloudFront distribution to keep the Lambda\@Edge function up to date. You can review these policies in the [CloudFormation template](https://github.com/fingerprintjs/aws-cloudfront-proxy/blob/main/cloudformation/template.yml).
### Step 3.3: Configure stack options
Fingerprint integration has no specific stack options to configure at this step. You can change them depending on your internal requirements.
In the **Capabilities and transforms** section:
1. Check *I acknowledge that AWS CloudFormation might create IAM resources.*
2. Check *I acknowledge that AWS CloudFormation might create IAM resources with custom names.*
3. Check *I acknowledge that AWS CloudFormation might require the following capability: CAPABILITY\_AUTO\_EXPAND*
Click **Next**.
### Step 3.4: Review and create
Review the **Parameters** section and click **Submit**.
After deployment, you will be redirected to the CloudFormation Stacks page where you can see a list of resources created by the application.
### Step 3.2: Specify stack details
Provide a stack name and fill in the required template parameters.
* Set **FpjsPreSharedSecret** to the `FPJS_PRE_SHARED_SECRET` value you created in Step 1.
The following parameters, **FpjsAgentDownloadPath** and **FpjsGetResultPath**, can be left at
their default values because they are only required for JavaScript Agent v3.
**Note: Proxy secret required**
Proxied identification requests without a valid proxy secret will result in an authentication error and not receive identification results.
In this step, you need to choose between using an existing CloudFront distribution or creating a new one.
#### A) Use an existing CloudFront distribution (recommended)
If your website is already running on CloudFront, you can use the same distribution and domain for the proxy integration.
This is the recommended setup. Your website and the proxy function will be same-site, served from the same IP address or IP address range. Having the same or similar IP improves cookie lifetimes in Safari — they will be stored in the browser for up to one year instead of 7 days.
* Set **DistributionId** to the identifier of your existing CloudFront distribution.
#### B) Create a new CloudFront distribution
If your website is not running on CloudFront, you can create a new CloudFront distribution and website subdomain just for the proxy integration.
This setup limits Safari cookie lifetime to 7 days. Because your website and the Lambda proxy function will likely have [different IP ranges](https://github.com/WebKit/WebKit/pull/5347), Safari will apply the same cookie lifetime cap as for third-party CNAME cloaking. This is still an improvement over third-party cookies getting blocked entirely by Safari. But we recommend serving your website and the proxy integration using the same CloudFront distribution if possible (option A above).
* Leave **DistributionId** *empty*. The template will create and configure a new CloudFront distribution for you.
* If you want to attach an alternate domain name and custom SSL certificate to the new CloudFront distribution, fill in these parameters:
* Set **ACMCertificateARN** to the ARN identifier of your SSL certificate in the AWS Certificate Manager.
* Set **DomainNames** to a list of plus-separated domain names, for example: `domain1.com` or `domain1.com+domain2.com`. These will be attached to the created CloudFront distribution.
The deployment will fail if any of the domain names is not covered by the certificate or if it is already used as an alternate name for another CloudFront distribution.
Once you have made your choice, click **Next**.
> Note: This application creates the custom IAM roles that allow us to modify CloudFront distribution to keep the Lambda\@Edge function up to date. You can review these policies in the [CloudFormation template](https://github.com/fingerprintjs/aws-cloudfront-proxy/blob/main/cloudformation/template.yml).
### Step 3.3: Configure stack options
Fingerprint integration has no specific stack options to configure at this step. You can change them depending on your internal requirements.
In the **Capabilities and transforms** section:
1. Check *I acknowledge that AWS CloudFormation might create IAM resources.*
2. Check *I acknowledge that AWS CloudFormation might create IAM resources with custom names.*
3. Check *I acknowledge that AWS CloudFormation might require the following capability: CAPABILITY\_AUTO\_EXPAND*
Click **Next**.
### Step 3.4: Review and create
Review the **Parameters** section and click **Submit**.
After deployment, you will be redirected to the CloudFormation Stacks page where you can see a list of resources created by the application.
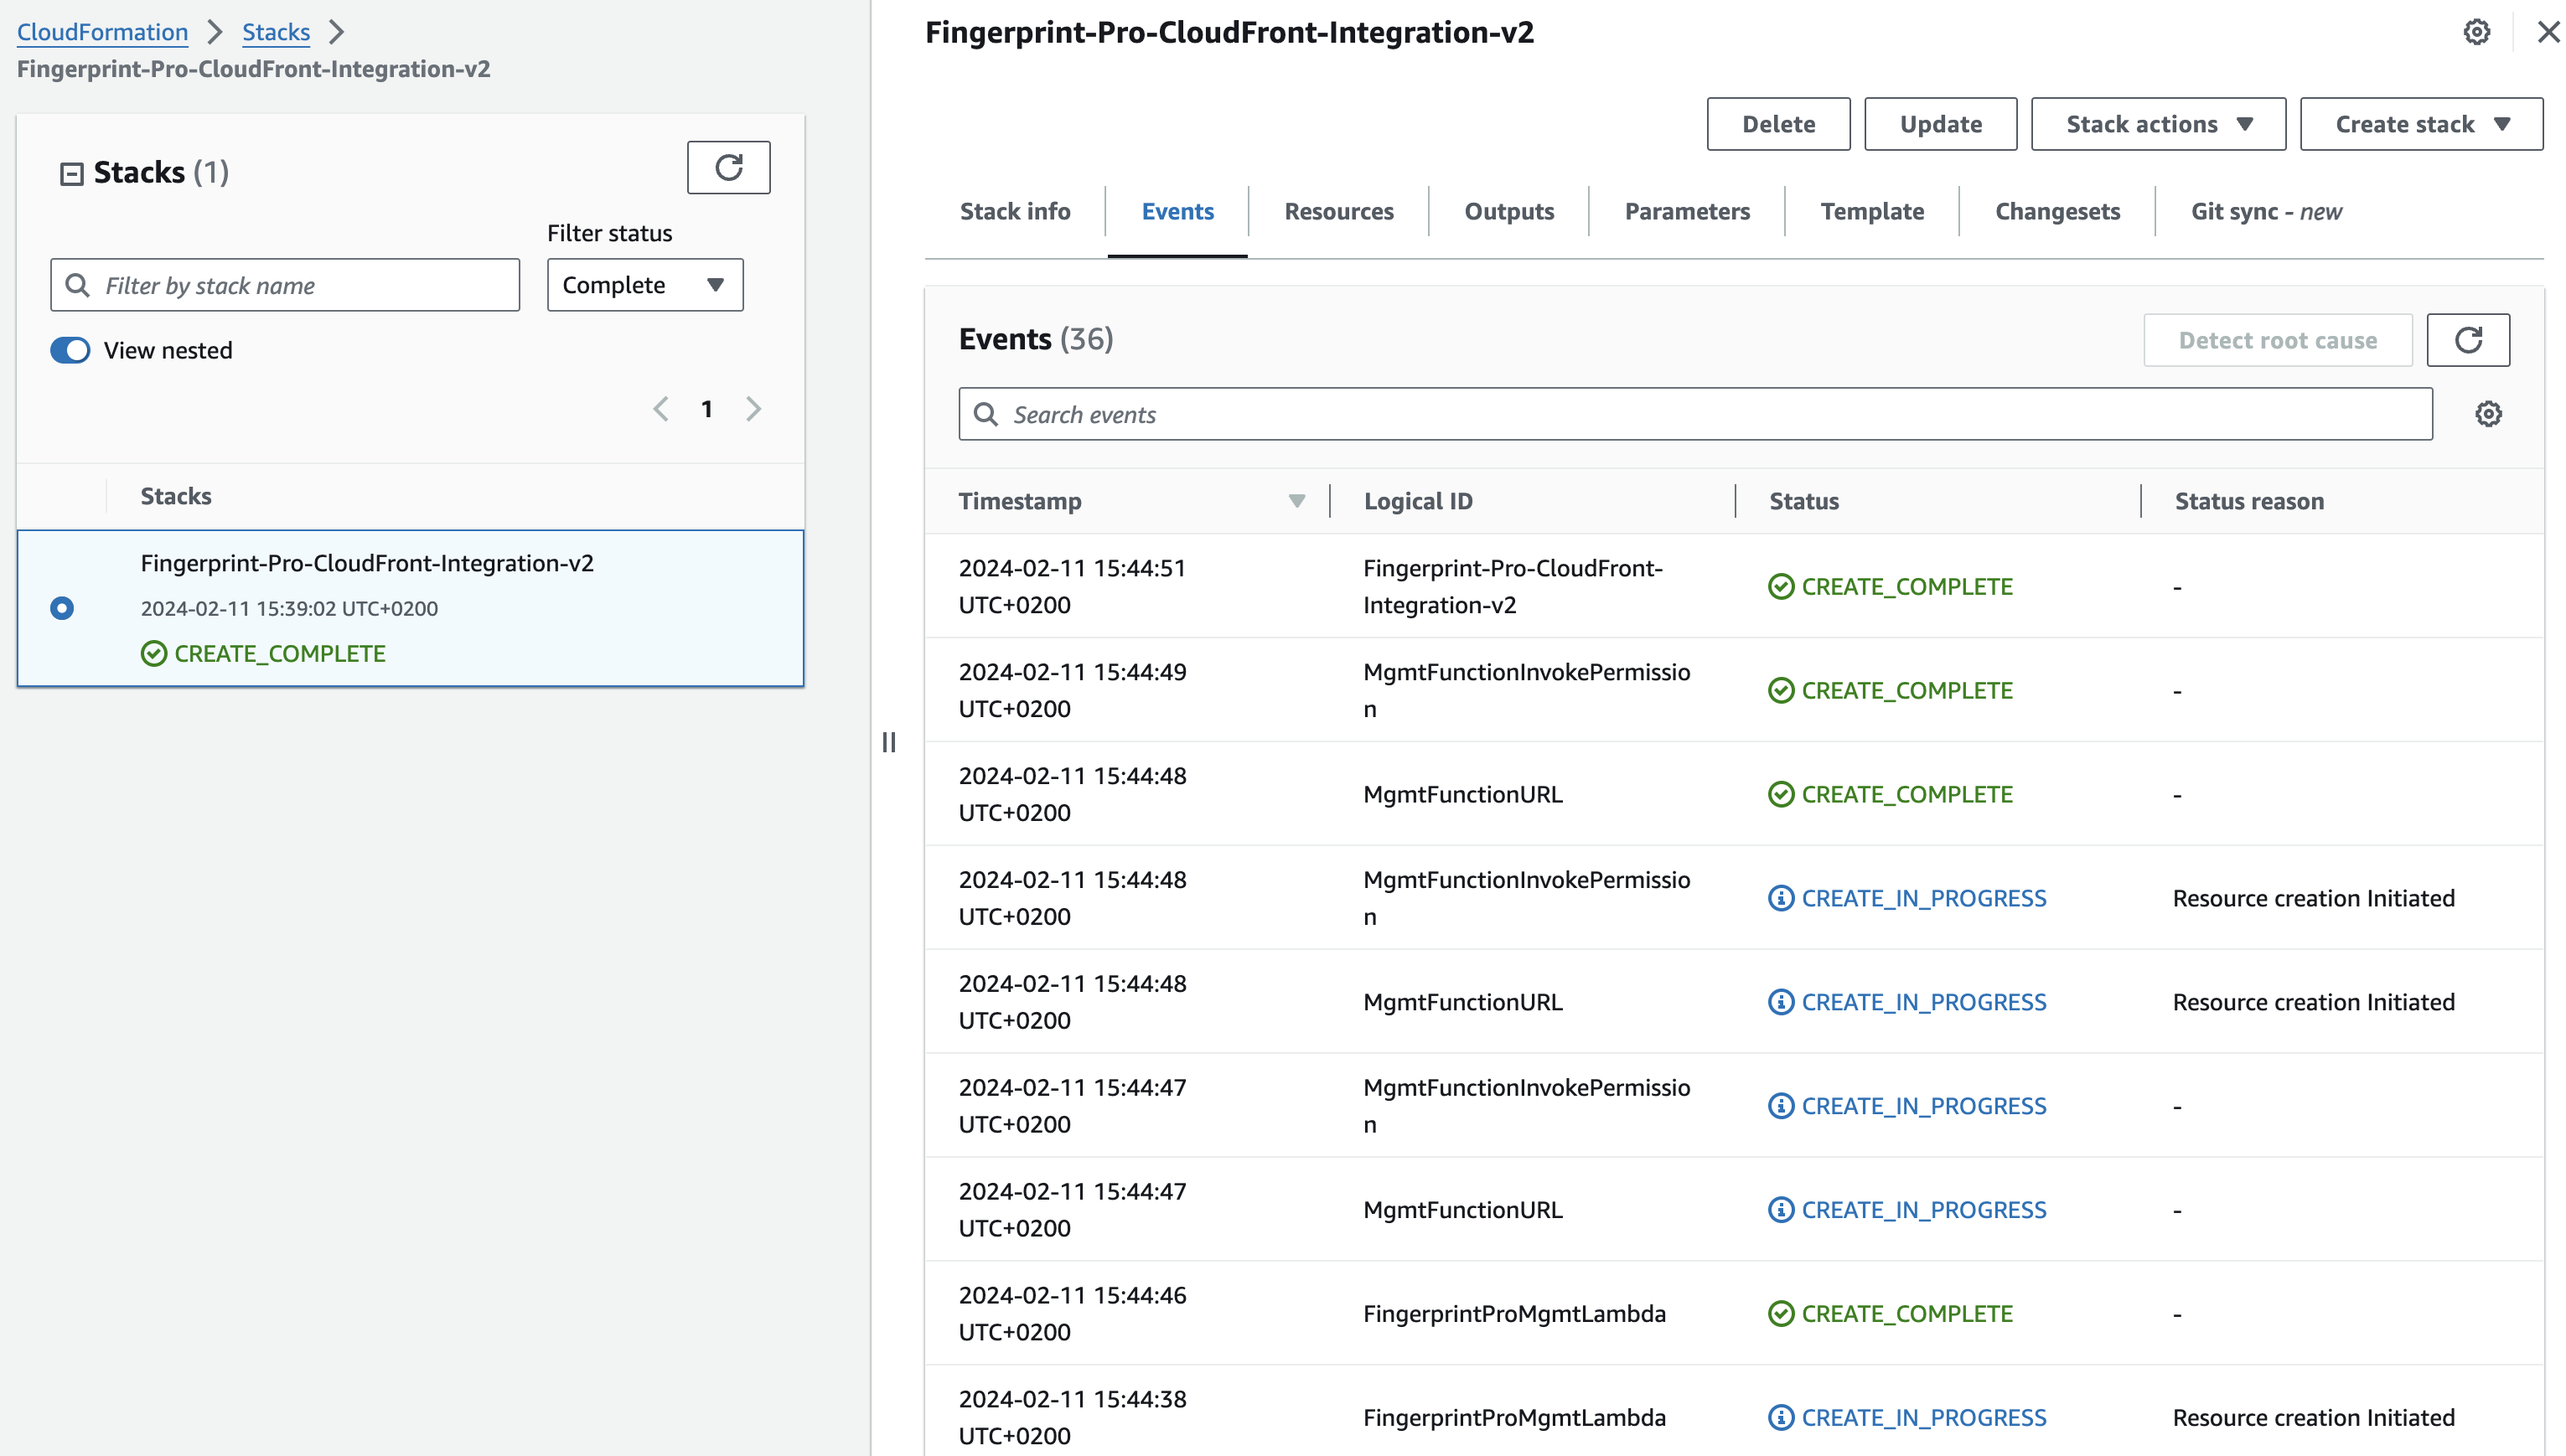 * The **Status** indicates the current state of deployment. It starts from `REVIEW_IN_PROGRESS` to `CREATE_IN_PROGRESS`, and finally `CREATE_COMPLETE`.
* If you see a different status (`CREATE_FAILED`, `ROLLBACK_IN_PROGRESS`, `ROLLBACK_COMPLETE`, etc), please contact our [support team](mailto:support@fingerprint.com).
Once the application is fully deployed (stack has the status `CREATE_COMPLETE`), you can switch to the **Outputs** tab, and find the names of created entities.
* The **Status** indicates the current state of deployment. It starts from `REVIEW_IN_PROGRESS` to `CREATE_IN_PROGRESS`, and finally `CREATE_COMPLETE`.
* If you see a different status (`CREATE_FAILED`, `ROLLBACK_IN_PROGRESS`, `ROLLBACK_COMPLETE`, etc), please contact our [support team](mailto:support@fingerprint.com).
Once the application is fully deployed (stack has the status `CREATE_COMPLETE`), you can switch to the **Outputs** tab, and find the names of created entities.
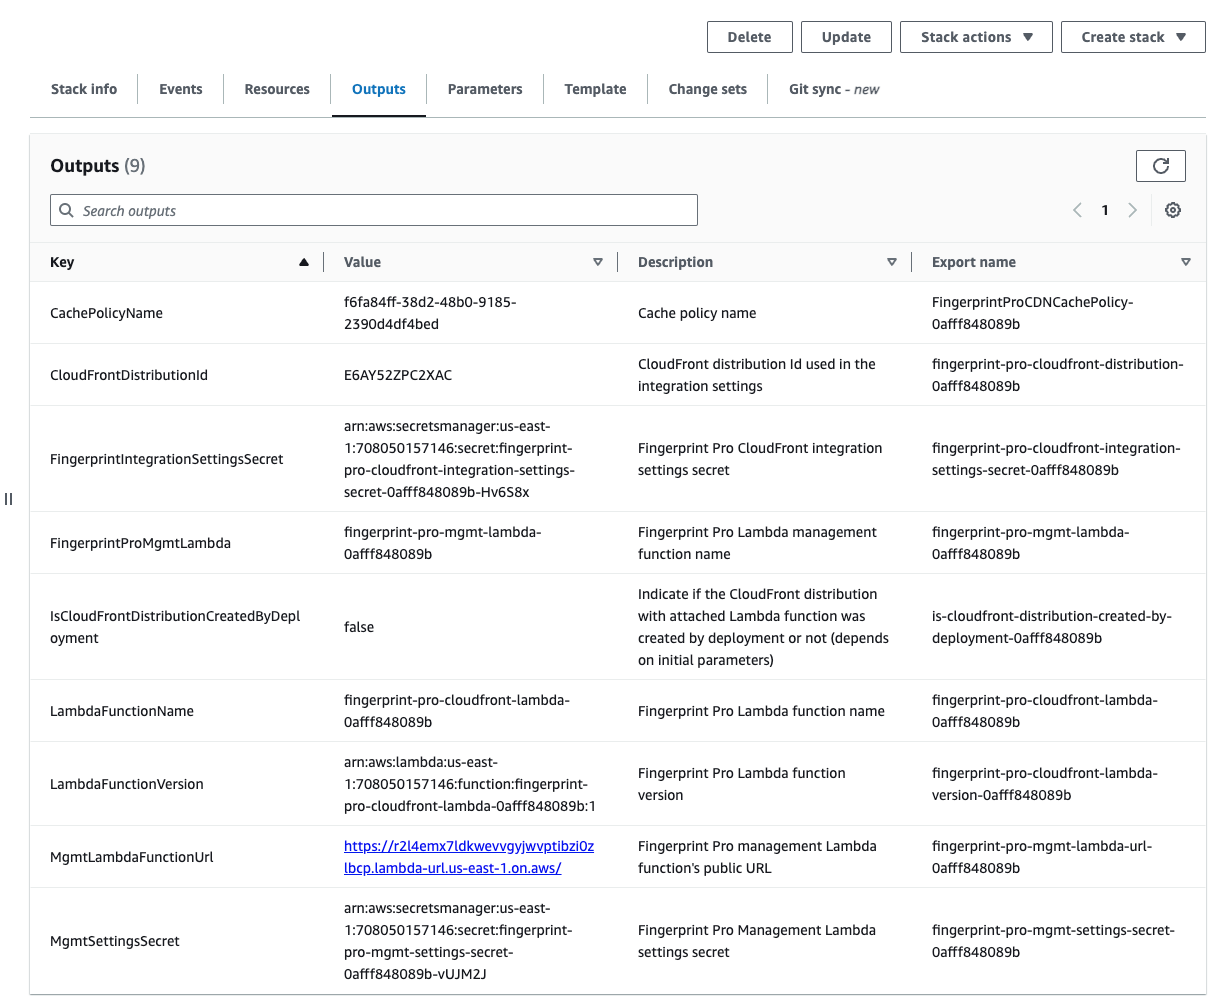 * The *Export name* of `LambdaFunctionName` is a unique name of the created Lambda proxy function.
* The *Export name* of `FingerprintProMgmtLambda` is a unique name of the created Management function responsible for delivering updates to the main Lambda proxy function.
* The *Value* of `CloudFrontDistributionId` is an internal ID of the CloudFront distribution created by the CloudFormation template or your existing CloudFront distribution that you specified in [Step 3.2.A](#a-use-an-existing-cloudfront-distribution-recommended).
* The *Export name* of `FingerprintIntegrationSettingsSecret` is the name of the AWS Secret for the Lambda proxy function. You can save this value somewhere. You might need it in [Step 4.1](#step-4-1-create-a-new-origin).
* The *Export name* of `CachePolicyName` is a unique name of the CloudFront cache policy, which will be applied in a cache behavior for Fingerprint requests. You can save this value somewhere. You might need it in [Step 4.2](#step-4-2-create-a-cache-behavior).
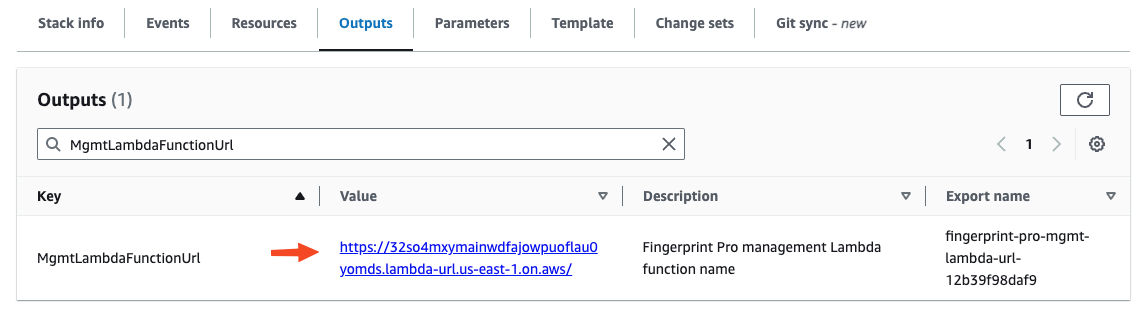
* The *Value* of `MgmtLambdaFunctionUrl` is a public URL of the management Lambda function. You can save this value somewhere. You will need it later to enable automatic updates for your integration in [Step 6](#step-6-enable-automatic-updates-in-the-fingerprint-dashboard).
**Do not disrupt the Management function**
The Management Lambda function (`FingerprintProMgmtLambda`) deployed alongside the main proxy function is responsible for updating the integration. It makes sure visitor identification on your website keeps up with new browser releases and fingerprinting evasion techniques. An outdated integration can lead to lower accuracy or break visitor identification completely. Don't disable or delete the management function.
## Step 4: Configure the CloudFront distribution
* If you are using an existing CloudFront distribution already serving your website (you have specified `DistributionId` in [Step 3.2.A](#a-use-an-existing-cloudfront-distribution-recommended)), start from [Step 4.1](#step-4-1-create-a-new-origin) to configure your distribution for the proxy integration.
* If you decided to create a new CloudFront distribution (you have left `DistributionId` empty in [Step 3.2.B](#b-create-a-new-cloudfront-distribution)), the CloudFormation template has deployed a new CloudFront distribution already pre-configured to serve the proxy integration.
1. Attach an alternate domain name and CNAME if you haven't specified it in [Step 3.2.B](#b-create-a-new-cloudfront-distribution).
2. Continue to [Step 5](#step-5-configure-the-fingerprint-javascript-agent-on-your-client).
### Step 4.1: Create a new origin
1. Go to your CloudFront distribution, switch to the **Origins** tab, and click **Create origin**.
2. Fill in the required fields:
1. Set **Origin domain** to `fpcdn.io`.
2. Set **Protocol** to `HTTPS only`.
3. Set **Minimum origin SSL protocol** to `TLSv1.2`.
4. Set **Name** to `fpcdn.io`.
5. Add a custom header:
* Set **Header name** to `FPJS_SECRET_NAME`
* Set **Value** to the *Export name* of `FingerprintIntegrationSettingsSecret` created in [Step 3.4](#step-3-4-review-and-create).
6. Finally, click **Create origin**.
### Step 4.2: Create a cache behavior
In this step, you will create a cache behavior to proxy requests to the Fingerprint API.
1. Go to your CloudFront distribution.
2. Switch to the **Behaviors** tab and click **Create behavior**.
3. Fill in the required fields:
1. Set **Path pattern** to a value that matches all routes under `FPJS_BEHAVIOR_PATH`. For example, if `FPJS_BEHAVIOR_PATH=random-path` fill in `random-path*`.
2. Set **Origin and origin groups** to `fpcdn.io`.
3. Set the **Viewer protocol policy** to `Redirect HTTP to HTTPS`.
4. Set the **Allowed HTTP methods** to `GET, HEAD, OPTIONS, PUT, POST, PATCH, DELETE`.
5. Set **Cache key and origin requests** to `Cache policy and origin request policy (recommended)`.
6. Set **Cache policy** to a *Custom* policy named `FingerprintProCDNCachePolicy-{id}`. You can find the name of your cache policy in *CloudFormation* > *Stacks* > \_*>\_Outputs* as the *Export name* of `CachePolicyName`.
7. Set **Origin request policy** to `AllViewer`.
8. Click **Create behavior**.
**Multi-segment behavior paths**
We recommend using **single** behavior path segments for simplicity, but it's possible to use more complex ones if needed.
For example:
```dotenv theme={"theme":"github-dark-dimmed"}
FPJS_BEHAVIOR_PATH="ore54guier/vbcnkxb654"
```
However, this requires adjustment of an additional custom header `FPJS_INTEGRATION_PATH_DEPTH` which describes the number of path segments in the behavior path:
1. Navigate back to your **fpcdn.io** origin.
2. Add an additional custom header:
* Set **Header name** to `FPJS_INTEGRATION_PATH_DEPTH`.
* Set **Value** to the number of path segments in the behavior path, in our example it's `2`.
```
Segment Segment
↓ ↓
ore54guier / vbcnkxb654 → 2 path segments
```
**Do not change the provided Cache Policy**
It is intentionally configured with the minimum TTL of `0`. Misconfiguring the policy could disrupt visitor identification and increase false positives (assigning the same visitor ID to different browsers).
### Step 4.3: Attach the Lambda function to the cache behavior
1. Go to **CloudFormation** > **Stacks** and open your newly created stack (named *Fingerprint-Pro-Cloudfront-Integration-v2* by default).
2. Switch to the **Resources** tab, find the resource with the **Logical ID** of `FingerprintProCloudFrontLambda` and click the link in the corresponding **Physical ID** column.
* The *Export name* of `LambdaFunctionName` is a unique name of the created Lambda proxy function.
* The *Export name* of `FingerprintProMgmtLambda` is a unique name of the created Management function responsible for delivering updates to the main Lambda proxy function.
* The *Value* of `CloudFrontDistributionId` is an internal ID of the CloudFront distribution created by the CloudFormation template or your existing CloudFront distribution that you specified in [Step 3.2.A](#a-use-an-existing-cloudfront-distribution-recommended).
* The *Export name* of `FingerprintIntegrationSettingsSecret` is the name of the AWS Secret for the Lambda proxy function. You can save this value somewhere. You might need it in [Step 4.1](#step-4-1-create-a-new-origin).
* The *Export name* of `CachePolicyName` is a unique name of the CloudFront cache policy, which will be applied in a cache behavior for Fingerprint requests. You can save this value somewhere. You might need it in [Step 4.2](#step-4-2-create-a-cache-behavior).
* The *Value* of `MgmtLambdaFunctionUrl` is a public URL of the management Lambda function. You can save this value somewhere. You will need it later to enable automatic updates for your integration in [Step 6](#step-6-enable-automatic-updates-in-the-fingerprint-dashboard).
**Do not disrupt the Management function**
The Management Lambda function (`FingerprintProMgmtLambda`) deployed alongside the main proxy function is responsible for updating the integration. It makes sure visitor identification on your website keeps up with new browser releases and fingerprinting evasion techniques. An outdated integration can lead to lower accuracy or break visitor identification completely. Don't disable or delete the management function.
## Step 4: Configure the CloudFront distribution
* If you are using an existing CloudFront distribution already serving your website (you have specified `DistributionId` in [Step 3.2.A](#a-use-an-existing-cloudfront-distribution-recommended)), start from [Step 4.1](#step-4-1-create-a-new-origin) to configure your distribution for the proxy integration.
* If you decided to create a new CloudFront distribution (you have left `DistributionId` empty in [Step 3.2.B](#b-create-a-new-cloudfront-distribution)), the CloudFormation template has deployed a new CloudFront distribution already pre-configured to serve the proxy integration.
1. Attach an alternate domain name and CNAME if you haven't specified it in [Step 3.2.B](#b-create-a-new-cloudfront-distribution).
2. Continue to [Step 5](#step-5-configure-the-fingerprint-javascript-agent-on-your-client).
### Step 4.1: Create a new origin
1. Go to your CloudFront distribution, switch to the **Origins** tab, and click **Create origin**.
2. Fill in the required fields:
1. Set **Origin domain** to `fpcdn.io`.
2. Set **Protocol** to `HTTPS only`.
3. Set **Minimum origin SSL protocol** to `TLSv1.2`.
4. Set **Name** to `fpcdn.io`.
5. Add a custom header:
* Set **Header name** to `FPJS_SECRET_NAME`
* Set **Value** to the *Export name* of `FingerprintIntegrationSettingsSecret` created in [Step 3.4](#step-3-4-review-and-create).
6. Finally, click **Create origin**.
### Step 4.2: Create a cache behavior
In this step, you will create a cache behavior to proxy requests to the Fingerprint API.
1. Go to your CloudFront distribution.
2. Switch to the **Behaviors** tab and click **Create behavior**.
3. Fill in the required fields:
1. Set **Path pattern** to a value that matches all routes under `FPJS_BEHAVIOR_PATH`. For example, if `FPJS_BEHAVIOR_PATH=random-path` fill in `random-path*`.
2. Set **Origin and origin groups** to `fpcdn.io`.
3. Set the **Viewer protocol policy** to `Redirect HTTP to HTTPS`.
4. Set the **Allowed HTTP methods** to `GET, HEAD, OPTIONS, PUT, POST, PATCH, DELETE`.
5. Set **Cache key and origin requests** to `Cache policy and origin request policy (recommended)`.
6. Set **Cache policy** to a *Custom* policy named `FingerprintProCDNCachePolicy-{id}`. You can find the name of your cache policy in *CloudFormation* > *Stacks* > \_*>\_Outputs* as the *Export name* of `CachePolicyName`.
7. Set **Origin request policy** to `AllViewer`.
8. Click **Create behavior**.
**Multi-segment behavior paths**
We recommend using **single** behavior path segments for simplicity, but it's possible to use more complex ones if needed.
For example:
```dotenv theme={"theme":"github-dark-dimmed"}
FPJS_BEHAVIOR_PATH="ore54guier/vbcnkxb654"
```
However, this requires adjustment of an additional custom header `FPJS_INTEGRATION_PATH_DEPTH` which describes the number of path segments in the behavior path:
1. Navigate back to your **fpcdn.io** origin.
2. Add an additional custom header:
* Set **Header name** to `FPJS_INTEGRATION_PATH_DEPTH`.
* Set **Value** to the number of path segments in the behavior path, in our example it's `2`.
```
Segment Segment
↓ ↓
ore54guier / vbcnkxb654 → 2 path segments
```
**Do not change the provided Cache Policy**
It is intentionally configured with the minimum TTL of `0`. Misconfiguring the policy could disrupt visitor identification and increase false positives (assigning the same visitor ID to different browsers).
### Step 4.3: Attach the Lambda function to the cache behavior
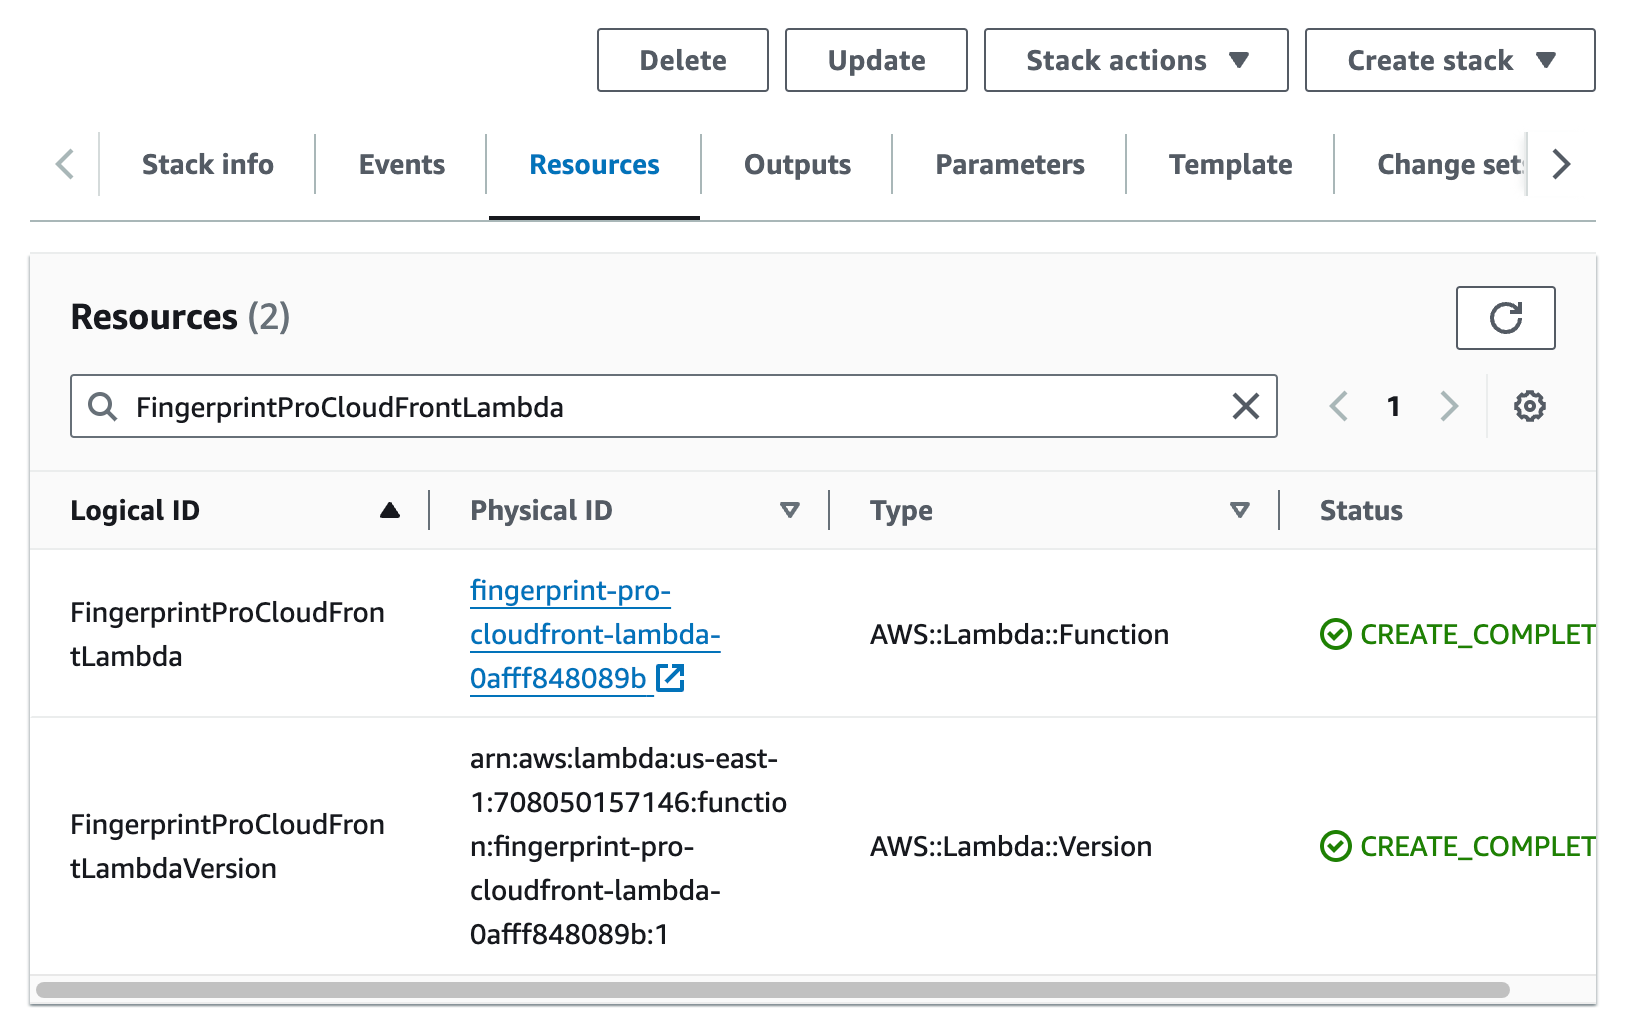
1. Go to **CloudFormation** > **Stacks** and open your newly created stack (named *Fingerprint-Pro-Cloudfront-Integration-v2* by default).
2. Switch to the **Resources** tab, find the resource with the **Logical ID** of `FingerprintProCloudFrontLambda` and click the link in the corresponding **Physical ID** column.
 3. Scroll down and switch to the **Configuration** tab.
4. On the left, click **Triggers**, then click **Add trigger**.
5. Select `CloudFront` as the source and click **Deploy to Lambda\@Edge**.
3. Scroll down and switch to the **Configuration** tab.
4. On the left, click **Triggers**, then click **Add trigger**.
5. Select `CloudFront` as the source and click **Deploy to Lambda\@Edge**.
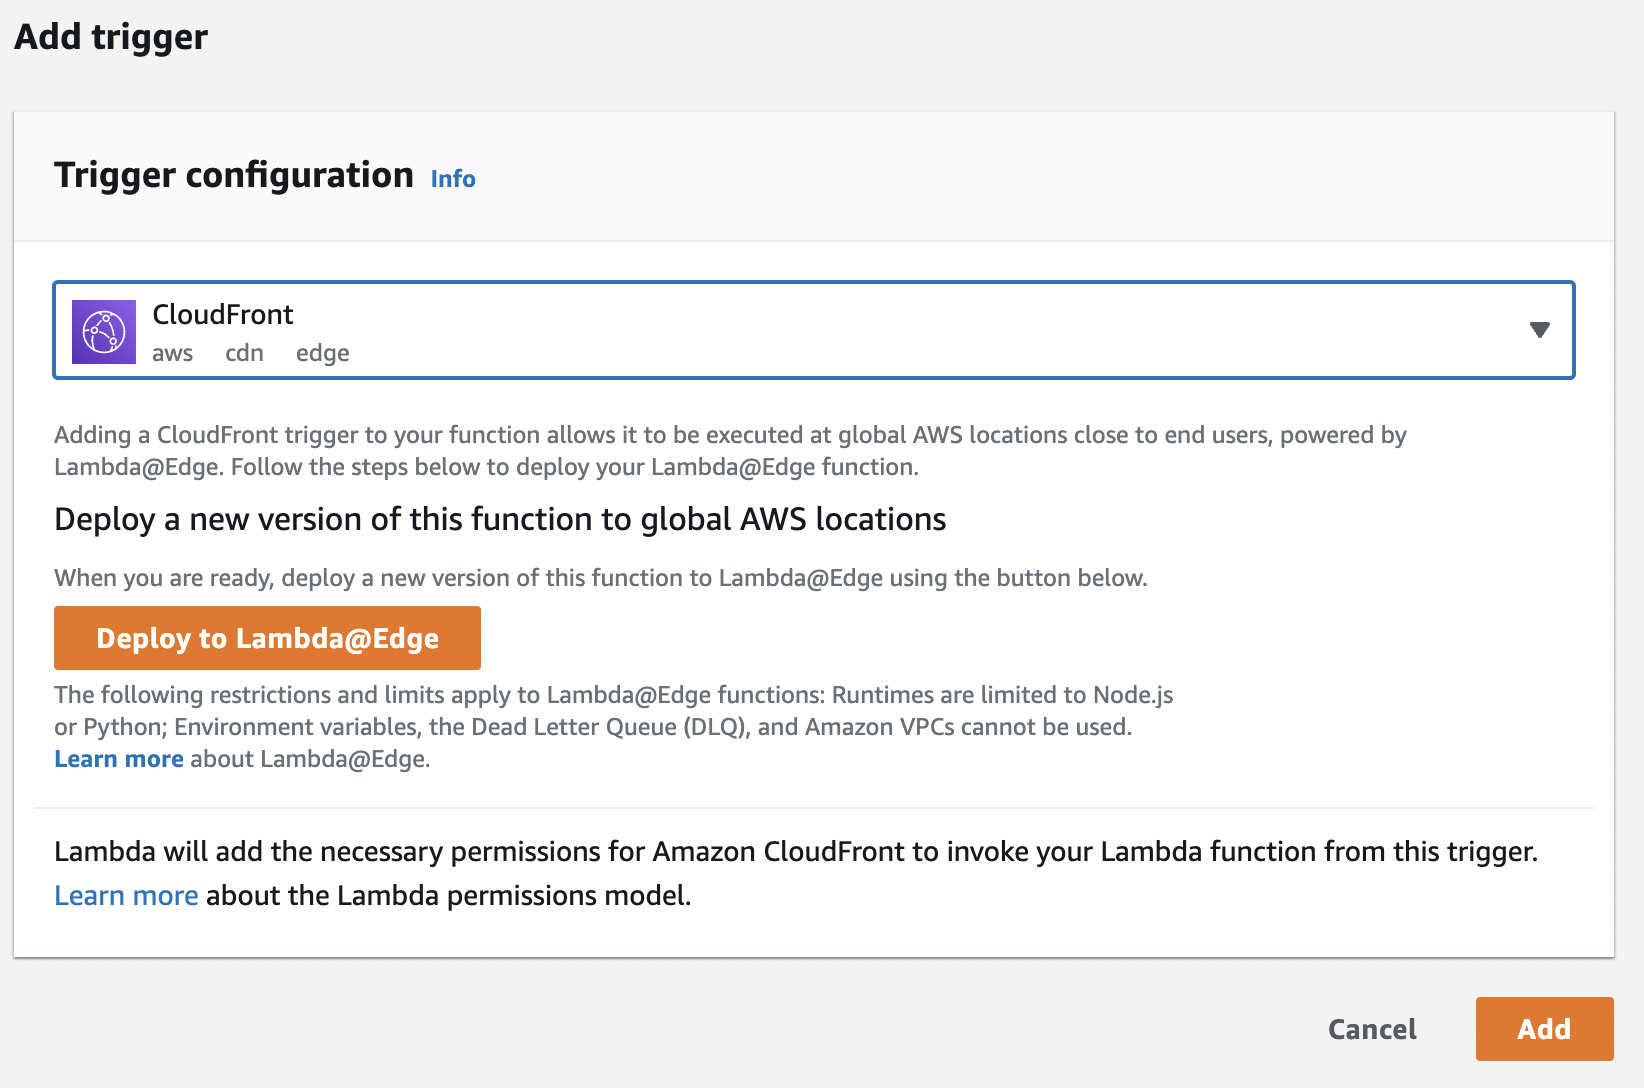 6. Select **Configure new CloudFront trigger.**
1. Select your distribution.
2. Select the cache behavior you created in the previous step.
3. Set **CloudFront event** to `Origin Request`.
4. Check **Include body**.
5. Check **Confirm deploy to Lambda\@Edge**.
6. Click **Deploy**.
It may take several minutes to add the trigger to the CloudFront distribution. To monitor the progress, go to your CloudFront distribution, switch to the **General** tab, and check the **Last modified** time.
## Step 5: Configure the Fingerprint JavaScript agent on your client
Use the path variables created in [Step 2](/docs/cloudfront-proxy-integration-v2#step-2-create-path-variable) to construct the `endpoints` URL.
If your website and the proxy integration are behind the same CloudFront distribution (you chose [Step 3.2.A](#a-use-an-existing-cloudfront-distribution-recommended)), the JavaScript Agent configuration will use randomized paths inside your domain, for example:
```javascript NPM package theme={"theme":"github-dark-dimmed"}
import * as Fingerprint from '@fingerprint/agent'
// Initialize the agent at application startup.
const fp = Fingerprint.start({
apiKey: 'PUBLIC_API_KEY',
endpoints: 'https://yourwebsite.com/FPJS_BEHAVIOR_PATH/?region=us',
region: 'us',
});
```
```javascript CDN theme={"theme":"github-dark-dimmed"}
const url = 'https://yourwebsite.com/FPJS_BEHAVIOR_PATH/web/v4/PUBLIC_API_KEY';
const fpPromise = import(url)
.then(Fingerprint => Fingerprint.start({
endpoints: 'https://yourwebsite.com/FPJS_BEHAVIOR_PATH/?region=us',
region: 'us',
}));
```
If you set up a separate CloudFront distribution on your subdomain according to [Step 3.2.B](#b-create-a-new-cloudfront-distribution), the JavaScript Agent configuration will use that subdomain to interact with Fingerprint, for example:
```javascript NPM package theme={"theme":"github-dark-dimmed"}
import * as Fingerprint from '@fingerprint/agent'
// Initialize the agent at application startup.
const fp = Fingerprint.start({
apiKey: 'PUBLIC_API_KEY',
endpoints: 'https://metrics.yourwebsite.com/FPJS_BEHAVIOR_PATH/?region=us',
region: 'us',
});
```
```javascript CDN theme={"theme":"github-dark-dimmed"}
const url = 'https://metrics.yourwebsite.com/FPJS_BEHAVIOR_PATH/web/v4/PUBLIC_API_KEY';
const fpPromise = import(url)
.then(Fingerprint => Fingerprint.start({
endpoints: 'https://metrics.yourwebsite.com/FPJS_BEHAVIOR_PATH/?region=us',
region: 'us',
}));
```
**Parameter URL nuances:** Pass the region to the `endpoints` parameter in the following format:
`?region=eu`. The value needs to reflect the [region](/docs/regions) of your application.
If everything is configured correctly, you should receive data through your CloudFront distribution successfully.
## Step 6: Enable automatic updates in the Fingerprint Dashboard
Keeping the integration up to date is crucial for maintaining maximum identification accuracy. To enable automatic updates, provide the following Management function settings from AWS to the Fingerprint dashboard:
* The public URL of the Management function.
* An authentication token for the Management function.
When a new version of the proxy integration is available, Fingerprint will trigger an update by sending a request to the Management function URL, authenticated with the provided token. The token has only the permissions necessary for this purpose. You can verify the granted permissions in the Management function's Execution role (Stack > Resources > `FpMgmtLambdaFunctionExecutionRole`).
Note: Only users with the **Owner** or **Admin** role assigned can enable automatic updates for
the integration in the Dashboard.
### Step 6.1: Find the Management function details in AWS
1. Go to **CloudFormation** > [**Stacks**](https://us-east-1.console.aws.amazon.com/cloudformation/home?region=us-east-1#/stacks/) and open your newly created stack (named *Fingerprint-Pro-Cloudfront-Integration-v2* by default).
2. Switch to the **Outputs** tab. The *Value* of `MgmtLambdaFunctionUrl` is a public URL of your Management Lambda function. Save it somewhere.
6. Select **Configure new CloudFront trigger.**
1. Select your distribution.
2. Select the cache behavior you created in the previous step.
3. Set **CloudFront event** to `Origin Request`.
4. Check **Include body**.
5. Check **Confirm deploy to Lambda\@Edge**.
6. Click **Deploy**.
It may take several minutes to add the trigger to the CloudFront distribution. To monitor the progress, go to your CloudFront distribution, switch to the **General** tab, and check the **Last modified** time.
## Step 5: Configure the Fingerprint JavaScript agent on your client
Use the path variables created in [Step 2](/docs/cloudfront-proxy-integration-v2#step-2-create-path-variable) to construct the `endpoints` URL.
If your website and the proxy integration are behind the same CloudFront distribution (you chose [Step 3.2.A](#a-use-an-existing-cloudfront-distribution-recommended)), the JavaScript Agent configuration will use randomized paths inside your domain, for example:
```javascript NPM package theme={"theme":"github-dark-dimmed"}
import * as Fingerprint from '@fingerprint/agent'
// Initialize the agent at application startup.
const fp = Fingerprint.start({
apiKey: 'PUBLIC_API_KEY',
endpoints: 'https://yourwebsite.com/FPJS_BEHAVIOR_PATH/?region=us',
region: 'us',
});
```
```javascript CDN theme={"theme":"github-dark-dimmed"}
const url = 'https://yourwebsite.com/FPJS_BEHAVIOR_PATH/web/v4/PUBLIC_API_KEY';
const fpPromise = import(url)
.then(Fingerprint => Fingerprint.start({
endpoints: 'https://yourwebsite.com/FPJS_BEHAVIOR_PATH/?region=us',
region: 'us',
}));
```
If you set up a separate CloudFront distribution on your subdomain according to [Step 3.2.B](#b-create-a-new-cloudfront-distribution), the JavaScript Agent configuration will use that subdomain to interact with Fingerprint, for example:
```javascript NPM package theme={"theme":"github-dark-dimmed"}
import * as Fingerprint from '@fingerprint/agent'
// Initialize the agent at application startup.
const fp = Fingerprint.start({
apiKey: 'PUBLIC_API_KEY',
endpoints: 'https://metrics.yourwebsite.com/FPJS_BEHAVIOR_PATH/?region=us',
region: 'us',
});
```
```javascript CDN theme={"theme":"github-dark-dimmed"}
const url = 'https://metrics.yourwebsite.com/FPJS_BEHAVIOR_PATH/web/v4/PUBLIC_API_KEY';
const fpPromise = import(url)
.then(Fingerprint => Fingerprint.start({
endpoints: 'https://metrics.yourwebsite.com/FPJS_BEHAVIOR_PATH/?region=us',
region: 'us',
}));
```
**Parameter URL nuances:** Pass the region to the `endpoints` parameter in the following format:
`?region=eu`. The value needs to reflect the [region](/docs/regions) of your application.
If everything is configured correctly, you should receive data through your CloudFront distribution successfully.
## Step 6: Enable automatic updates in the Fingerprint Dashboard
Keeping the integration up to date is crucial for maintaining maximum identification accuracy. To enable automatic updates, provide the following Management function settings from AWS to the Fingerprint dashboard:
* The public URL of the Management function.
* An authentication token for the Management function.
When a new version of the proxy integration is available, Fingerprint will trigger an update by sending a request to the Management function URL, authenticated with the provided token. The token has only the permissions necessary for this purpose. You can verify the granted permissions in the Management function's Execution role (Stack > Resources > `FpMgmtLambdaFunctionExecutionRole`).
Note: Only users with the **Owner** or **Admin** role assigned can enable automatic updates for
the integration in the Dashboard.
### Step 6.1: Find the Management function details in AWS
1. Go to **CloudFormation** > [**Stacks**](https://us-east-1.console.aws.amazon.com/cloudformation/home?region=us-east-1#/stacks/) and open your newly created stack (named *Fingerprint-Pro-Cloudfront-Integration-v2* by default).
2. Switch to the **Outputs** tab. The *Value* of `MgmtLambdaFunctionUrl` is a public URL of your Management Lambda function. Save it somewhere.
 3. Switch to the **Resources** tab. Click the *Physical ID* of the `MgmtSettingsSecret`.
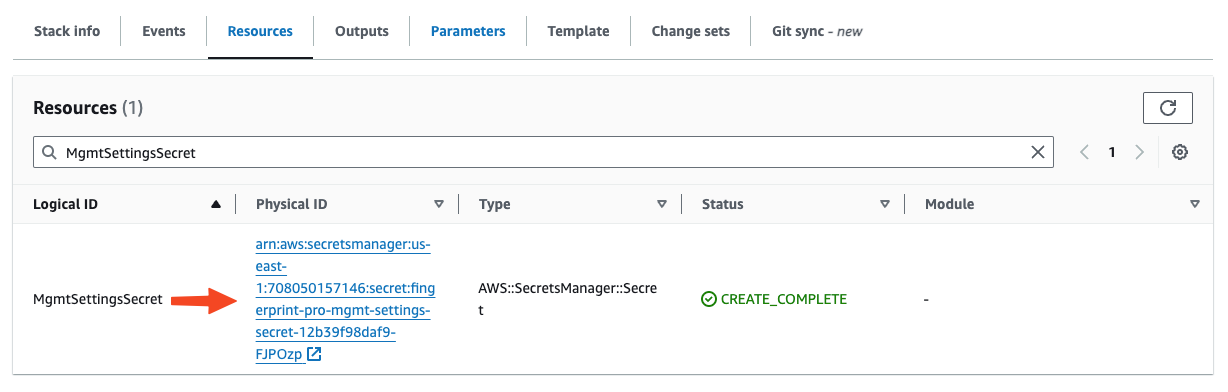 4. Inside the secret page, click **Retrieve secret value** and copy the token value. This is the authentication token for the Management Lambda function. Save it somewhere.
### Step 6.2: Provide the Management function details to the Fingerprint Dashboard
1. Go to **Dashboard** > [**SDKs & integrations**](https://dashboard.fingerprint.com/integrations) > **AWS CloudFront**.
2. If you have multiple environments in your workspace, select the environment scope you want to enable updates for in the top navigation bar. It should be the same environment scope that you used to [create the integration's proxy secret](/docs/cloudfront-proxy-integration-v2#step-1-issue-a-proxy-secret).
3. Click **Enable updates**.
4. Fill in the values of **CloudFront Management Lambda URL** and **Authentication Token** that you retrieved in Step 6.1.
5. Click **Save Changes**.
4. Inside the secret page, click **Retrieve secret value** and copy the token value. This is the authentication token for the Management Lambda function. Save it somewhere.
### Step 6.2: Provide the Management function details to the Fingerprint Dashboard
1. Go to **Dashboard** > [**SDKs & integrations**](https://dashboard.fingerprint.com/integrations) > **AWS CloudFront**.
2. If you have multiple environments in your workspace, select the environment scope you want to enable updates for in the top navigation bar. It should be the same environment scope that you used to [create the integration's proxy secret](/docs/cloudfront-proxy-integration-v2#step-1-issue-a-proxy-secret).
3. Click **Enable updates**.
4. Fill in the values of **CloudFront Management Lambda URL** and **Authentication Token** that you retrieved in Step 6.1.
5. Click **Save Changes**.
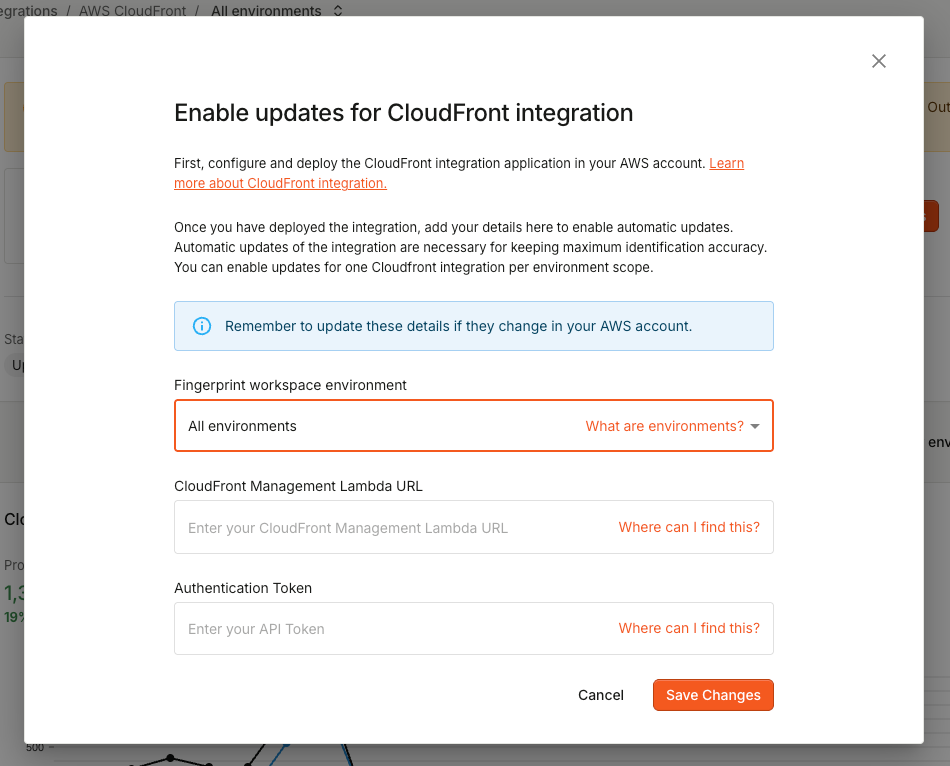 The integration page will show **Status: Updates enabled** and Fingerprint will automatically keep your integration up to date.
## Troubleshooting
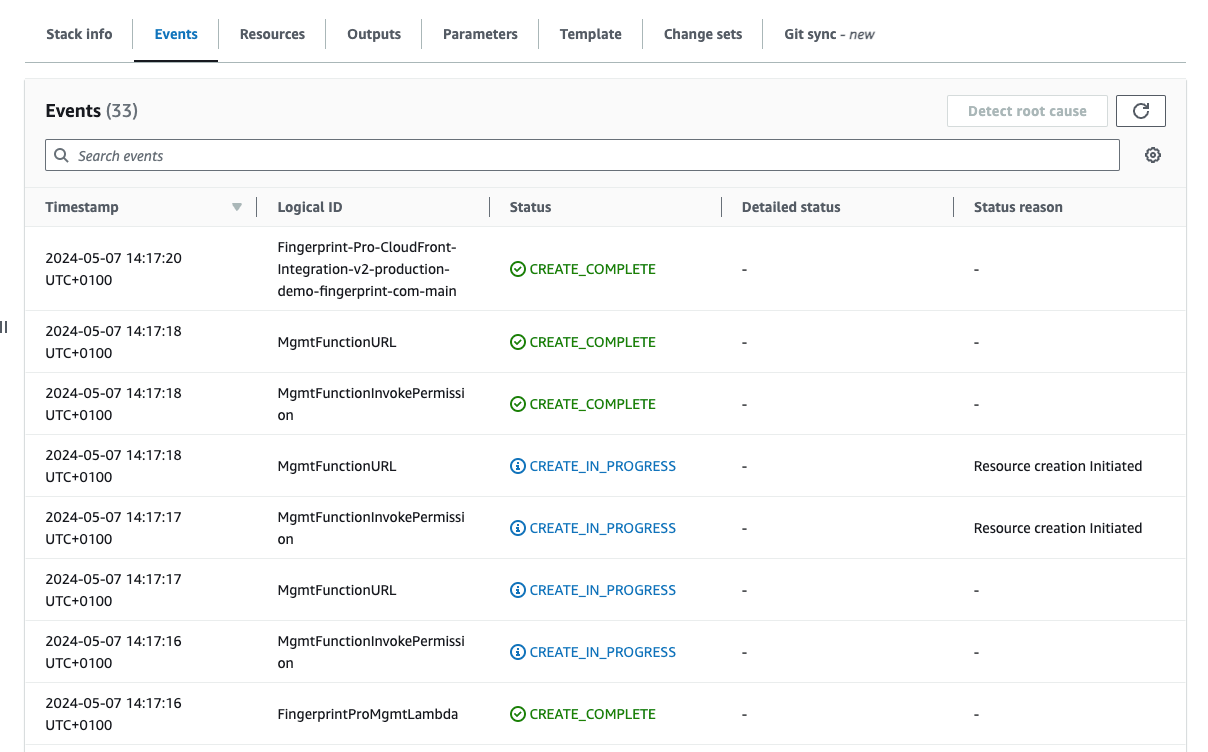
If you run into problems, please provide our support team with the following information:
1. Open the integration CloudFormation stack.
2. Go to the **Events** tab, and copy the contents of the **Status reason** column for any failed statuses.
The integration page will show **Status: Updates enabled** and Fingerprint will automatically keep your integration up to date.
## Troubleshooting
If you run into problems, please provide our support team with the following information:
1. Open the integration CloudFormation stack.
2. Go to the **Events** tab, and copy the contents of the **Status reason** column for any failed statuses.
 ## What's next
To learn more about calculating AWS costs and monitoring your CloudFront integration, go back to the [general CloudFront Proxy Integration guide](/docs/cloudfront-proxy-integration-v2#monitoring-and-managing-the-integration).
## What's next
To learn more about calculating AWS costs and monitoring your CloudFront integration, go back to the [general CloudFront Proxy Integration guide](/docs/cloudfront-proxy-integration-v2#monitoring-and-managing-the-integration).