> ## Documentation Index
> Fetch the complete documentation index at: https://docs.fingerprint.com/llms.txt
> Use this file to discover all available pages before exploring further.
# Flow deployments on Cloudflare (Beta)
> Deploy Fingerprint identification and protection to the edge without touching your application's code.
**Feature in Beta**
This feature is currently in an open Beta testing phase. We recommend testing it inside an isolated staging environment. All feedback is welcome! If you encounter any issues, please [contact](https://fingerprint.com/support/) our support team.
**Pre-requisites**
* A Fingerprint account with an **Admin** role.
* A website [proxied](https://developers.cloudflare.com/dns/proxy-status/) (not DNS-only) through Cloudflare.
**Flow** is a no-code Fingerprint deployment method, currently supported for websites hosted on **Cloudflare**.
The Flow worker sits between the browser accessing your website and the origin server. It automatically handles all the steps required to identify visitors on your website and protect sensitive actions:
* It injects the JavaScript agent into the pages you define.
* For the API endpoints you define, it triggers visitor identification. Optionally, it can protect those endpoints using the Rules engine.
* Requests are naturally same-site, no need for a separate proxy integration to deal with ad blockers.
For a more detailed conceptual overview, see [How Cloudflare Flow deployments work](#how-cloudflare-flow-deployments-work).
There are two ways to use Flow workers:
* [**In combination with the Rules engine (Protection mode)**](#using-a-flow-worker-with-the-rules-engine)
* [**On its own (Monitoring mode)**](#using-a-flow-worker-on-its-own-monitoring-mode)
## Using a Flow worker with the Rules Engine
The Rules Engine allows you to define rules evaluated against the Fingerprint identification events. For example, you can define a ruleset that prevents browsers in incognito mode from creating accounts in your application. See [Rules engine](/docs/rules-engine) for more details.
One way of using the ruleset is by deploying it using a Flow worker. For example, you can protect the `POST api.yourwebsite.com/create-account` API, called from the `yourwebsite.com/signup` page.
You cannot protect the signup page itself, only the API endpoint it calls. Calling the protected API endpoint from the identification page is necessary to trigger visitor identification.
1. Open your ruleset and switch to the **Settings** tab.
2. Under **Deployment**, click **Deploy with Cloudflare**.
3. Enter your **Cloudflare Account ID**, your Cloudflare **Token**, and click **Validate**.
1. You can get your Cloudflare Account ID from the [Cloudflare Dashboard -> Workers and Pages](https://dash.cloudflare.com/?to=/:account/workers-and-pages), on the bottom right corner of the page.
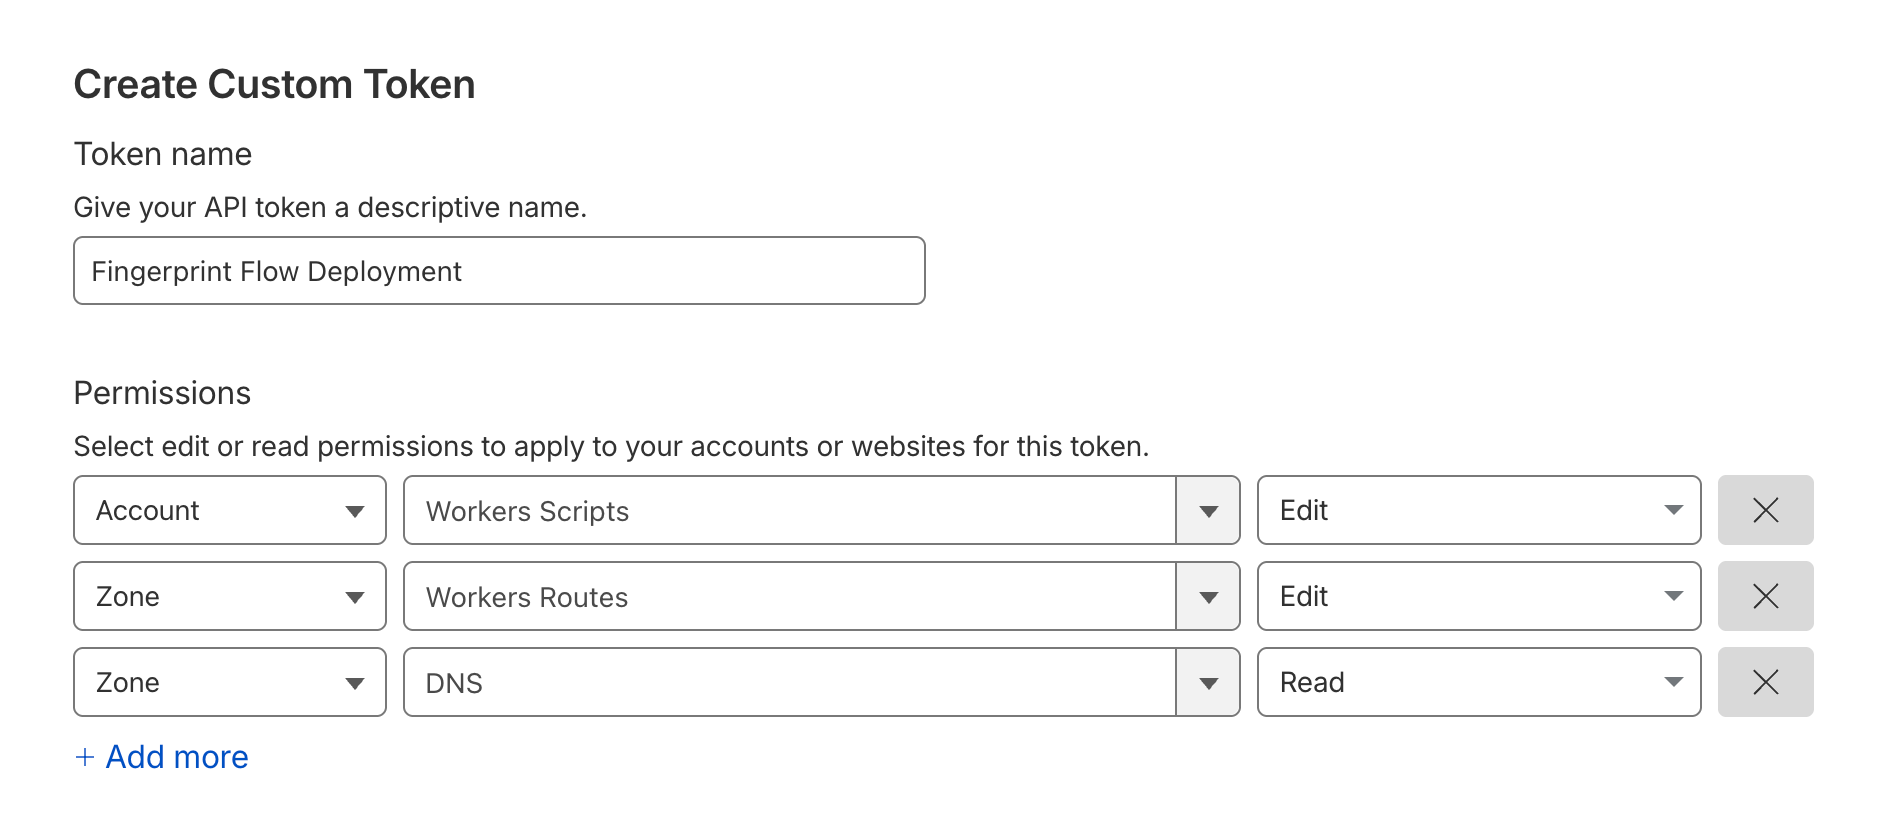
2. You need to get or create a Cloudflare token with the following permissions. [Click here to create a Cloudflare token from a pre-filled template](https://dash.cloudflare.com/profile/api-tokens?permissionGroupKeys=%5B%7B%22key%22%3A%22dns%22%2C%22type%22%3A%22read%22%7D%2C%7B%22key%22%3A%22workers_routes%22%2C%22type%22%3A%22edit%22%7D%2C%7B%22key%22%3A%22workers_scripts%22%2C%22type%22%3A%22edit%22%7D%5D\&name=fingerprint.com+flow+worker+deployment\&accountId=*\&zoneId=all):
1. `Account:Workers Scripts:Edit`
2. `Zone:Workers Routes:Edit` for the zone the worker will use
3. `Zone:DNS:Read` for the zone you want to deploy to
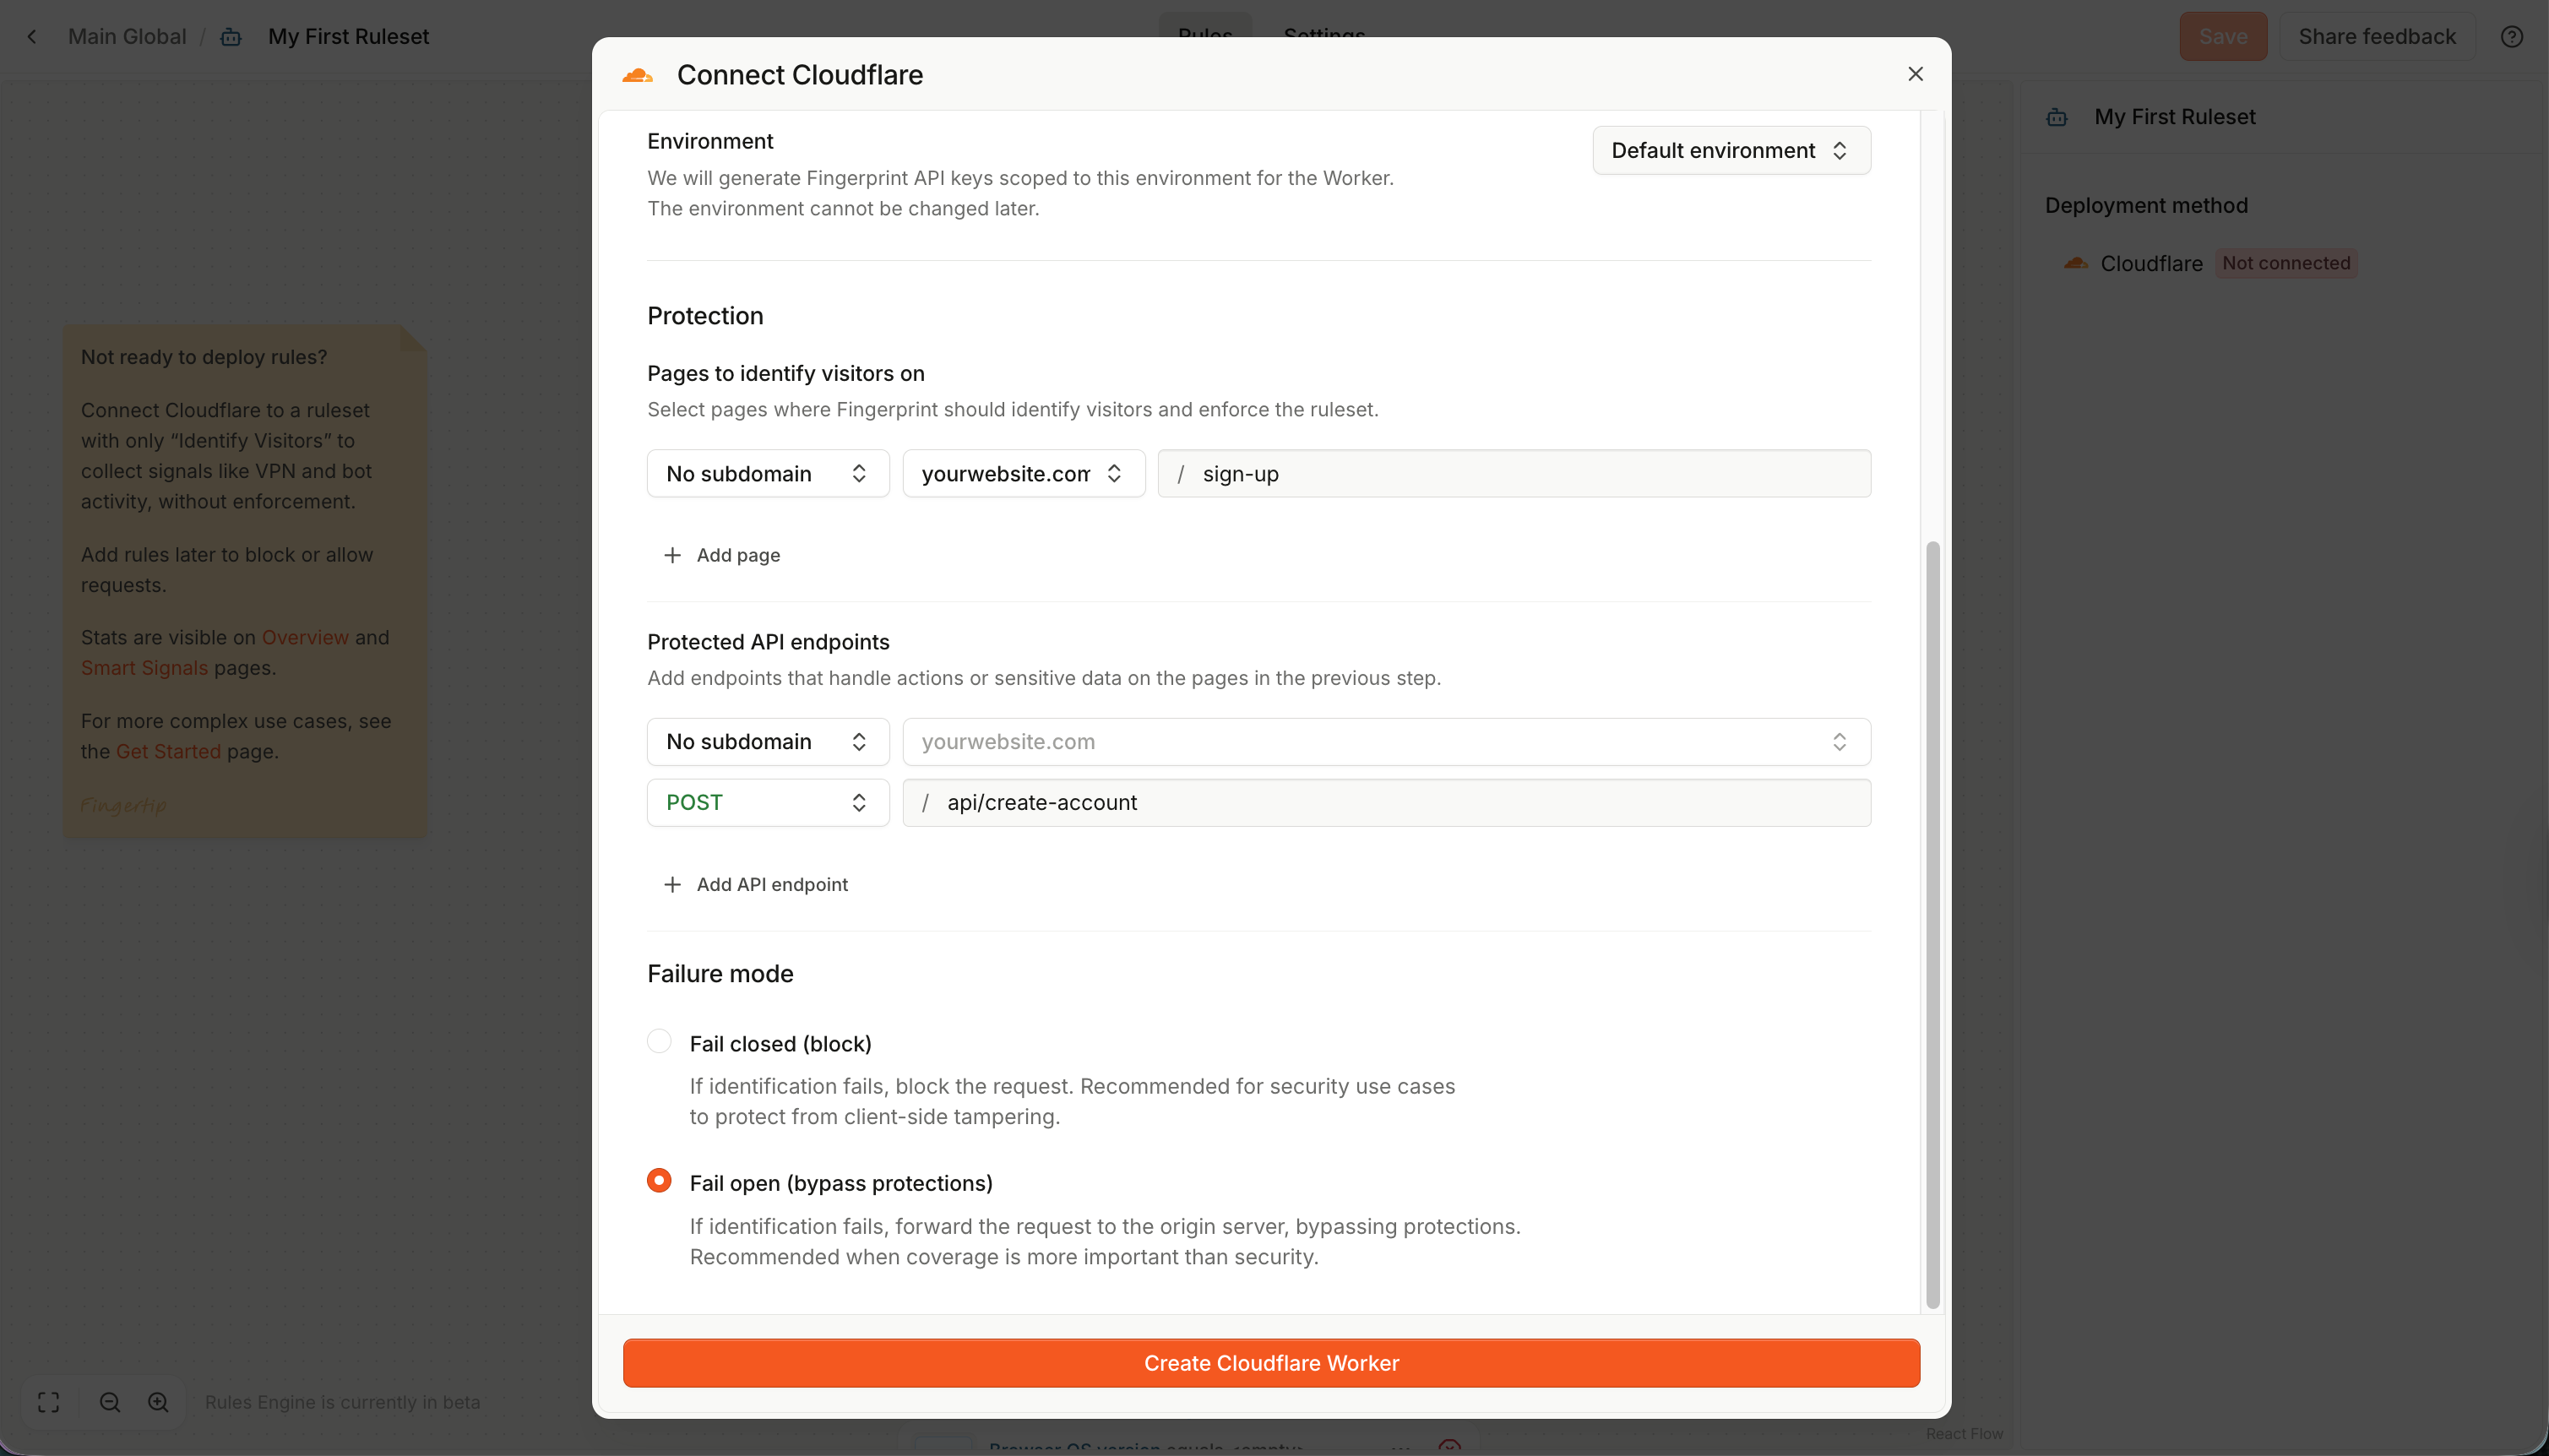
 4. Pick the [environment](/docs/multiple-environments) of the Public and Secret API keys generated for the deployment.
5. Define at least one page for identifying visitors. For example, to identify visitors on your sign-up page, add:
1. `[no subdomain]`
2. `yourwebsite.com`
3. `/signup`
6. Define at least one API endpoint to protect with your ruleset. These protected APIs need to be called from the pages in the last step. They can be on a different subdomain, but must be inside the same zone. See [How Cloudflare Flow deployments work](#how-cloudflare-flow-deployments-work) for more details. For example, to protect the sign-up endpoint, add:
1. `api.`
2. `yourwebsite.com`
3. `POST`
4. `/create-account`.
7. Define the Failure mode. By default, the worker will *Fail open*, meaning it will let requests through if an unexpected identification error occurs. We recommend starting with this configuration for the initial testing, then switching to *Fail closed* for security use cases.
8. Click **Create Cloudflare worker**.
4. Pick the [environment](/docs/multiple-environments) of the Public and Secret API keys generated for the deployment.
5. Define at least one page for identifying visitors. For example, to identify visitors on your sign-up page, add:
1. `[no subdomain]`
2. `yourwebsite.com`
3. `/signup`
6. Define at least one API endpoint to protect with your ruleset. These protected APIs need to be called from the pages in the last step. They can be on a different subdomain, but must be inside the same zone. See [How Cloudflare Flow deployments work](#how-cloudflare-flow-deployments-work) for more details. For example, to protect the sign-up endpoint, add:
1. `api.`
2. `yourwebsite.com`
3. `POST`
4. `/create-account`.
7. Define the Failure mode. By default, the worker will *Fail open*, meaning it will let requests through if an unexpected identification error occurs. We recommend starting with this configuration for the initial testing, then switching to *Fail closed* for security use cases.
8. Click **Create Cloudflare worker**.
 Within a few seconds, the Flow worker is deployed into your Cloudflare account.
* You can open your Cloudflare dashboard to confirm.
* You can navigate to the identification page in Incognito mode and try triggering the protected API. You will be blocked by the ruleset and receive the response you defined in your [rule action](/docs/rules-engine#rule-action).
Within a few seconds, the Flow worker is deployed into your Cloudflare account.
* You can open your Cloudflare dashboard to confirm.
* You can navigate to the identification page in Incognito mode and try triggering the protected API. You will be blocked by the ruleset and receive the response you defined in your [rule action](/docs/rules-engine#rule-action).
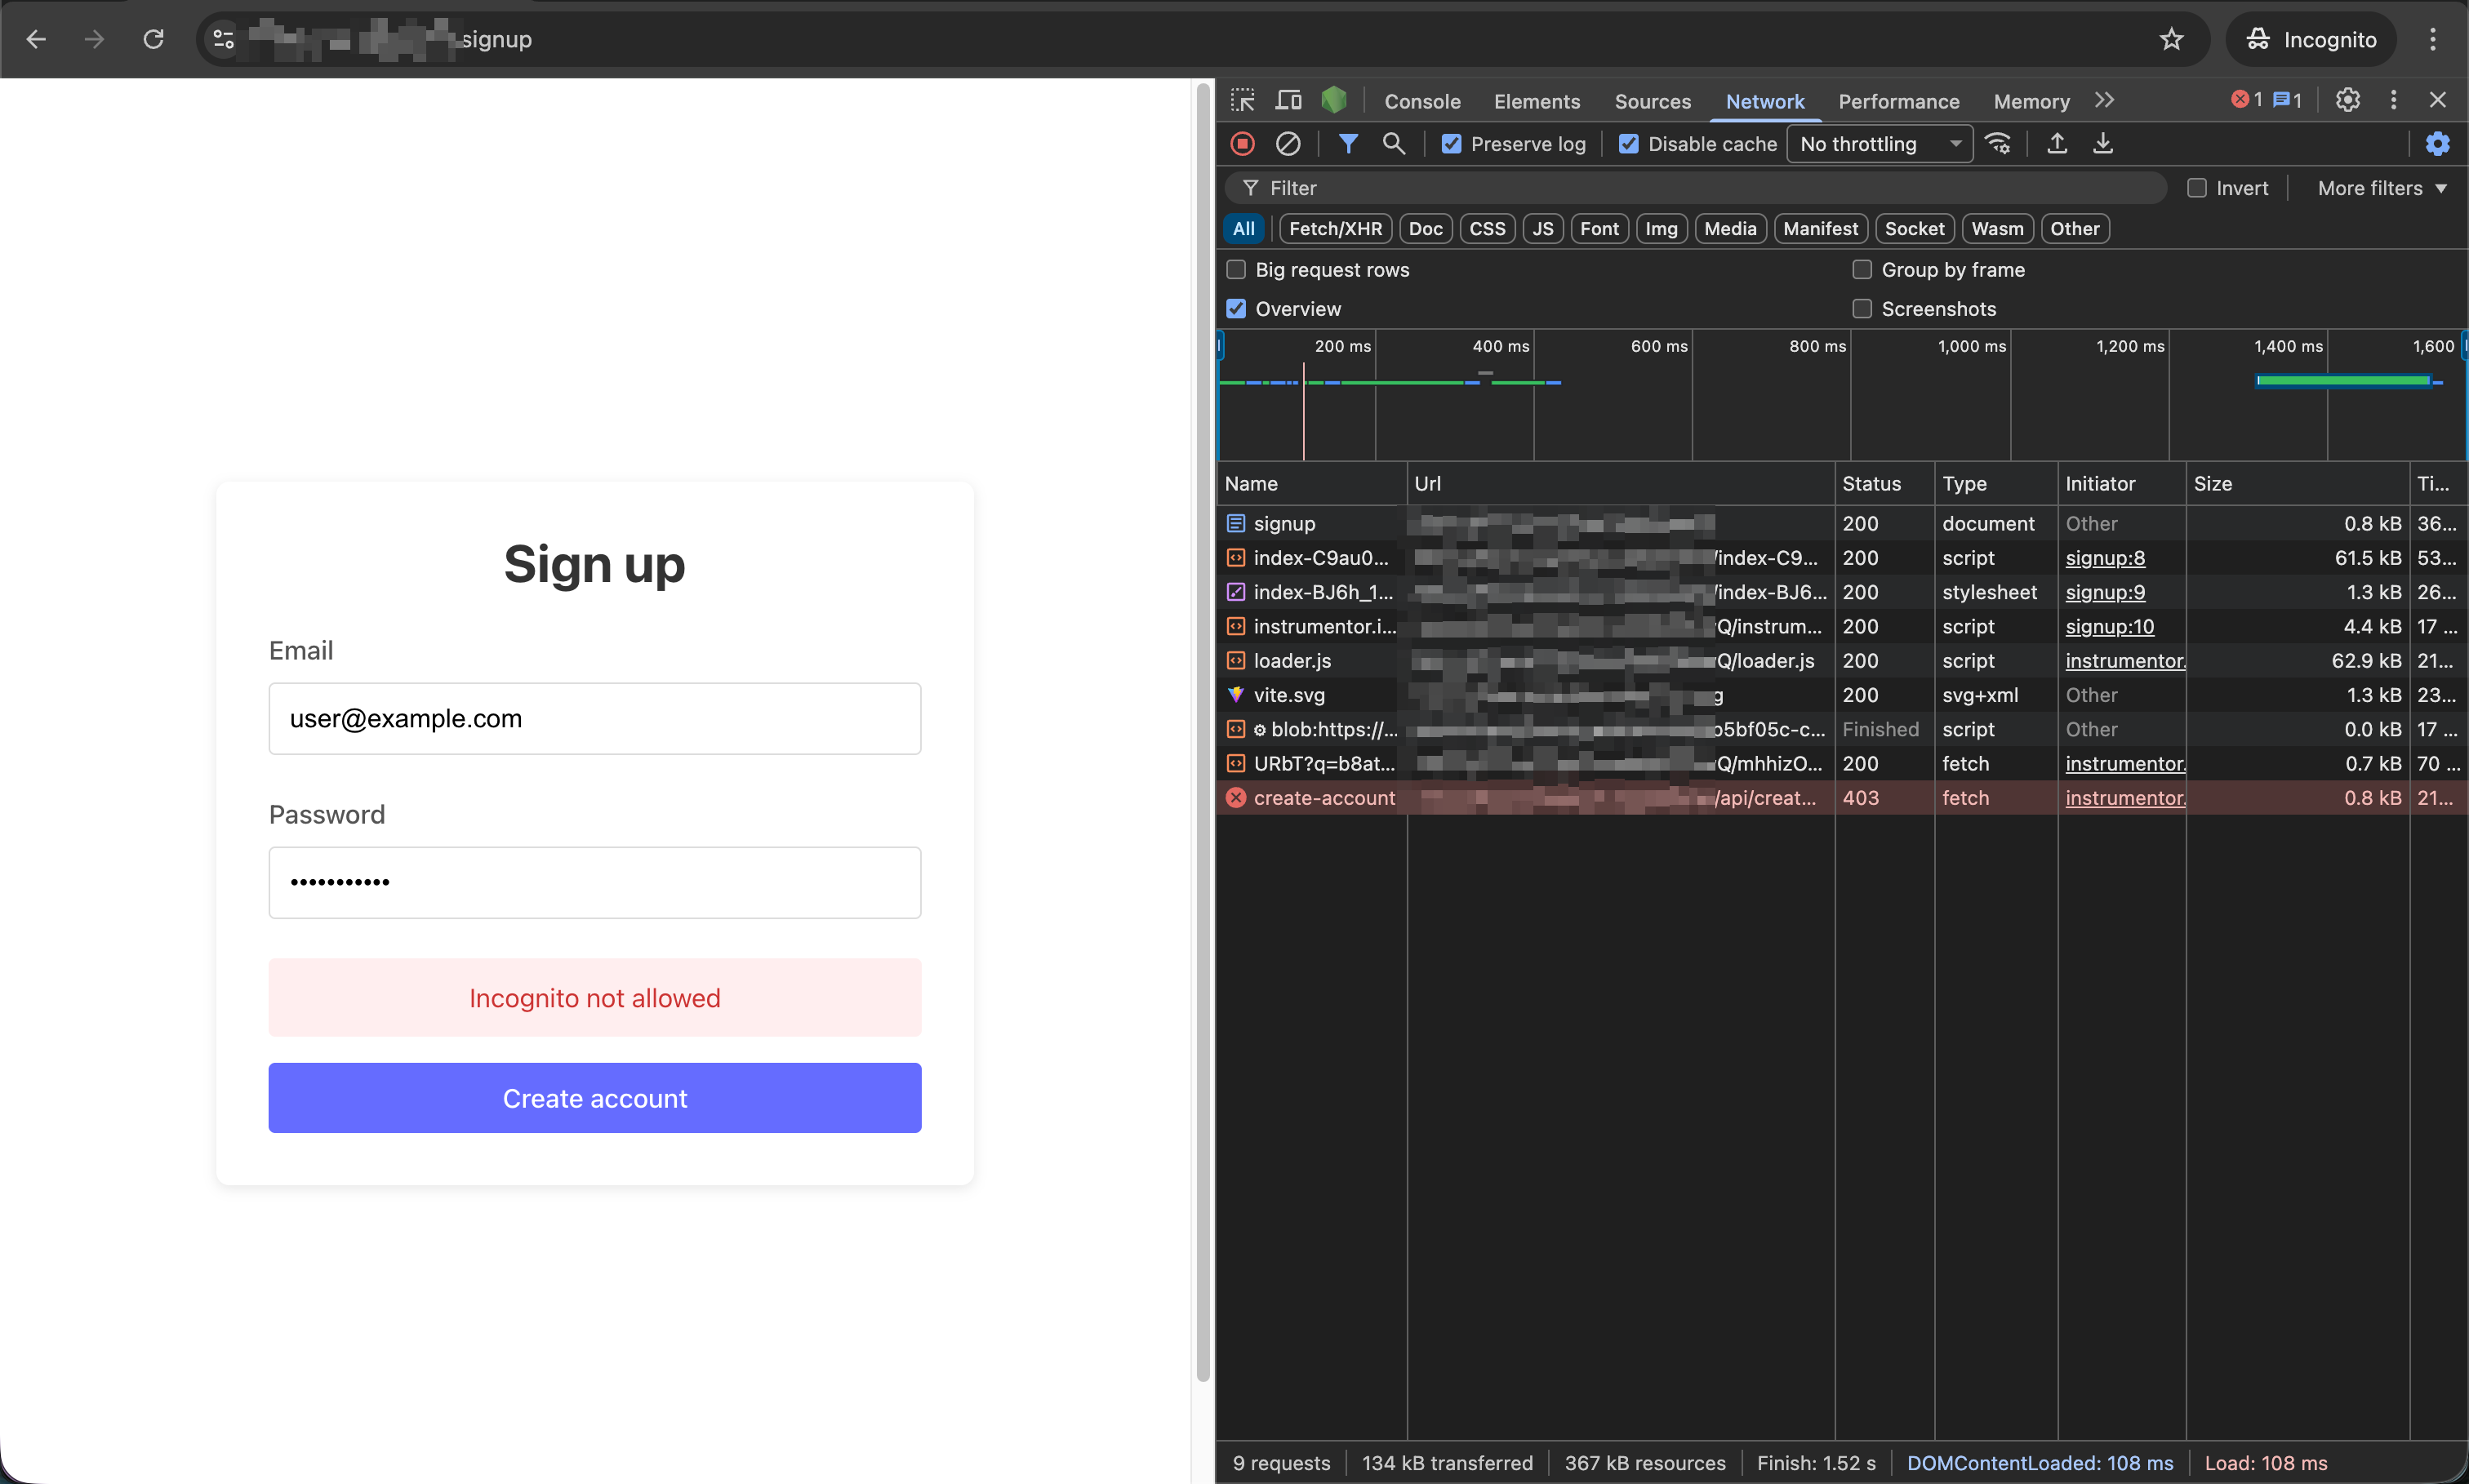 Note: The Flow worker will start intercepting protected requests and applying rules immediately after deployment. If the failure mode is set to *Fail closed*, any errors in the [request instrumentation](#how-cloudflare-flow-deployments-work) (e.g., missing or corrupted browser data) will be treated as tampering attempts and blocked with a `403` Error response from the Flow worker.
* We recommend testing your ruleset and Flow deployment in a separate staging environment before applying it to production.
* You can deploy the Flow worker set to *Fail open* for the initial test of your configuration.
* You can deploy an empty or [disabled](/docs/rules-engine#ruleset-settings) ruleset first to test the Flow worker without applying any rules.
* You can delete the Flow deployment at any time using the Fingerprint Dashboard, or even manually remove the worker from your Cloudflare dashboard if needed.
### Editing Flow deployments
You can update your Flow deployment any time:
1. Navigate to **\** > **Settings** tab.
2. Under **Deployment**, click **⋯ (More actions)**, then **Edit worker**.
3. Add, remove, or update the identification pages and protected APIs.
4. Click **Save and redeploy** to save your changes.
This redeploys the Flow worker with the updated configuration. Do not make manual changes to the worker code or environment variables directly through Cloudflare as they will be overwritten by Fingerprint on the next redeployment.
Note: The Flow worker will start intercepting protected requests and applying rules immediately after deployment. If the failure mode is set to *Fail closed*, any errors in the [request instrumentation](#how-cloudflare-flow-deployments-work) (e.g., missing or corrupted browser data) will be treated as tampering attempts and blocked with a `403` Error response from the Flow worker.
* We recommend testing your ruleset and Flow deployment in a separate staging environment before applying it to production.
* You can deploy the Flow worker set to *Fail open* for the initial test of your configuration.
* You can deploy an empty or [disabled](/docs/rules-engine#ruleset-settings) ruleset first to test the Flow worker without applying any rules.
* You can delete the Flow deployment at any time using the Fingerprint Dashboard, or even manually remove the worker from your Cloudflare dashboard if needed.
### Editing Flow deployments
You can update your Flow deployment any time:
1. Navigate to **\** > **Settings** tab.
2. Under **Deployment**, click **⋯ (More actions)**, then **Edit worker**.
3. Add, remove, or update the identification pages and protected APIs.
4. Click **Save and redeploy** to save your changes.
This redeploys the Flow worker with the updated configuration. Do not make manual changes to the worker code or environment variables directly through Cloudflare as they will be overwritten by Fingerprint on the next redeployment.
 **Rules are part of the Ruleset, not the Flow deployment**
* The Flow worker only knows its Ruleset ID. Rulesets are stored and evaluated inside the Fingerprint platform, not on Cloudflare.
* To update rules, make changes to the Ruleset and save it. It might take up to 60 seconds for the changes to take effect on your website.
* We recommend testing your rule changes in a separate staging ruleset and staging web environment before applying them to production.
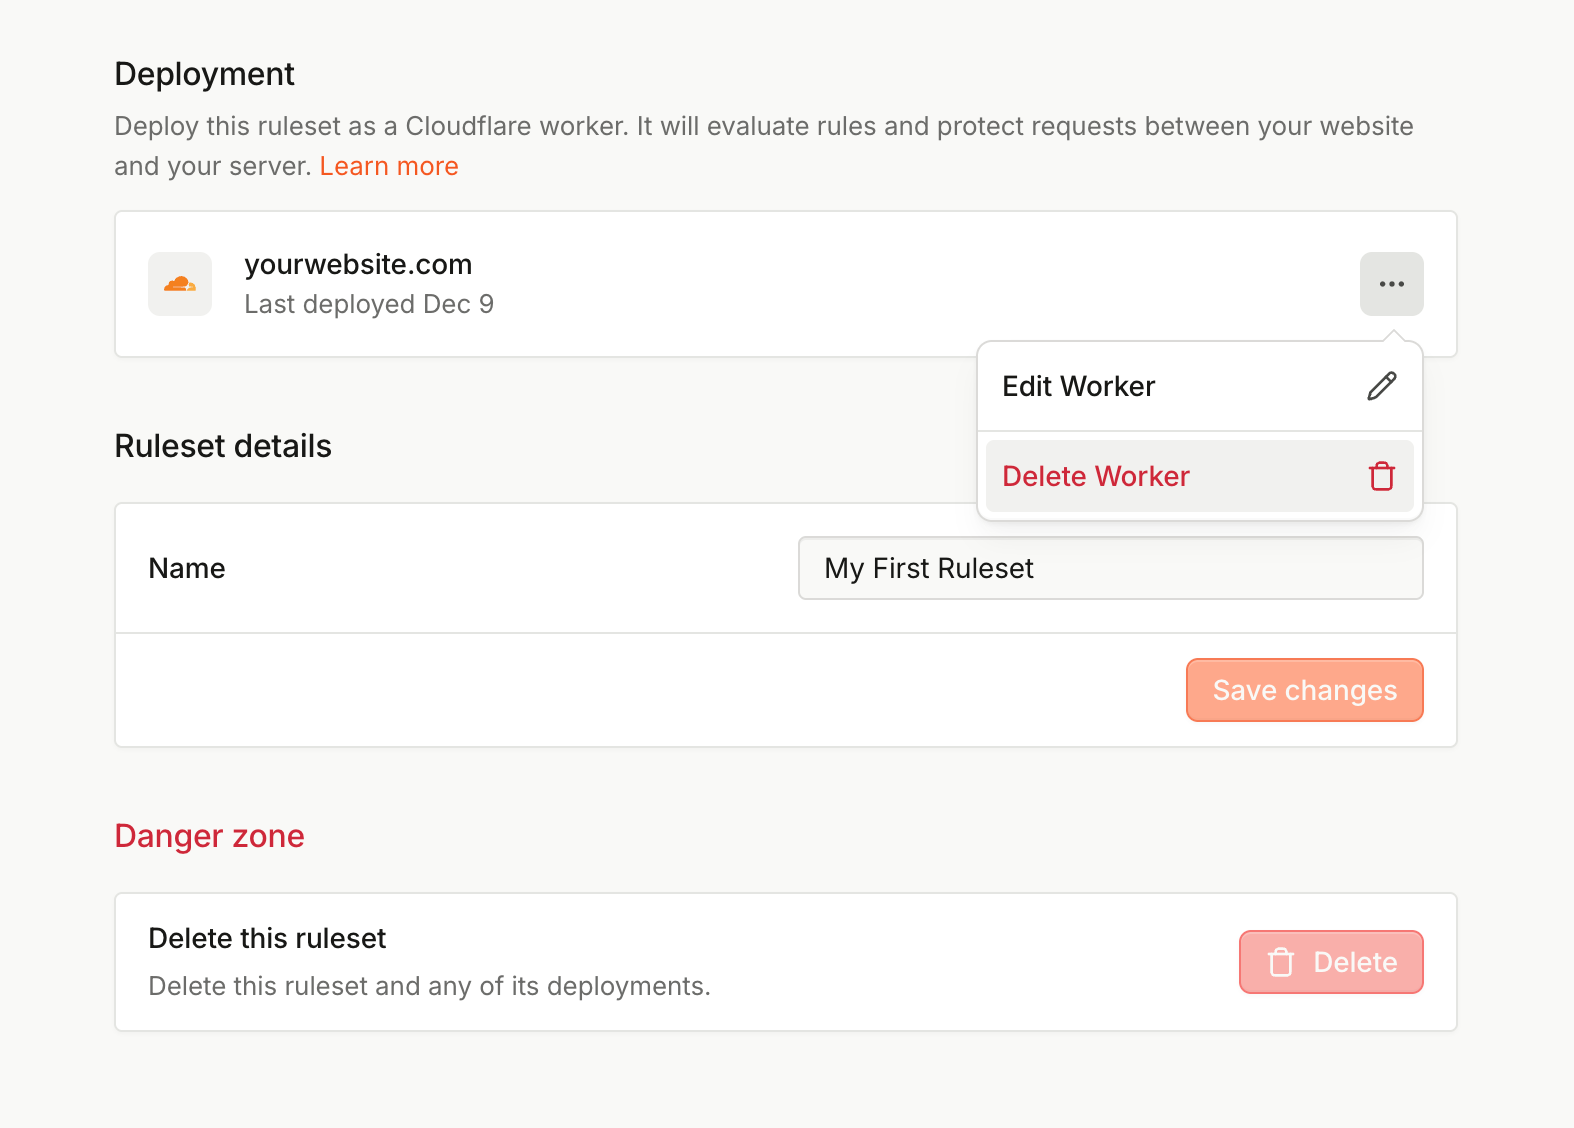
### Deleting Flow deployment
To delete the Flow deployment:
1. Navigate to **\** > **Settings** tab.
2. Under **Deployment**, click **⋯ (More actions)**, then **Delete worker**.
3. Confirm by typing your domain name and clicking **Delete deployment**.
This completely removes the Flow worker and its associated routes from your Cloudflare account. The ruleset itself remains stored in your Fingerprint workspace. Note that you cannot delete a deployed ruleset without removing the Flow deployment first.
## Using a Flow worker on its own (Monitoring mode)
You can deploy a Flow worker without a ruleset. This allows you to identify visitors on your website and collect data about your traffic without applying any protective actions.
To deploy a Flow worker in monitoring mode:
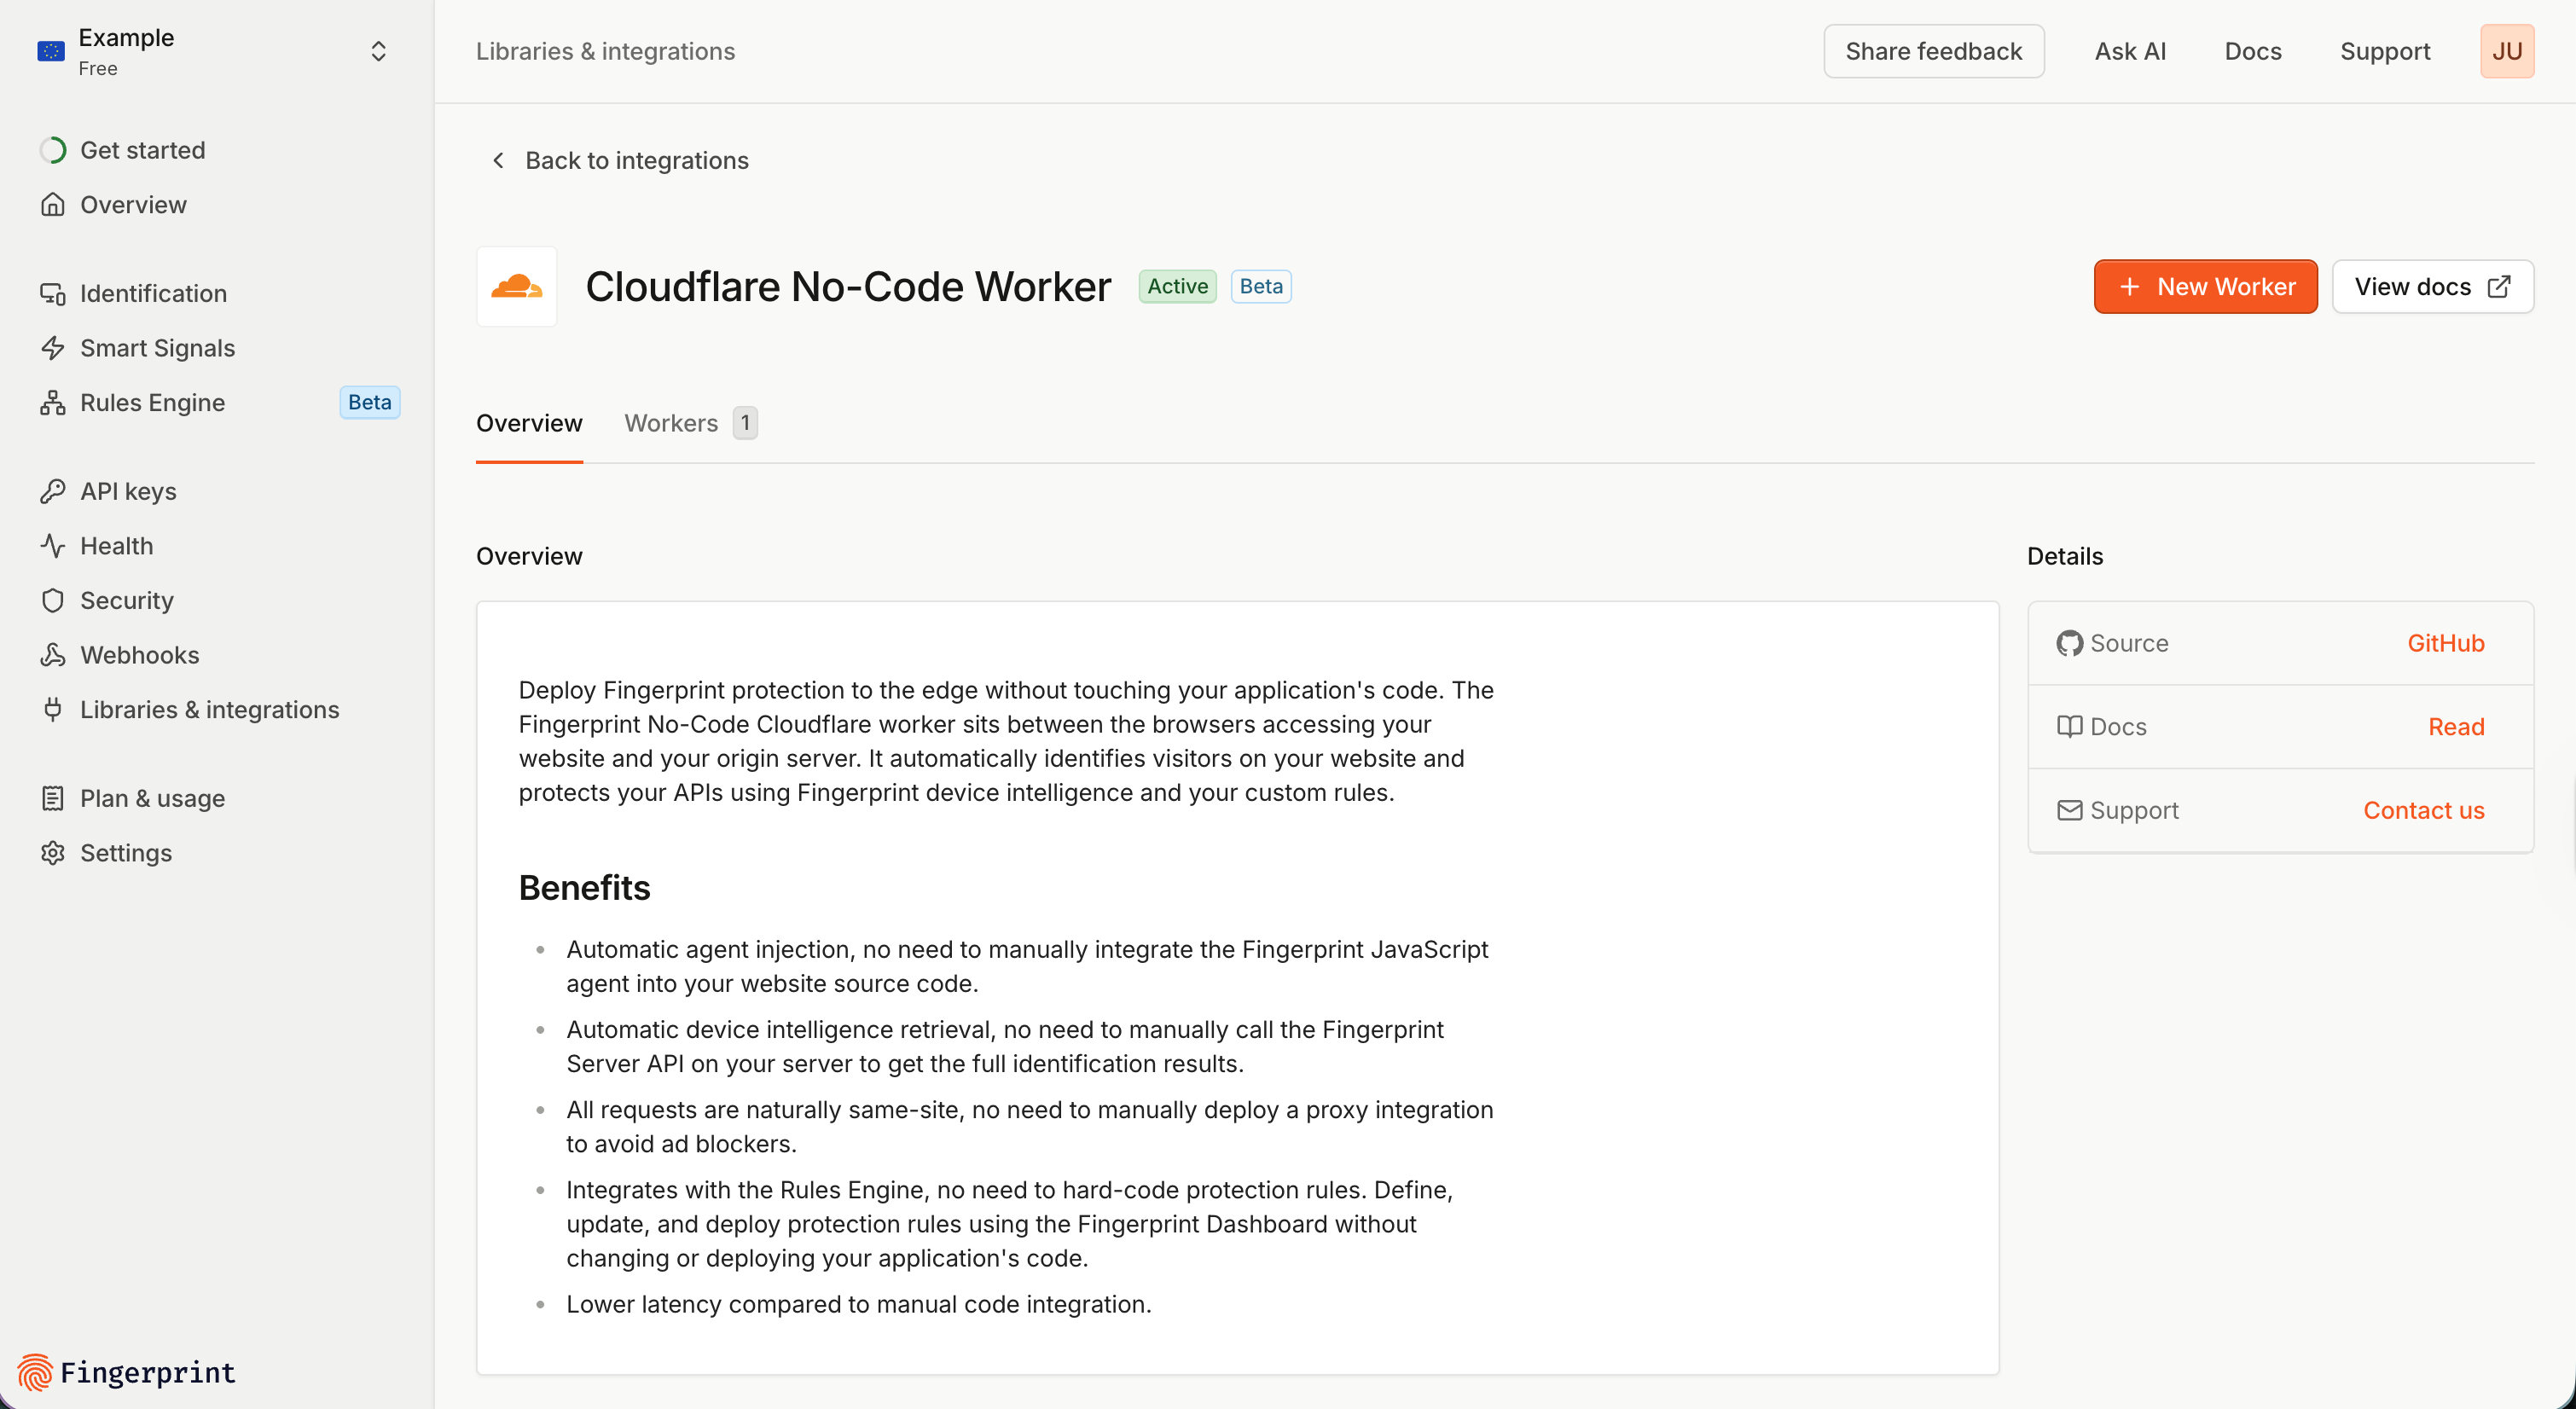
1. In the Fingerprint Dashboard, navigate to **Libraries & integrations** -> **Directory** -> [**Cloudflare No-Code Worker**](https://dashboard.fingerprint.com/integrations/cloudflare-flow).
2. Click **New worker**.
3. Provide your **Cloudflare credentials**, define the **Identification pages** and **API endpoints**.
1. It works the same as when [using Flow with the Rules engine](#using-a-flow-worker-with-the-rules-engine); see that section above for more details. The only difference is that there is no ruleset associated with the Flow worker.
2. Note that you still need to define the API endpoints even if you are not using any ruleset. The identification page calling the API endpoint is what triggers visitor identification and sends the data to the worker, even if no protection is applied.
3. In Monitoring mode, we recommend keeping the **Failure mode** set to *Fail open* to let requests through if an unexpected identification error occurs.
4. Click **Create Cloudflare worker** to deploy.
**Rules are part of the Ruleset, not the Flow deployment**
* The Flow worker only knows its Ruleset ID. Rulesets are stored and evaluated inside the Fingerprint platform, not on Cloudflare.
* To update rules, make changes to the Ruleset and save it. It might take up to 60 seconds for the changes to take effect on your website.
* We recommend testing your rule changes in a separate staging ruleset and staging web environment before applying them to production.
### Deleting Flow deployment
To delete the Flow deployment:
1. Navigate to **\** > **Settings** tab.
2. Under **Deployment**, click **⋯ (More actions)**, then **Delete worker**.
3. Confirm by typing your domain name and clicking **Delete deployment**.
This completely removes the Flow worker and its associated routes from your Cloudflare account. The ruleset itself remains stored in your Fingerprint workspace. Note that you cannot delete a deployed ruleset without removing the Flow deployment first.
## Using a Flow worker on its own (Monitoring mode)
You can deploy a Flow worker without a ruleset. This allows you to identify visitors on your website and collect data about your traffic without applying any protective actions.
To deploy a Flow worker in monitoring mode:
1. In the Fingerprint Dashboard, navigate to **Libraries & integrations** -> **Directory** -> [**Cloudflare No-Code Worker**](https://dashboard.fingerprint.com/integrations/cloudflare-flow).
2. Click **New worker**.
3. Provide your **Cloudflare credentials**, define the **Identification pages** and **API endpoints**.
1. It works the same as when [using Flow with the Rules engine](#using-a-flow-worker-with-the-rules-engine); see that section above for more details. The only difference is that there is no ruleset associated with the Flow worker.
2. Note that you still need to define the API endpoints even if you are not using any ruleset. The identification page calling the API endpoint is what triggers visitor identification and sends the data to the worker, even if no protection is applied.
3. In Monitoring mode, we recommend keeping the **Failure mode** set to *Fail open* to let requests through if an unexpected identification error occurs.
4. Click **Create Cloudflare worker** to deploy.
 You can switch to the **Workers** tab to see all your workers, whether they are using rulesets or not.
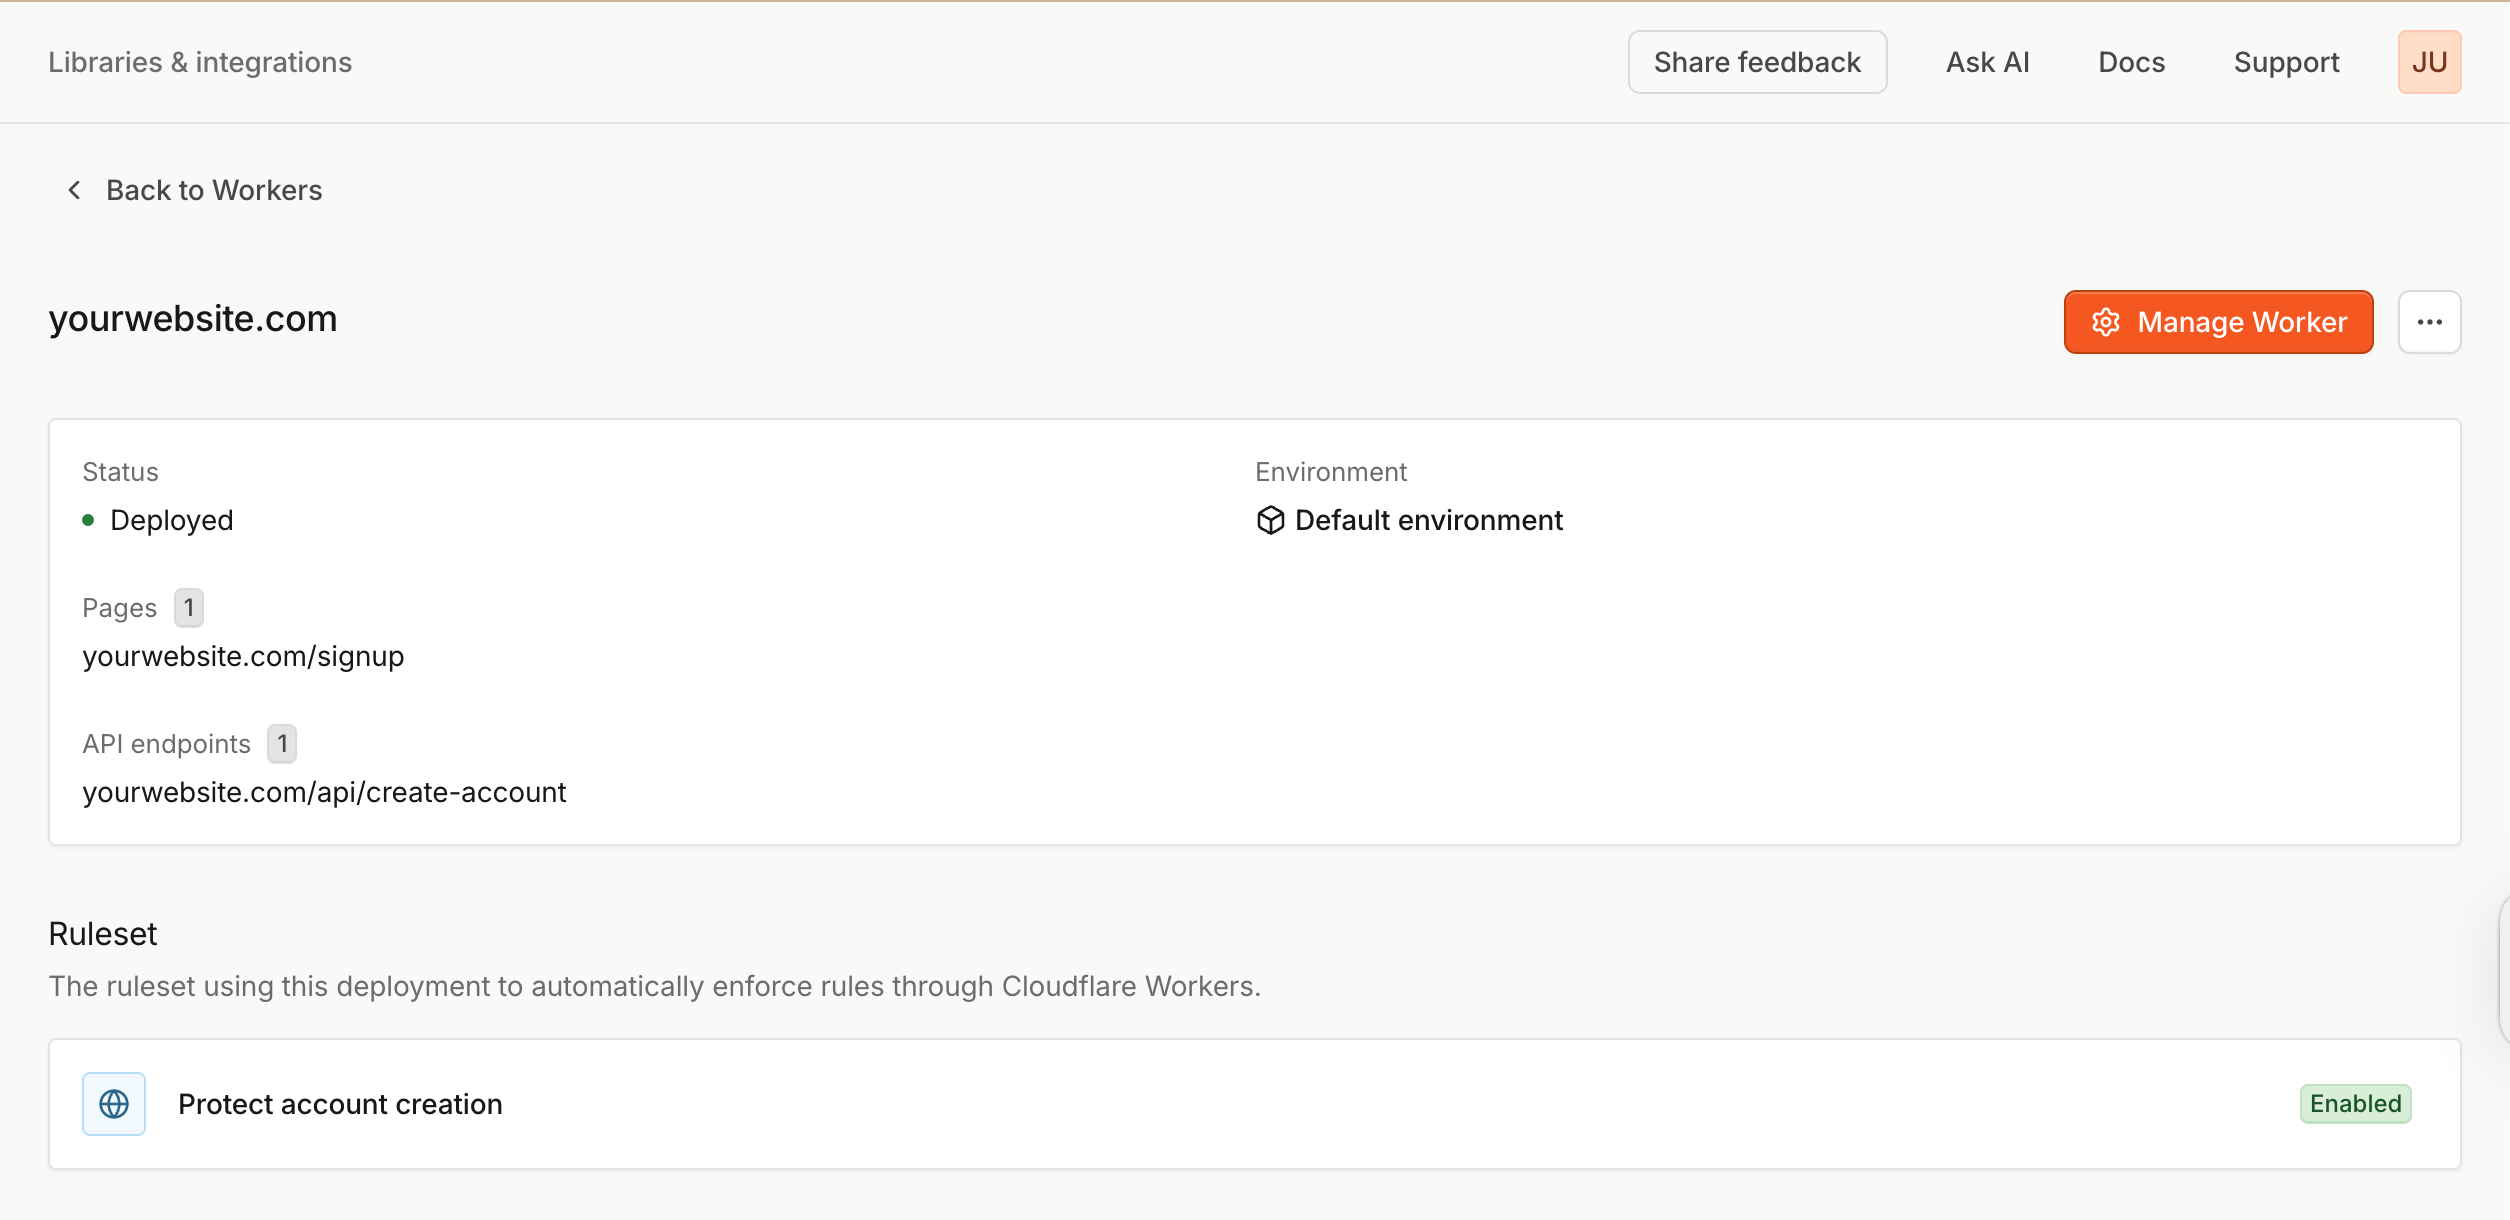
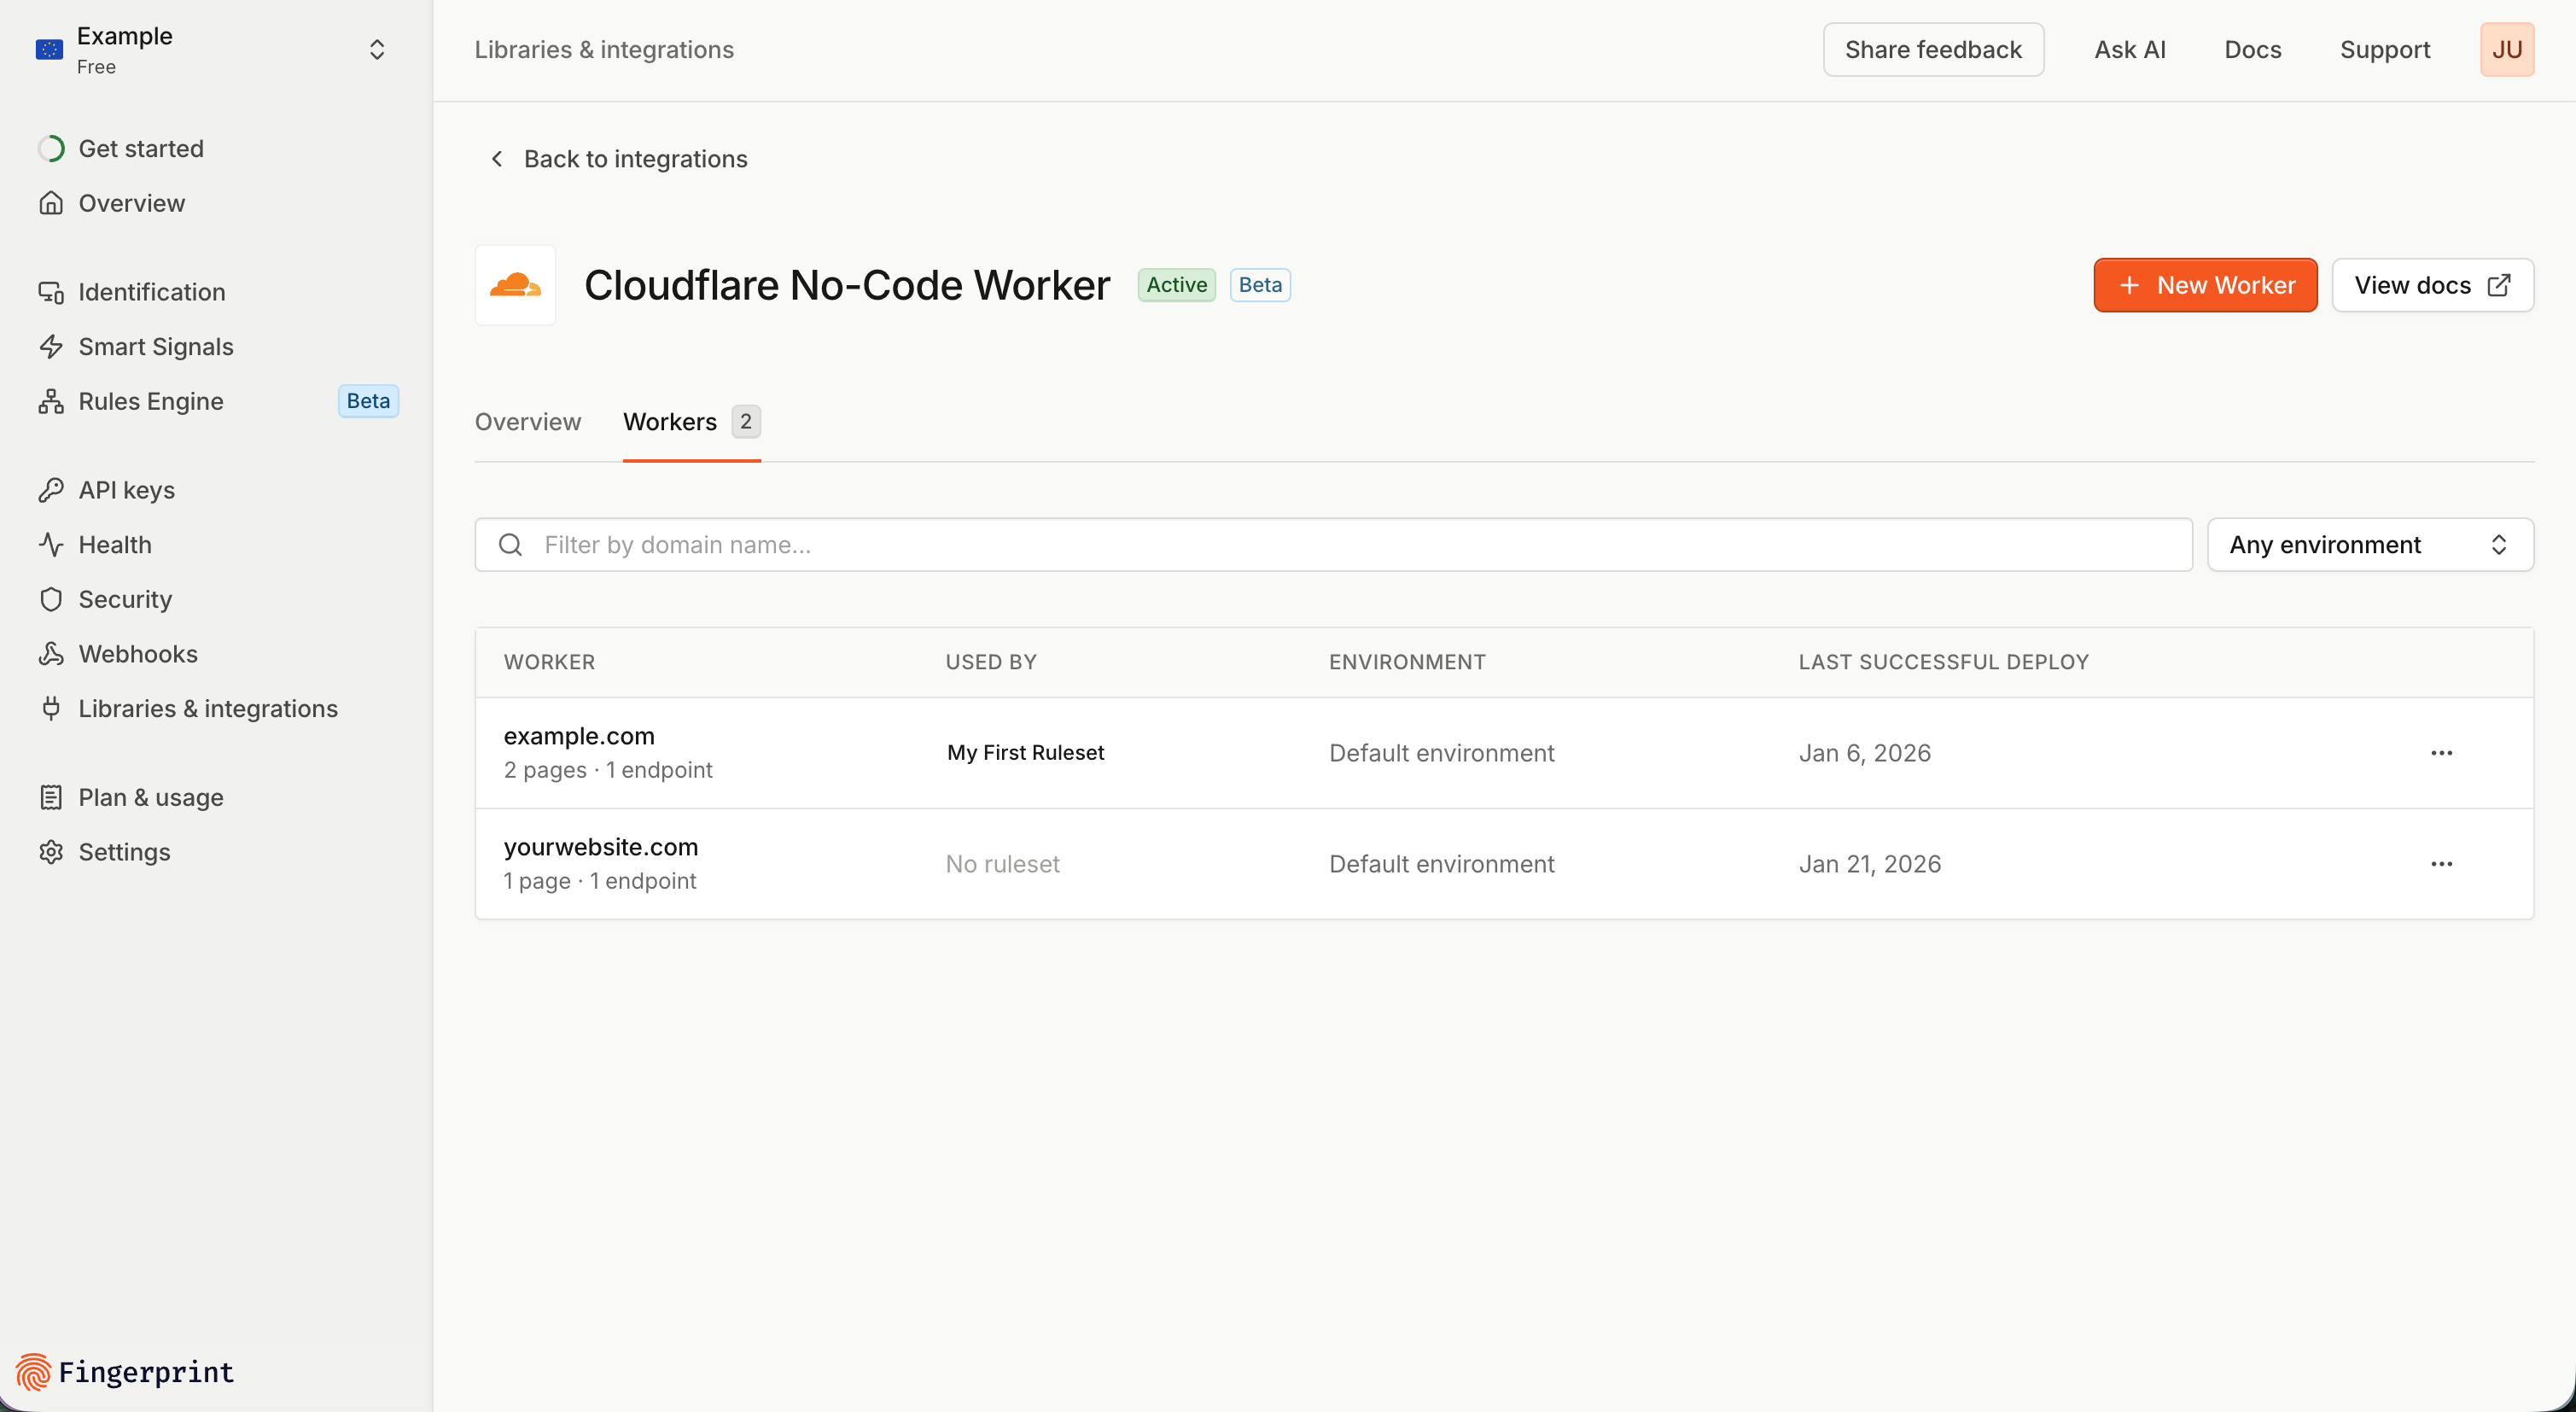 Clicking on a worker opens the worker detail, where you can view, manage, or delete the worker.
 ## Using a Flow worker to detect bots at the edge
Flow workers can detect AI agents, AI assistants, and bots that access your pages and API endpoints.
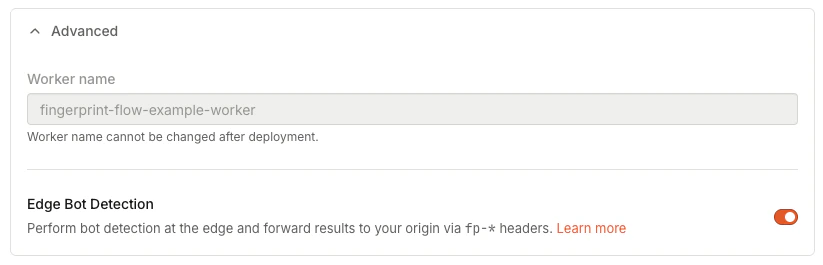
To enable this capability, when deploying or editing a Flow worker, expand the **Advanced** section, below the **Cloudflare credentials** section, and select the toggle labeled **Edge Bot Detection**.
## Using a Flow worker to detect bots at the edge
Flow workers can detect AI agents, AI assistants, and bots that access your pages and API endpoints.
To enable this capability, when deploying or editing a Flow worker, expand the **Advanced** section, below the **Cloudflare credentials** section, and select the toggle labeled **Edge Bot Detection**.
 After enabling **Edge Bot Detection**, the Flow worker provides bot detection data to your pages and APIs by setting HTTP request headers in the requests it forwards.
This data falls into two categories: [IP intelligence](#ip-intelligence-request-headers) and [bot intelligence](#bot-intelligence-request-headers). The following tables list the request headers and a description of their values for each category.
### IP intelligence request headers
IP intelligence headers are provided for all requests, including those that are made by AI automation, bots, or humans.
| Request Header | Description |
| ----------------------- | -------------------------------------------------- |
| `fp-ip-info-v4-address` | The IPv4 address of the requesting browser or bot. |
| `fp-ip-info-v6-address` | The IPv6 address of the requesting browser or bot. |
### Bot intelligence request headers
Bot intelligence headers are provided for bots and AI automation. If the request cannot be attributed to a bot or AI automation, the fp-bot-info-\* request headers will not be set.
| Request Header | Description |
| ---------------------- | -------------------------------------------------------------------------------------------- |
| `fp-bot-info-category` | The `bot_info.category` for the bot e.g., `ai_agent`, `ai_browser`, `search_engine_crawler`. |
| `fp-bot-info-provider` | The organization that operates the bot, e.g., `OpenAI` or `AWS`. |
| `fp-bot-info-name` | Human-readable bot name, e.g., `ChatGPT Agent`. |
| `fp-bot-info-identity` | Verification status: `signed`, `verified`, `unknown`, or `spoofed`. |
### Learn more
* Refer to the [Bot directory](/docs/bot-detection/bot-directory) for a list of the bots and AI agents identified by edge bot detection, and the request header field values you can expect for each agent.
* Read the [AI agent detection](/docs/ai-agents) guide to learn how Fingerprint detects AI agents.
* Read the [AI assistant detection](/docs/ai-assistants) guide to learn how Fingerprint detects AI assistants.
## How Cloudflare Flow deployments work
Cloudflare Flow allows you to integrate Fingerprint protection into your website without touching your application's code. It replaces the need to [install the JavaScript agent on your website](/docs/install-the-javascript-agent), [set up a proxy to avoid ad-blockers](/docs/protecting-the-javascript-agent-from-adblockers), [integrate Fingerprint Server API into your backend](/docs/get-server-side-intelligence), and write custom protection logic based on Fingerprint results.
Importantly, Cloudflare Flow deployment is different from the [Cloudflare Proxy Integration](/docs/cloudflare-integration), which only proxies requests between your website and Fingerprint when integrating Fingerprint manually.
Here is how it works in detail:
* Using your Cloudflare API token and credentials, Fingerprint deploys a Cloudflare worker on your domain, which intercepts HTTP requests between browsers accessing your website and the origin server.
* When serving the pages that identify visitors (for example, `yourwebsite.com/signup` page), the worker injects the Fingerprint [JavaScript agent](/reference/js-agent-v4) and an instrumentation script into the page markup.
* Fingerprint creates a Public [API key](/docs/configuration#api-keys) and a Secret API key used only by the Flow worker and the injected JavaScript agent.
* For HTTP requests to APIs you want to protect (for example, the `POST api.yourwebsite.com/create-account` request), the instrumentation script collects information about the browser configuration and attaches it to the request as a custom header, `fp-data`.
* The `fp-data` header takes up approximately 20 KB, around 16% of the Cloudflare's [total request header size limit](https://developers.cloudflare.com/workers/platform/limits/#request-limits) of 128 KB.
* The Flow worker intercepts the protected request and sends the browser information to the Fingerprint Identification API. If the worker is using a ruleset, the request also includes the ruleset ID.
* In return, the worker receives the full [identification event](/reference/server-api-v4-get-event) and (if applicable) the [rule action](/docs/rules-engine#rule-action) produced by evaluating your ruleset.
* If using a ruleset, the Flow worker processes the rule action by blocking the protected request or allowing it to reach the origin server.
* The Flow worker code is [open-sourced on GitHub](https://github.com/fingerprintjs/flow-cloudflare-worker).
### Route pattern matching
The identification pages and protected APIs are converted to Cloudflare worker [route patterns](https://developers.cloudflare.com/workers/configuration/routing/routes/#matching-behavior) and follow the same format and [matching behavior](https://developers.cloudflare.com/workers/configuration/routing/routes/#matching-behavior).
* Each Cloudflare route can only be served by one Cloudflare worker. If you try to use a route pattern already served by another worker, your deployment will fail.
* You can use a wildcard (`*`) at the end of the path but not in the middle of it.
* Using a wildcard suffix (`/path*`) is [required to match requests with query parameters](https://developers.cloudflare.com/workers/configuration/routing/routes/#:~:text=Route%20pattern%20matching%20considers%20the%20entire%20request%20URL%2C%20including%20the%20query%20parameter%20string.%20Since%20route%20patterns%20may%20not%20contain%20query%20parameters%2C%20the%20only%20way%20to%20have%20a%20route%20pattern%20match%20URLs%20with%20query%20parameters%20is%20to%20terminate%20it%20with%20a%20wildcard%2C%20*.) like `path?query=value`.
You might encounter edge cases where Cloudflare caching interacts with wildcard route matching in a way that produces [unexpected behavior](https://community.cloudflare.com/t/presence-of-query-string-make-route-match-fail/63400). In that case, do not hesitate to contact our [support team](https://fingerprint.com/support/). Defensively using both the base and wildcard variants of the path (`path` and `path*`) can help.
### Current limitations
* You can only protect API calls (actions, transactions) made by the visitor on the identification page. You cannot protect the page itself.
* For example, you cannot block bots from visiting the sign-up page, but you can block the `create-account` API call made by the page if the bot clicks "Create account".
* You can define a maximum of 10 identification pages and 10 protected APIs per Flow deployment.
* You must define at least one identification page and one API endpoint per Flow deployment, even if you are using the worker in Monitoring mode. The identification page calling the API endpoint is what triggers visitor identification.
* Customizations of the JavaScript agent behavior, such as [tags](/reference/js-agent-v4-get-function#tag), [linked IDs](/reference/js-agent-v4-get-function#linkedid), [custom timeout](/reference/js-agent-v4-get-function#timeout), etc., are not supported at this time.
* At the moment, you cannot rotate the Public and Secret [API keys](/docs/configuration#api-keys) used by the worker. The secret API key is encrypted in both the Fingerprint and Cloudflare dashboards, so exposing it is unlikely. If you need to replace either key anyway, you need to delete your Flow deployment and recreate it. Alternatively, you can contact our [support team](https://fingerprint.com/support/) for assistance.
* Protected API calls made with `fetch` must NOT use [`mode: 'no-cors'`](https://developer.mozilla.org/en-US/docs/Web/API/RequestInit#mode). In `no-cors` mode, the browser strips the `fp-data` header, so identification fails and the request is either blocked or forwarded to the origin server (based on your chosen failure mode).
### Troubleshooting
If you encounter any issues with your Flow deployment, you can:
* Use the [Fingerprint Dashboard](https://dashboard.fingerprint.com/) > **Identification** page to confirm that Flow deployment is generating identification events as expected. Note that any Smart Signals not enabled for your workspace will always evaluate to false.
* Hard reload the identification page of your website to ensure you are getting the latest version from the Flow worker. Look for `instrumentor.iife.js` in the Network tab of your browser's developer tools to confirm.
* Make sure the protected API is actually called from the identification page you defined. Use the browser's developer tools to confirm that the `fp-data` header is being attached to the request.
* Navigate to your Cloudflare dashboard to confirm the worker configuration matches your Flow deployment (worker code, environment variables, routes, etc.).
* Enable [Worker logs](https://developers.cloudflare.com/workers/observability/logs/workers-logs) and examine them for errors. Any error returned from the Fingerprint Identification API will only be visible here, not propagated to your application.
* Most common errors include [Request filtering](/docs/request-filtering-for-websites) blocking identification requests by origin.
* Contact our [support team](https://fingerprint.com/support/). Include relevant logs or screenshots of the above to aid troubleshooting.
After enabling **Edge Bot Detection**, the Flow worker provides bot detection data to your pages and APIs by setting HTTP request headers in the requests it forwards.
This data falls into two categories: [IP intelligence](#ip-intelligence-request-headers) and [bot intelligence](#bot-intelligence-request-headers). The following tables list the request headers and a description of their values for each category.
### IP intelligence request headers
IP intelligence headers are provided for all requests, including those that are made by AI automation, bots, or humans.
| Request Header | Description |
| ----------------------- | -------------------------------------------------- |
| `fp-ip-info-v4-address` | The IPv4 address of the requesting browser or bot. |
| `fp-ip-info-v6-address` | The IPv6 address of the requesting browser or bot. |
### Bot intelligence request headers
Bot intelligence headers are provided for bots and AI automation. If the request cannot be attributed to a bot or AI automation, the fp-bot-info-\* request headers will not be set.
| Request Header | Description |
| ---------------------- | -------------------------------------------------------------------------------------------- |
| `fp-bot-info-category` | The `bot_info.category` for the bot e.g., `ai_agent`, `ai_browser`, `search_engine_crawler`. |
| `fp-bot-info-provider` | The organization that operates the bot, e.g., `OpenAI` or `AWS`. |
| `fp-bot-info-name` | Human-readable bot name, e.g., `ChatGPT Agent`. |
| `fp-bot-info-identity` | Verification status: `signed`, `verified`, `unknown`, or `spoofed`. |
### Learn more
* Refer to the [Bot directory](/docs/bot-detection/bot-directory) for a list of the bots and AI agents identified by edge bot detection, and the request header field values you can expect for each agent.
* Read the [AI agent detection](/docs/ai-agents) guide to learn how Fingerprint detects AI agents.
* Read the [AI assistant detection](/docs/ai-assistants) guide to learn how Fingerprint detects AI assistants.
## How Cloudflare Flow deployments work
Cloudflare Flow allows you to integrate Fingerprint protection into your website without touching your application's code. It replaces the need to [install the JavaScript agent on your website](/docs/install-the-javascript-agent), [set up a proxy to avoid ad-blockers](/docs/protecting-the-javascript-agent-from-adblockers), [integrate Fingerprint Server API into your backend](/docs/get-server-side-intelligence), and write custom protection logic based on Fingerprint results.
Importantly, Cloudflare Flow deployment is different from the [Cloudflare Proxy Integration](/docs/cloudflare-integration), which only proxies requests between your website and Fingerprint when integrating Fingerprint manually.
Here is how it works in detail:
* Using your Cloudflare API token and credentials, Fingerprint deploys a Cloudflare worker on your domain, which intercepts HTTP requests between browsers accessing your website and the origin server.
* When serving the pages that identify visitors (for example, `yourwebsite.com/signup` page), the worker injects the Fingerprint [JavaScript agent](/reference/js-agent-v4) and an instrumentation script into the page markup.
* Fingerprint creates a Public [API key](/docs/configuration#api-keys) and a Secret API key used only by the Flow worker and the injected JavaScript agent.
* For HTTP requests to APIs you want to protect (for example, the `POST api.yourwebsite.com/create-account` request), the instrumentation script collects information about the browser configuration and attaches it to the request as a custom header, `fp-data`.
* The `fp-data` header takes up approximately 20 KB, around 16% of the Cloudflare's [total request header size limit](https://developers.cloudflare.com/workers/platform/limits/#request-limits) of 128 KB.
* The Flow worker intercepts the protected request and sends the browser information to the Fingerprint Identification API. If the worker is using a ruleset, the request also includes the ruleset ID.
* In return, the worker receives the full [identification event](/reference/server-api-v4-get-event) and (if applicable) the [rule action](/docs/rules-engine#rule-action) produced by evaluating your ruleset.
* If using a ruleset, the Flow worker processes the rule action by blocking the protected request or allowing it to reach the origin server.
* The Flow worker code is [open-sourced on GitHub](https://github.com/fingerprintjs/flow-cloudflare-worker).
### Route pattern matching
The identification pages and protected APIs are converted to Cloudflare worker [route patterns](https://developers.cloudflare.com/workers/configuration/routing/routes/#matching-behavior) and follow the same format and [matching behavior](https://developers.cloudflare.com/workers/configuration/routing/routes/#matching-behavior).
* Each Cloudflare route can only be served by one Cloudflare worker. If you try to use a route pattern already served by another worker, your deployment will fail.
* You can use a wildcard (`*`) at the end of the path but not in the middle of it.
* Using a wildcard suffix (`/path*`) is [required to match requests with query parameters](https://developers.cloudflare.com/workers/configuration/routing/routes/#:~:text=Route%20pattern%20matching%20considers%20the%20entire%20request%20URL%2C%20including%20the%20query%20parameter%20string.%20Since%20route%20patterns%20may%20not%20contain%20query%20parameters%2C%20the%20only%20way%20to%20have%20a%20route%20pattern%20match%20URLs%20with%20query%20parameters%20is%20to%20terminate%20it%20with%20a%20wildcard%2C%20*.) like `path?query=value`.
You might encounter edge cases where Cloudflare caching interacts with wildcard route matching in a way that produces [unexpected behavior](https://community.cloudflare.com/t/presence-of-query-string-make-route-match-fail/63400). In that case, do not hesitate to contact our [support team](https://fingerprint.com/support/). Defensively using both the base and wildcard variants of the path (`path` and `path*`) can help.
### Current limitations
* You can only protect API calls (actions, transactions) made by the visitor on the identification page. You cannot protect the page itself.
* For example, you cannot block bots from visiting the sign-up page, but you can block the `create-account` API call made by the page if the bot clicks "Create account".
* You can define a maximum of 10 identification pages and 10 protected APIs per Flow deployment.
* You must define at least one identification page and one API endpoint per Flow deployment, even if you are using the worker in Monitoring mode. The identification page calling the API endpoint is what triggers visitor identification.
* Customizations of the JavaScript agent behavior, such as [tags](/reference/js-agent-v4-get-function#tag), [linked IDs](/reference/js-agent-v4-get-function#linkedid), [custom timeout](/reference/js-agent-v4-get-function#timeout), etc., are not supported at this time.
* At the moment, you cannot rotate the Public and Secret [API keys](/docs/configuration#api-keys) used by the worker. The secret API key is encrypted in both the Fingerprint and Cloudflare dashboards, so exposing it is unlikely. If you need to replace either key anyway, you need to delete your Flow deployment and recreate it. Alternatively, you can contact our [support team](https://fingerprint.com/support/) for assistance.
* Protected API calls made with `fetch` must NOT use [`mode: 'no-cors'`](https://developer.mozilla.org/en-US/docs/Web/API/RequestInit#mode). In `no-cors` mode, the browser strips the `fp-data` header, so identification fails and the request is either blocked or forwarded to the origin server (based on your chosen failure mode).
### Troubleshooting
If you encounter any issues with your Flow deployment, you can:
* Use the [Fingerprint Dashboard](https://dashboard.fingerprint.com/) > **Identification** page to confirm that Flow deployment is generating identification events as expected. Note that any Smart Signals not enabled for your workspace will always evaluate to false.
* Hard reload the identification page of your website to ensure you are getting the latest version from the Flow worker. Look for `instrumentor.iife.js` in the Network tab of your browser's developer tools to confirm.
* Make sure the protected API is actually called from the identification page you defined. Use the browser's developer tools to confirm that the `fp-data` header is being attached to the request.
* Navigate to your Cloudflare dashboard to confirm the worker configuration matches your Flow deployment (worker code, environment variables, routes, etc.).
* Enable [Worker logs](https://developers.cloudflare.com/workers/observability/logs/workers-logs) and examine them for errors. Any error returned from the Fingerprint Identification API will only be visible here, not propagated to your application.
* Most common errors include [Request filtering](/docs/request-filtering-for-websites) blocking identification requests by origin.
* Contact our [support team](https://fingerprint.com/support/). Include relevant logs or screenshots of the above to aid troubleshooting.