> ## Documentation Index
> Fetch the complete documentation index at: https://docs.fingerprint.com/llms.txt
> Use this file to discover all available pages before exploring further.
# Google Tag Manager
[The Fingerprint Google Tag Manager integration](https://github.com/fingerprintjs/gtm-integration) is an open-source [tag template][template-link] you can manually import into [Google Tag Manager](https://support.google.com/tagmanager/answer/6102821). It allows you to add and manage the Fingerprint [JavaScript agent](/reference/js-agent) on your website without changing the website code or redeploying it.
* Supports all standard functionality of the JavaScript agent.
* Pushes data to the [GTM's data layer](https://developers.google.com/tag-platform/tag-manager/web/datalayer) which can be processed by other tags or by JavaScript code on your website.
**Note: Google Analytics does not allow using browser fingerprints**
The Google Analytics terms of service contain a [policy against using browser fingerprints](https://support.google.com/analytics/answer/9682282?hl=en\&ref_topic=2919631\&sjid=9027453856798034060-EU):
*"You must not use device fingerprints or locally shared objects (e.g. Flash cookies, Browser Helper Objects, HTML5 local storage) other than HTTP cookies, or user-resettable device identifiers designed for use in measurement or advertising, in connection with Google Analytics."*
Breaching the policy can lead to [suspending or terminating your access to Google services](https://policies.google.com/terms?hl=en-US#toc-problems). You can use the visitor ID provided by Fingerprint in other 3rd party tags and tools, but we advise against using it inside Google Analytics.
Assuming you have already [signed up for Fingerprint](https://dashboard.fingerprint.com/signup/) and your website already has Google Tag Manager [installed](https://developers.google.com/tag-platform/tag-manager/web), here is how to add a Fingerprint tag:
## 1. Import the Fingerprint GTM template
You can install the template manually from the integration's [GitHub repository][template-link].
1. [Download the template][template-link] and make sure it is saved as `template.tpl` not `template.tpl.txt`.
2. Open the Google Tag Manager workspace of your website.
3. Go to **Templates** and click **New** to create a new template.
4. To [import](https://developers.google.com/tag-platform/tag-manager/templates#export_and_import) the template, click the **More actions (⋮)** button in the top right corner, select **Import** and pick the downloaded `template.tpl` file.
5. Click **Save**.
## 2. Add a Fingerprint tag to your website
1. Go to **Tags** and click **New** to create a new tag.
2. Click **Choose a tag type** and under **Custom**, pick your imported **Fingerprint** template.
3. Configure the tag:
1. Choose your **Tag type**. **Start and Identify** loads the script and identifies the visitor right after the tag is triggered. This is the recommended option if you want to identify visitors on page initialization.
> Note: If you want to identify visitors after an event (e.g. form submission) with minimum latency, you might want to separate starting the JavaScript agent from the identification request. In that case, you can create two separate Fingerprint tags:
>
> * First, with tag type **Start**, which is triggered on page initialization.
> * Second, with tag type **Identify** which is triggered by another event. You can create your own [custom event trigger](https://support.google.com/tagmanager/answer/7679219?hl=en) and then fire it from a 3rd party tag or from your JavaScript code: `dataLayer.push({'event': 'identifyVisitor'});`
2. Enter your [`public API key`](/reference/js-agent-start-function#apikey) and [`region`](/reference/js-agent-start-function#region).
3. In the **Additional fields** section, you can optionally configure the [`endpoints`](/reference/js-agent-start-function#endpoints), [`tag`](/reference/js-agent-get-function#tag), [`linkedId`](/reference/js-agent-get-function#linkedid). You can change **Result custom name** to change the name of the `result` object in the *dataLayer*.
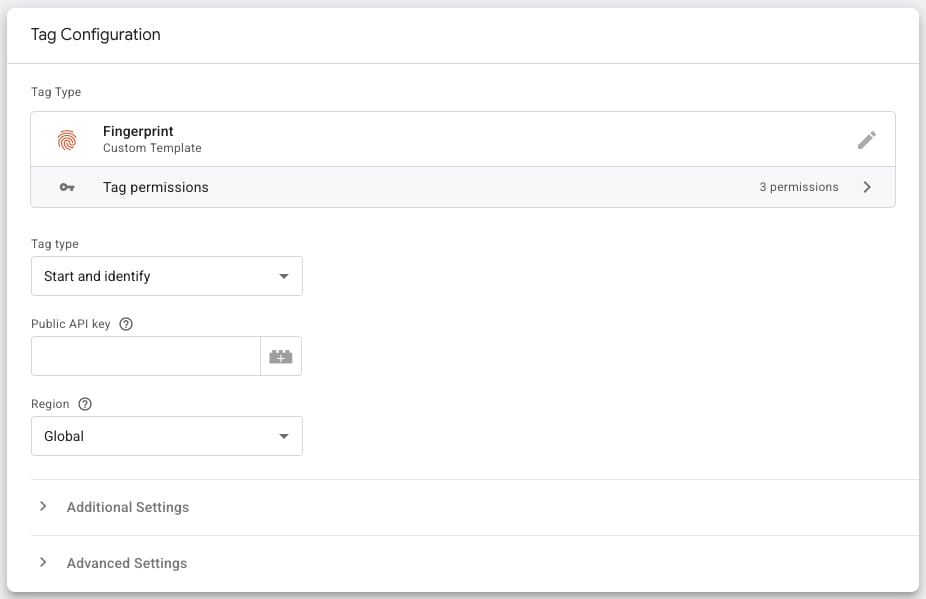 4. In the **Triggering** section, add a new trigger, for example: **Initialization**.\\
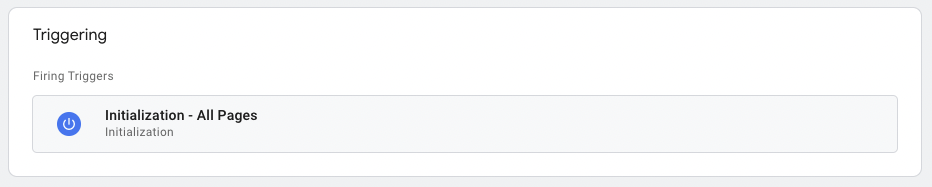 5. Click **Save** to save your tag.
6. Click **Submit** and publish your workspace changes to your website.
If the tag is configured correctly, you will see identification events on your [Fingerprint dashboard](https://dashboard.fingerprint.com/).
## Using the Fingerprint result in custom JavaScript code
Fingerprint data can be accessed through the GTM's [`dataLayer`](https://developers.google.com/tag-platform/tag-manager/web/datalayer) API in your JavaScript code. It's important to check if the result data (specified by *Result custom name*) is already present in the data layer.
```javascript theme={"theme":"github-dark-dimmed"}
window.dataLayer.push(function () {
if (this.get("FingerprintResult")) { // Make sure the page has already received result data
const result = this.get("FingerprintResult");
console.log(JSON.stringify(result)); // Use Fingerprint result
}
});
```
## Using the Fingerprint result in a custom variable
You can expose every property of the [`result`](/reference/js-agent-get-function#get-response-fields) object as a [user-defined variable](https://support.google.com/tagmanager/answer/7683362?hl=en) and use it in the configuration fields of other tags. For example, you can reference the [`visitor_id`](/reference/js-agent-get-function#visitor_id) as a variable in another tag.
1. Inside Google Tag Manager, go to **Variables**, and click **New** to create a new user-defined variable.
2. Select the **Data Layer Variable** type.
3. Name your variable, for example `VisitorID`.
4. Set **Data Layer Variable Name** to `FingerprintResult.visitor_id`. The data layer properties format follows the [result format](/reference/js-agent-get-function#get-response-fields) provided by the JavaScript agent.
5. Click **Save** to create the variable.
5. Click **Save** to save your tag.
6. Click **Submit** and publish your workspace changes to your website.
If the tag is configured correctly, you will see identification events on your [Fingerprint dashboard](https://dashboard.fingerprint.com/).
## Using the Fingerprint result in custom JavaScript code
Fingerprint data can be accessed through the GTM's [`dataLayer`](https://developers.google.com/tag-platform/tag-manager/web/datalayer) API in your JavaScript code. It's important to check if the result data (specified by *Result custom name*) is already present in the data layer.
```javascript theme={"theme":"github-dark-dimmed"}
window.dataLayer.push(function () {
if (this.get("FingerprintResult")) { // Make sure the page has already received result data
const result = this.get("FingerprintResult");
console.log(JSON.stringify(result)); // Use Fingerprint result
}
});
```
## Using the Fingerprint result in a custom variable
You can expose every property of the [`result`](/reference/js-agent-get-function#get-response-fields) object as a [user-defined variable](https://support.google.com/tagmanager/answer/7683362?hl=en) and use it in the configuration fields of other tags. For example, you can reference the [`visitor_id`](/reference/js-agent-get-function#visitor_id) as a variable in another tag.
1. Inside Google Tag Manager, go to **Variables**, and click **New** to create a new user-defined variable.
2. Select the **Data Layer Variable** type.
3. Name your variable, for example `VisitorID`.
4. Set **Data Layer Variable Name** to `FingerprintResult.visitor_id`. The data layer properties format follows the [result format](/reference/js-agent-get-function#get-response-fields) provided by the JavaScript agent.
5. Click **Save** to create the variable.
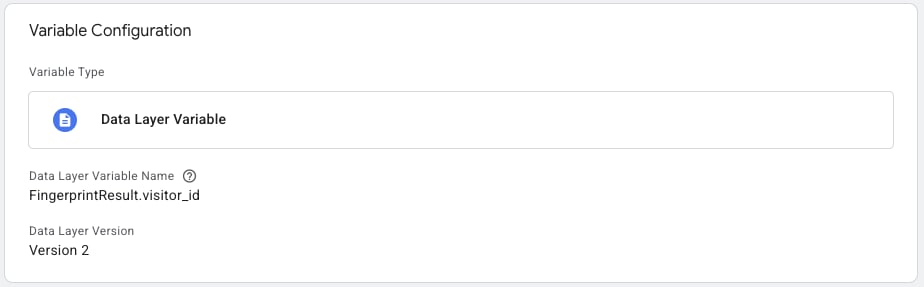 Now you can use the `{{VisitorID}}` variable in the configuration of 3rd party tags within your container. However, the tags need to wait for the Fingerprint `result` data:
1. Add a new Trigger to the 3rd party tag.
2. In the tag's configuration, add a new *Firing Trigger*, choose *Custom Event*, and enter `Fingerprint.identified`.
Now you can use the `{{VisitorID}}` variable in the configuration of 3rd party tags within your container. However, the tags need to wait for the Fingerprint `result` data:
1. Add a new Trigger to the 3rd party tag.
2. In the tag's configuration, add a new *Firing Trigger*, choose *Custom Event*, and enter `Fingerprint.identified`.
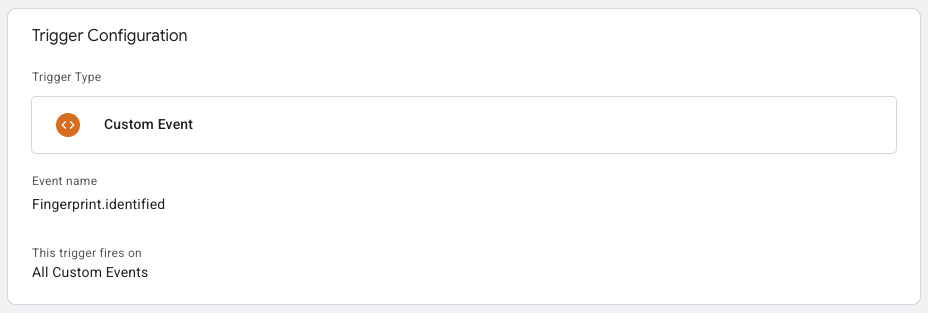 For testing purposes, you can create a [Custom HTML tag](https://support.google.com/tagmanager/answer/6107167?hl=en#) to log the variable to the console:
```html theme={"theme":"github-dark-dimmed"}
```
## Code and documentation
You can find the [code and technical documentation](https://github.com/fingerprintjs/gtm-integration) in the official GitHub repository.
## Limitations
* Some advanced JavaScript agent properties ([`storageKeyPrefix`](/reference/js-agent-start-function#storagekeyprefix), [`urlHashing`](/reference/js-agent-start-function#urlhashing), [`cache`](/reference/js-agent-start-function#cache)) are not currently supported. If you need to use these features, please contact [support](mailto:support@fingerprintjs.com).
* Ad-blocking browser extensions such as AdBlock, uBlock Origin, etc., can block all scripts served by Google Tag Manager, including Fingerprint. If this is a problem for your use case, see Google Tag Manager documentation for [Server-side tagging](https://developers.google.com/tag-platform/tag-manager/server-side) and [Custom domain configuration](https://developers.google.com/tag-platform/tag-manager/server-side/custom-domain).
## Migration guide for Google Tag Manager integration v2.0.0
Version 2.0.0 of the Google Tag Manager integration switches from JavaScript agent v3 to [JavaScript agent v4](/reference/migrating-from-v3-to-v4).
To migrate to version 2.0.0 from version 1.1.0 and earlier, you will need to:
1. Update your JavaScript code using the Fingerprint result
2. Update your Fingerprint tags to use the new [tag template][template-link]
3. Update user-defined variables referencing the Fingerprint result
4. Update triggers using Fingerprint custom events
5. Preview, test, and publish your changes
### 1. Update your JavaScript code using the Fingerprint result
If you have JavaScript code that is accessing the `FingerprintJSProResult`, you will need to update that code to use the new [`dataLayer`](https://developers.google.com/tag-platform/tag-manager/web/datalayer) result variable, named `FingerprintResult` by default.
Refer to the [JavaScript agent v4 reference](/reference/js-agent-get-function#get-response-fields) for the result format provided by the JavaScript agent.
To allow your JavaScript code to be updated before the new tags are created and published, you can support both agent v3 results and agent v4 results with the same code, using an approach similar to the code below:
```javascript theme={"theme":"github-dark-dimmed"}
window.dataLayer.push(function () {
if (this.get("FingerprintJSProResult")) {
const v3Result = this.get("FingerprintJSProResult");
console.log(v3Result.visitorId); // Use Fingerprint result
// [!code ++]
} else if (this.get("FingerprintResult")) {
const v4Result = this.get("FingerprintResult");// [!code ++]
console.log(v4Result.visitor_id);// [!code ++]
}
});
```
### 2. Update your Fingerprint tags to use the new tag template
First, follow the steps in the [Import the Fingerprint GTM template](#1-import-the-fingerprint-gtm-template) section to create the tag type for the version 2.0.0 Fingerprint tag.
The default name for the custom tag type, `Fingerprint`, differs from previous versions to avoid conflicts.
Next, update your tags by opening each tag for editing, taking note of the tags current parameter values, and then changing the tag type from the previous version, named `Fingerprint Pro` by default, to the new `Fingerprint` tag type.
Changing the tag type will reset the tag to its default state, and the parameter values you noted will need to be re-entered.
As you update your tags, you'll need to account for the following changes to the tag type's parameters:
* The `Tag type` parameter's values have changed from `Load and identify` and `Load` to `Start and identify` and `Start`, respectively.
* The `Script Url Pattern` and `Endpoint` parameters have been replaced by the `Endpoints` list. If you are using a custom subdomain or proxy integration, add an item to the `Endpoints` list with the endpoint URL for the integration.
* The `Extended result` parameter is no longer needed and has been removed.
* The default value for the `Result custom name` has changed from `FingerprintJSProResult` to `FingerprintResult`.
If the downstream usages of the result are not referencing individual properties, you might choose to use the previous `FingerprintJSProResult` name to limit the number of downstream updates you need to make.
After entering the parameter values, click **Save** to save your changes to the tag.
In step 5, you'll preview and test your changes before publishing to ensure a seamless migration to the new version without downtime.
### 3. Update user-defined variables referencing the Fingerprint result
Because the Fingerprint result format has changed with the migration to JavaScript agent v4, you will need to update each data layer variable that references the Fingerprint result values.
To update a variable, select the variable and edit the **Data Layer Variable Name** to use the new name for the value from the Fingerprint result.
When updating the data layer variable, take into account the value of the `Result custom name` parameter defined on the tag in the previous step. It defaults to `FingerprintResult` in version 2.0.0.
### 4. Update triggers using Fingerprint custom events
You will need to update triggers using custom events published by the Fingerprint tag, to account for changes to the names of these events in version 2.0.0.
Use the following mapping when updating your triggers:
| Previous event name | 2.0.0 event name |
| -------------------------- | ------------------------ |
| `FingerprintJS.loaded` | `Fingerprint.started` |
| `FingerprintJS.identified` | `Fingerprint.identified` |
### 5. Preview, test, and publish your changes
After creating the new tags and updating data layer variables to use JavaScript agent v4, use [Google Tag Manager Preview Mode](https://support.google.com/tagmanager/answer/6107056?hl=en) to test your changes before publishing.
Once you are satisfied with your changes, click **Publish** from the main workspace page to complete the migration.
[template-link]: https://github.com/fingerprintjs/gtm-integration/releases/latest/download/template.tpl
For testing purposes, you can create a [Custom HTML tag](https://support.google.com/tagmanager/answer/6107167?hl=en#) to log the variable to the console:
```html theme={"theme":"github-dark-dimmed"}
```
## Code and documentation
You can find the [code and technical documentation](https://github.com/fingerprintjs/gtm-integration) in the official GitHub repository.
## Limitations
* Some advanced JavaScript agent properties ([`storageKeyPrefix`](/reference/js-agent-start-function#storagekeyprefix), [`urlHashing`](/reference/js-agent-start-function#urlhashing), [`cache`](/reference/js-agent-start-function#cache)) are not currently supported. If you need to use these features, please contact [support](mailto:support@fingerprintjs.com).
* Ad-blocking browser extensions such as AdBlock, uBlock Origin, etc., can block all scripts served by Google Tag Manager, including Fingerprint. If this is a problem for your use case, see Google Tag Manager documentation for [Server-side tagging](https://developers.google.com/tag-platform/tag-manager/server-side) and [Custom domain configuration](https://developers.google.com/tag-platform/tag-manager/server-side/custom-domain).
## Migration guide for Google Tag Manager integration v2.0.0
Version 2.0.0 of the Google Tag Manager integration switches from JavaScript agent v3 to [JavaScript agent v4](/reference/migrating-from-v3-to-v4).
To migrate to version 2.0.0 from version 1.1.0 and earlier, you will need to:
1. Update your JavaScript code using the Fingerprint result
2. Update your Fingerprint tags to use the new [tag template][template-link]
3. Update user-defined variables referencing the Fingerprint result
4. Update triggers using Fingerprint custom events
5. Preview, test, and publish your changes
### 1. Update your JavaScript code using the Fingerprint result
If you have JavaScript code that is accessing the `FingerprintJSProResult`, you will need to update that code to use the new [`dataLayer`](https://developers.google.com/tag-platform/tag-manager/web/datalayer) result variable, named `FingerprintResult` by default.
Refer to the [JavaScript agent v4 reference](/reference/js-agent-get-function#get-response-fields) for the result format provided by the JavaScript agent.
To allow your JavaScript code to be updated before the new tags are created and published, you can support both agent v3 results and agent v4 results with the same code, using an approach similar to the code below:
```javascript theme={"theme":"github-dark-dimmed"}
window.dataLayer.push(function () {
if (this.get("FingerprintJSProResult")) {
const v3Result = this.get("FingerprintJSProResult");
console.log(v3Result.visitorId); // Use Fingerprint result
// [!code ++]
} else if (this.get("FingerprintResult")) {
const v4Result = this.get("FingerprintResult");// [!code ++]
console.log(v4Result.visitor_id);// [!code ++]
}
});
```
### 2. Update your Fingerprint tags to use the new tag template
First, follow the steps in the [Import the Fingerprint GTM template](#1-import-the-fingerprint-gtm-template) section to create the tag type for the version 2.0.0 Fingerprint tag.
The default name for the custom tag type, `Fingerprint`, differs from previous versions to avoid conflicts.
Next, update your tags by opening each tag for editing, taking note of the tags current parameter values, and then changing the tag type from the previous version, named `Fingerprint Pro` by default, to the new `Fingerprint` tag type.
Changing the tag type will reset the tag to its default state, and the parameter values you noted will need to be re-entered.
As you update your tags, you'll need to account for the following changes to the tag type's parameters:
* The `Tag type` parameter's values have changed from `Load and identify` and `Load` to `Start and identify` and `Start`, respectively.
* The `Script Url Pattern` and `Endpoint` parameters have been replaced by the `Endpoints` list. If you are using a custom subdomain or proxy integration, add an item to the `Endpoints` list with the endpoint URL for the integration.
* The `Extended result` parameter is no longer needed and has been removed.
* The default value for the `Result custom name` has changed from `FingerprintJSProResult` to `FingerprintResult`.
If the downstream usages of the result are not referencing individual properties, you might choose to use the previous `FingerprintJSProResult` name to limit the number of downstream updates you need to make.
After entering the parameter values, click **Save** to save your changes to the tag.
In step 5, you'll preview and test your changes before publishing to ensure a seamless migration to the new version without downtime.
### 3. Update user-defined variables referencing the Fingerprint result
Because the Fingerprint result format has changed with the migration to JavaScript agent v4, you will need to update each data layer variable that references the Fingerprint result values.
To update a variable, select the variable and edit the **Data Layer Variable Name** to use the new name for the value from the Fingerprint result.
When updating the data layer variable, take into account the value of the `Result custom name` parameter defined on the tag in the previous step. It defaults to `FingerprintResult` in version 2.0.0.
### 4. Update triggers using Fingerprint custom events
You will need to update triggers using custom events published by the Fingerprint tag, to account for changes to the names of these events in version 2.0.0.
Use the following mapping when updating your triggers:
| Previous event name | 2.0.0 event name |
| -------------------------- | ------------------------ |
| `FingerprintJS.loaded` | `Fingerprint.started` |
| `FingerprintJS.identified` | `Fingerprint.identified` |
### 5. Preview, test, and publish your changes
After creating the new tags and updating data layer variables to use JavaScript agent v4, use [Google Tag Manager Preview Mode](https://support.google.com/tagmanager/answer/6107056?hl=en) to test your changes before publishing.
Once you are satisfied with your changes, click **Publish** from the main workspace page to complete the migration.
[template-link]: https://github.com/fingerprintjs/gtm-integration/releases/latest/download/template.tpl