> ## Documentation Index
> Fetch the complete documentation index at: https://docs.fingerprint.com/llms.txt
> Use this file to discover all available pages before exploring further.
# Overview
> Fingerprint JavaScript agent v4.0.0 or later is required.
Fingerprint Cloudflare Proxy Integration proxies JavaScript agent download and identification requests between your website and Fingerprint through Cloudflare. Your website does not strictly need to be behind Cloudflare to use this proxy integration, although that is optimal for ease of setup and maximum accuracy benefits.
This guide assumes you are using [JavaScript agent v4](/reference/js-agent). If you are still
using JavaScript agent v3, see [Cloudflare Proxy Integration
(v3)](/docs/v3/cloudflare-integration) or migrate to [JavaScript agent
v4](/reference/migrating-from-v3-to-v4).
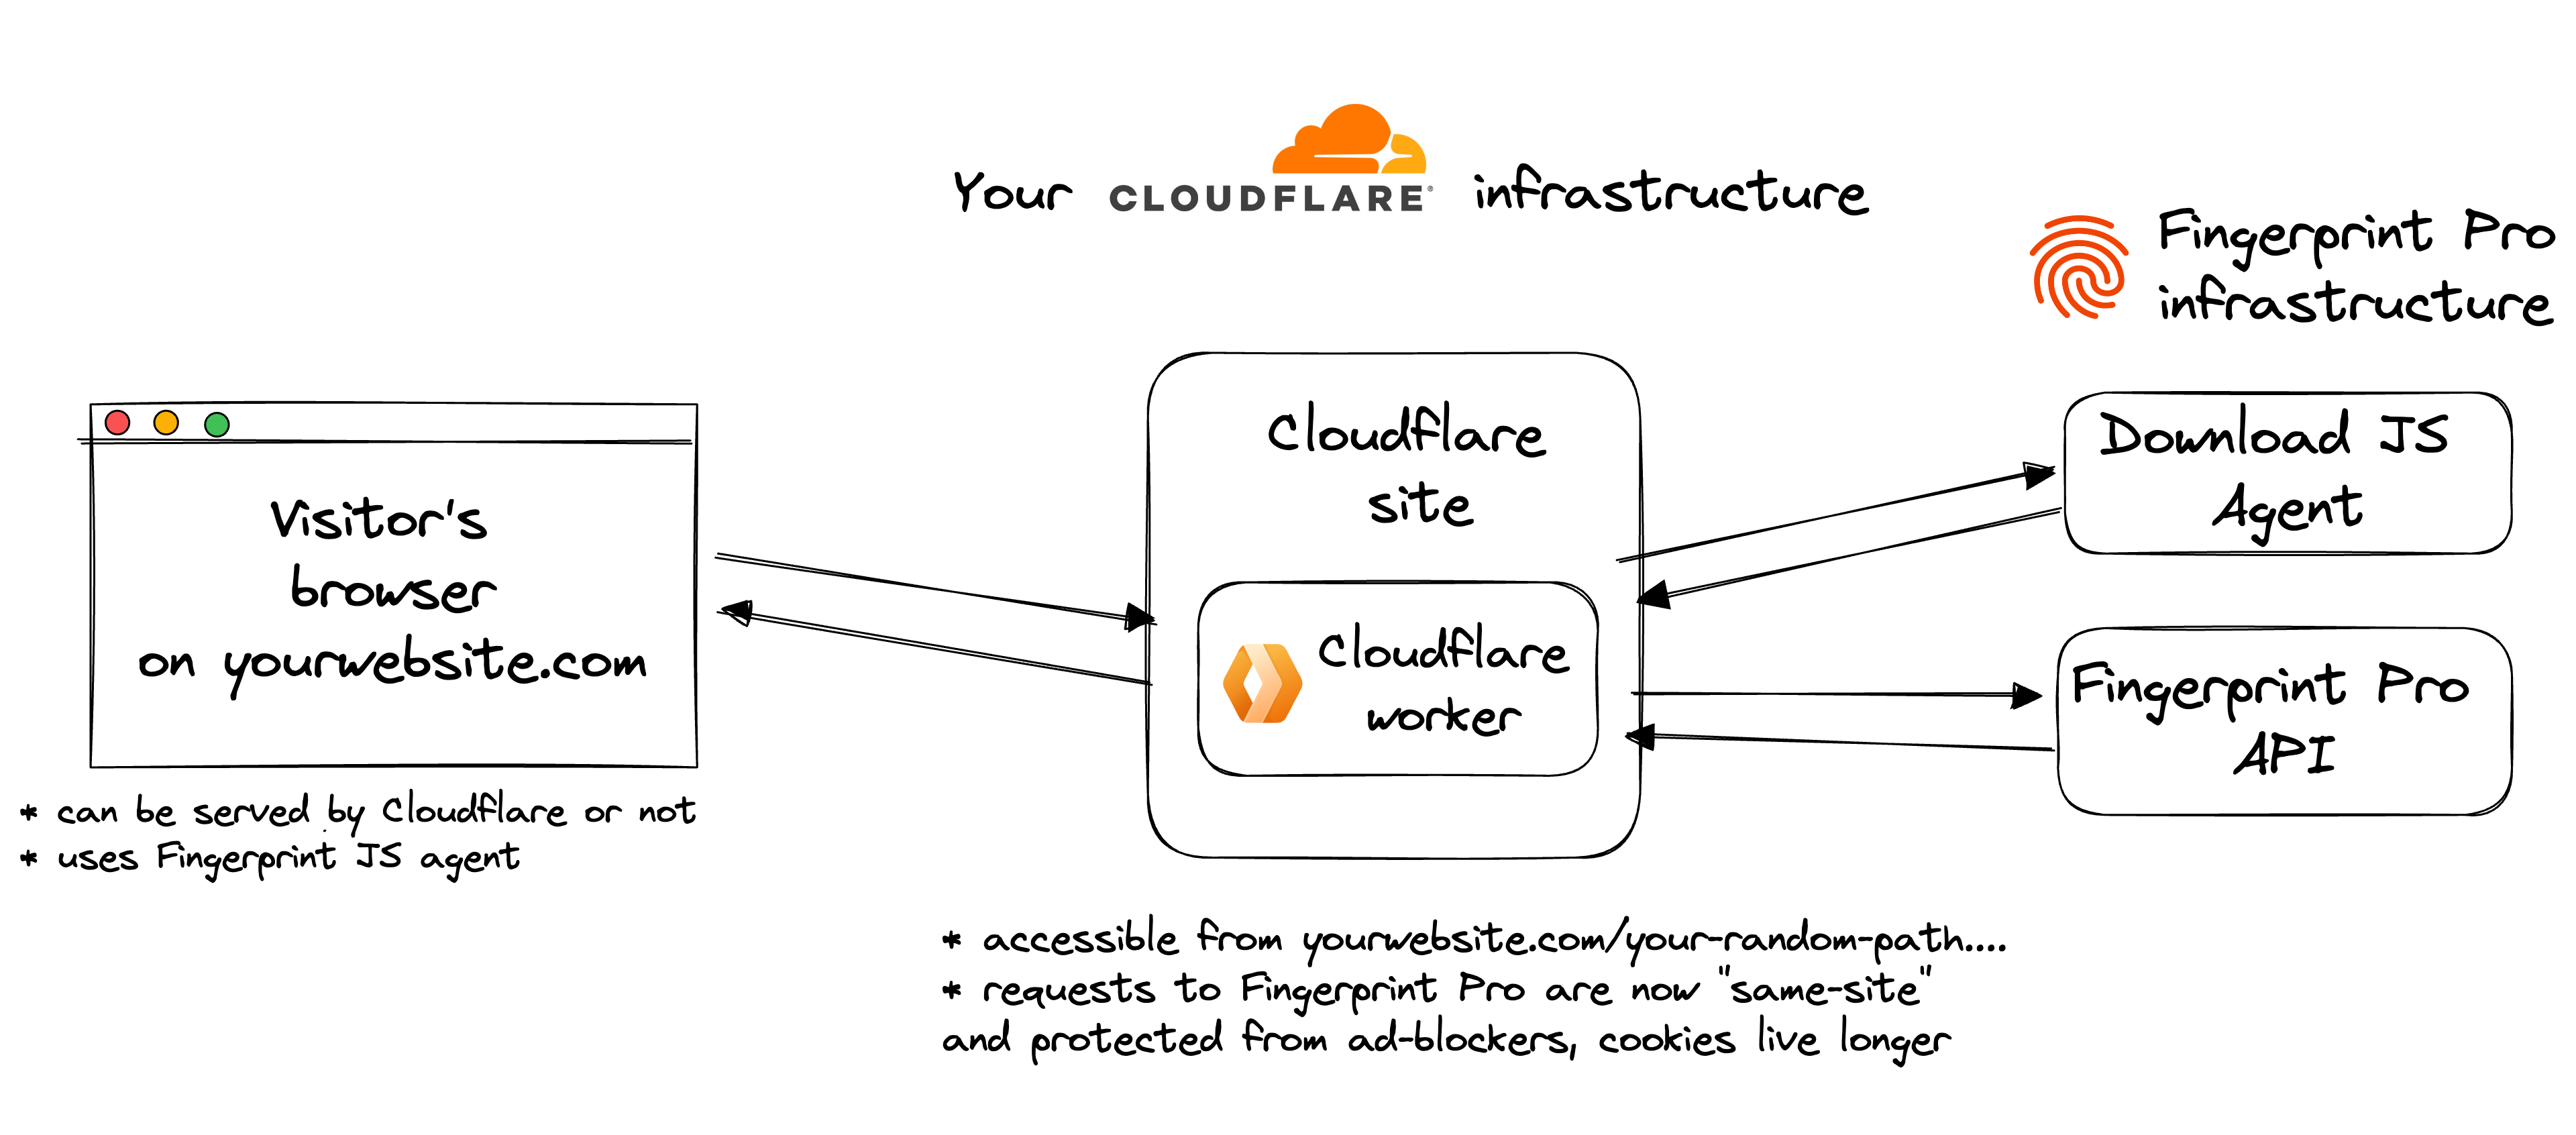 The integration consists of three components:
* Fingerprint infrastructure
* Cloudflare worker, created and managed by Fingerprint but running in your Cloudflare account
* Fingerprint JavaScript agent installed on your website
Fingerprint creates a [Cloudflare Worker](https://workers.cloudflare.com/) on a specific path on your site. The rest of your site is not affected.
Cloudflare worker code is open-source and available [on GitHub](https://github.com/fingerprintjs/cloudflare-worker-proxy). Once the Fingerprint JavaScript agent is configured correctly, the worker delivers the latest client-side logic and proxies identification requests and responses between your site and Fingerprint APIs.
## The benefits of using Cloudflare Proxy Integration
* Significant increase in accuracy in browsers with strict privacy features such as Safari or Firefox
* Cookies are recognized as first-party, so they can live longer in the browser and extend the lifetime of visitor IDs
* Ad blockers do not block the Fingerprint JavaScript agent from loading
* Ad blockers do not block identification requests because they are sent to a path or subdomain that belongs to your site
* Insight and control over identification requests that you can combine with other Cloudflare features such as WAF or Analytics
* The ability to manage unlimited subdomains and paths and provide Fingerprint services to all your customers at any scale while benefiting from first-party integration improvements
* Cookie security: the Cloudflare integration drops all cookies sent from the origin website. The worker code is open-source, so you can verify and audit this behavior
* Easier compliance and auditing
## Setup
The Cloudflare configuration guide in the Fingerprint [dashboard](https://dashboard.fingerprint.com/) will help you set everything up step by step. Start the guide from **SDKs & integrations**.
**Prerequisites**
* Only users with the **Admin** or **Owner** roles can launch the Cloudflare configuration guide in the dashboard.
* Cloudflare Proxy Integration uses the Cloudflare Workers [Custom Routes](https://developers.cloudflare.com/workers/platform/triggers/routes/) feature. Your site must be [added to Cloudflare](https://developers.cloudflare.com/fundamentals/get-started/setup/add-site/) and [proxied](https://developers.cloudflare.com/dns/manage-dns-records/reference/proxied-dns-records/) through Cloudflare, not DNS-only. If you can only add your domain to Cloudflare without proxying, see [Alternative worker subdomain setup (for DNS-only domains)](#alternative-worker-subdomain-setup-for-dns-only-domains).
### Step 1: Follow the Cloudflare configuration wizard
1. Go to **SDKs & integrations**, then select **Cloudflare**.
The integration consists of three components:
* Fingerprint infrastructure
* Cloudflare worker, created and managed by Fingerprint but running in your Cloudflare account
* Fingerprint JavaScript agent installed on your website
Fingerprint creates a [Cloudflare Worker](https://workers.cloudflare.com/) on a specific path on your site. The rest of your site is not affected.
Cloudflare worker code is open-source and available [on GitHub](https://github.com/fingerprintjs/cloudflare-worker-proxy). Once the Fingerprint JavaScript agent is configured correctly, the worker delivers the latest client-side logic and proxies identification requests and responses between your site and Fingerprint APIs.
## The benefits of using Cloudflare Proxy Integration
* Significant increase in accuracy in browsers with strict privacy features such as Safari or Firefox
* Cookies are recognized as first-party, so they can live longer in the browser and extend the lifetime of visitor IDs
* Ad blockers do not block the Fingerprint JavaScript agent from loading
* Ad blockers do not block identification requests because they are sent to a path or subdomain that belongs to your site
* Insight and control over identification requests that you can combine with other Cloudflare features such as WAF or Analytics
* The ability to manage unlimited subdomains and paths and provide Fingerprint services to all your customers at any scale while benefiting from first-party integration improvements
* Cookie security: the Cloudflare integration drops all cookies sent from the origin website. The worker code is open-source, so you can verify and audit this behavior
* Easier compliance and auditing
## Setup
The Cloudflare configuration guide in the Fingerprint [dashboard](https://dashboard.fingerprint.com/) will help you set everything up step by step. Start the guide from **SDKs & integrations**.
**Prerequisites**
* Only users with the **Admin** or **Owner** roles can launch the Cloudflare configuration guide in the dashboard.
* Cloudflare Proxy Integration uses the Cloudflare Workers [Custom Routes](https://developers.cloudflare.com/workers/platform/triggers/routes/) feature. Your site must be [added to Cloudflare](https://developers.cloudflare.com/fundamentals/get-started/setup/add-site/) and [proxied](https://developers.cloudflare.com/dns/manage-dns-records/reference/proxied-dns-records/) through Cloudflare, not DNS-only. If you can only add your domain to Cloudflare without proxying, see [Alternative worker subdomain setup (for DNS-only domains)](#alternative-worker-subdomain-setup-for-dns-only-domains).
### Step 1: Follow the Cloudflare configuration wizard
1. Go to **SDKs & integrations**, then select **Cloudflare**.
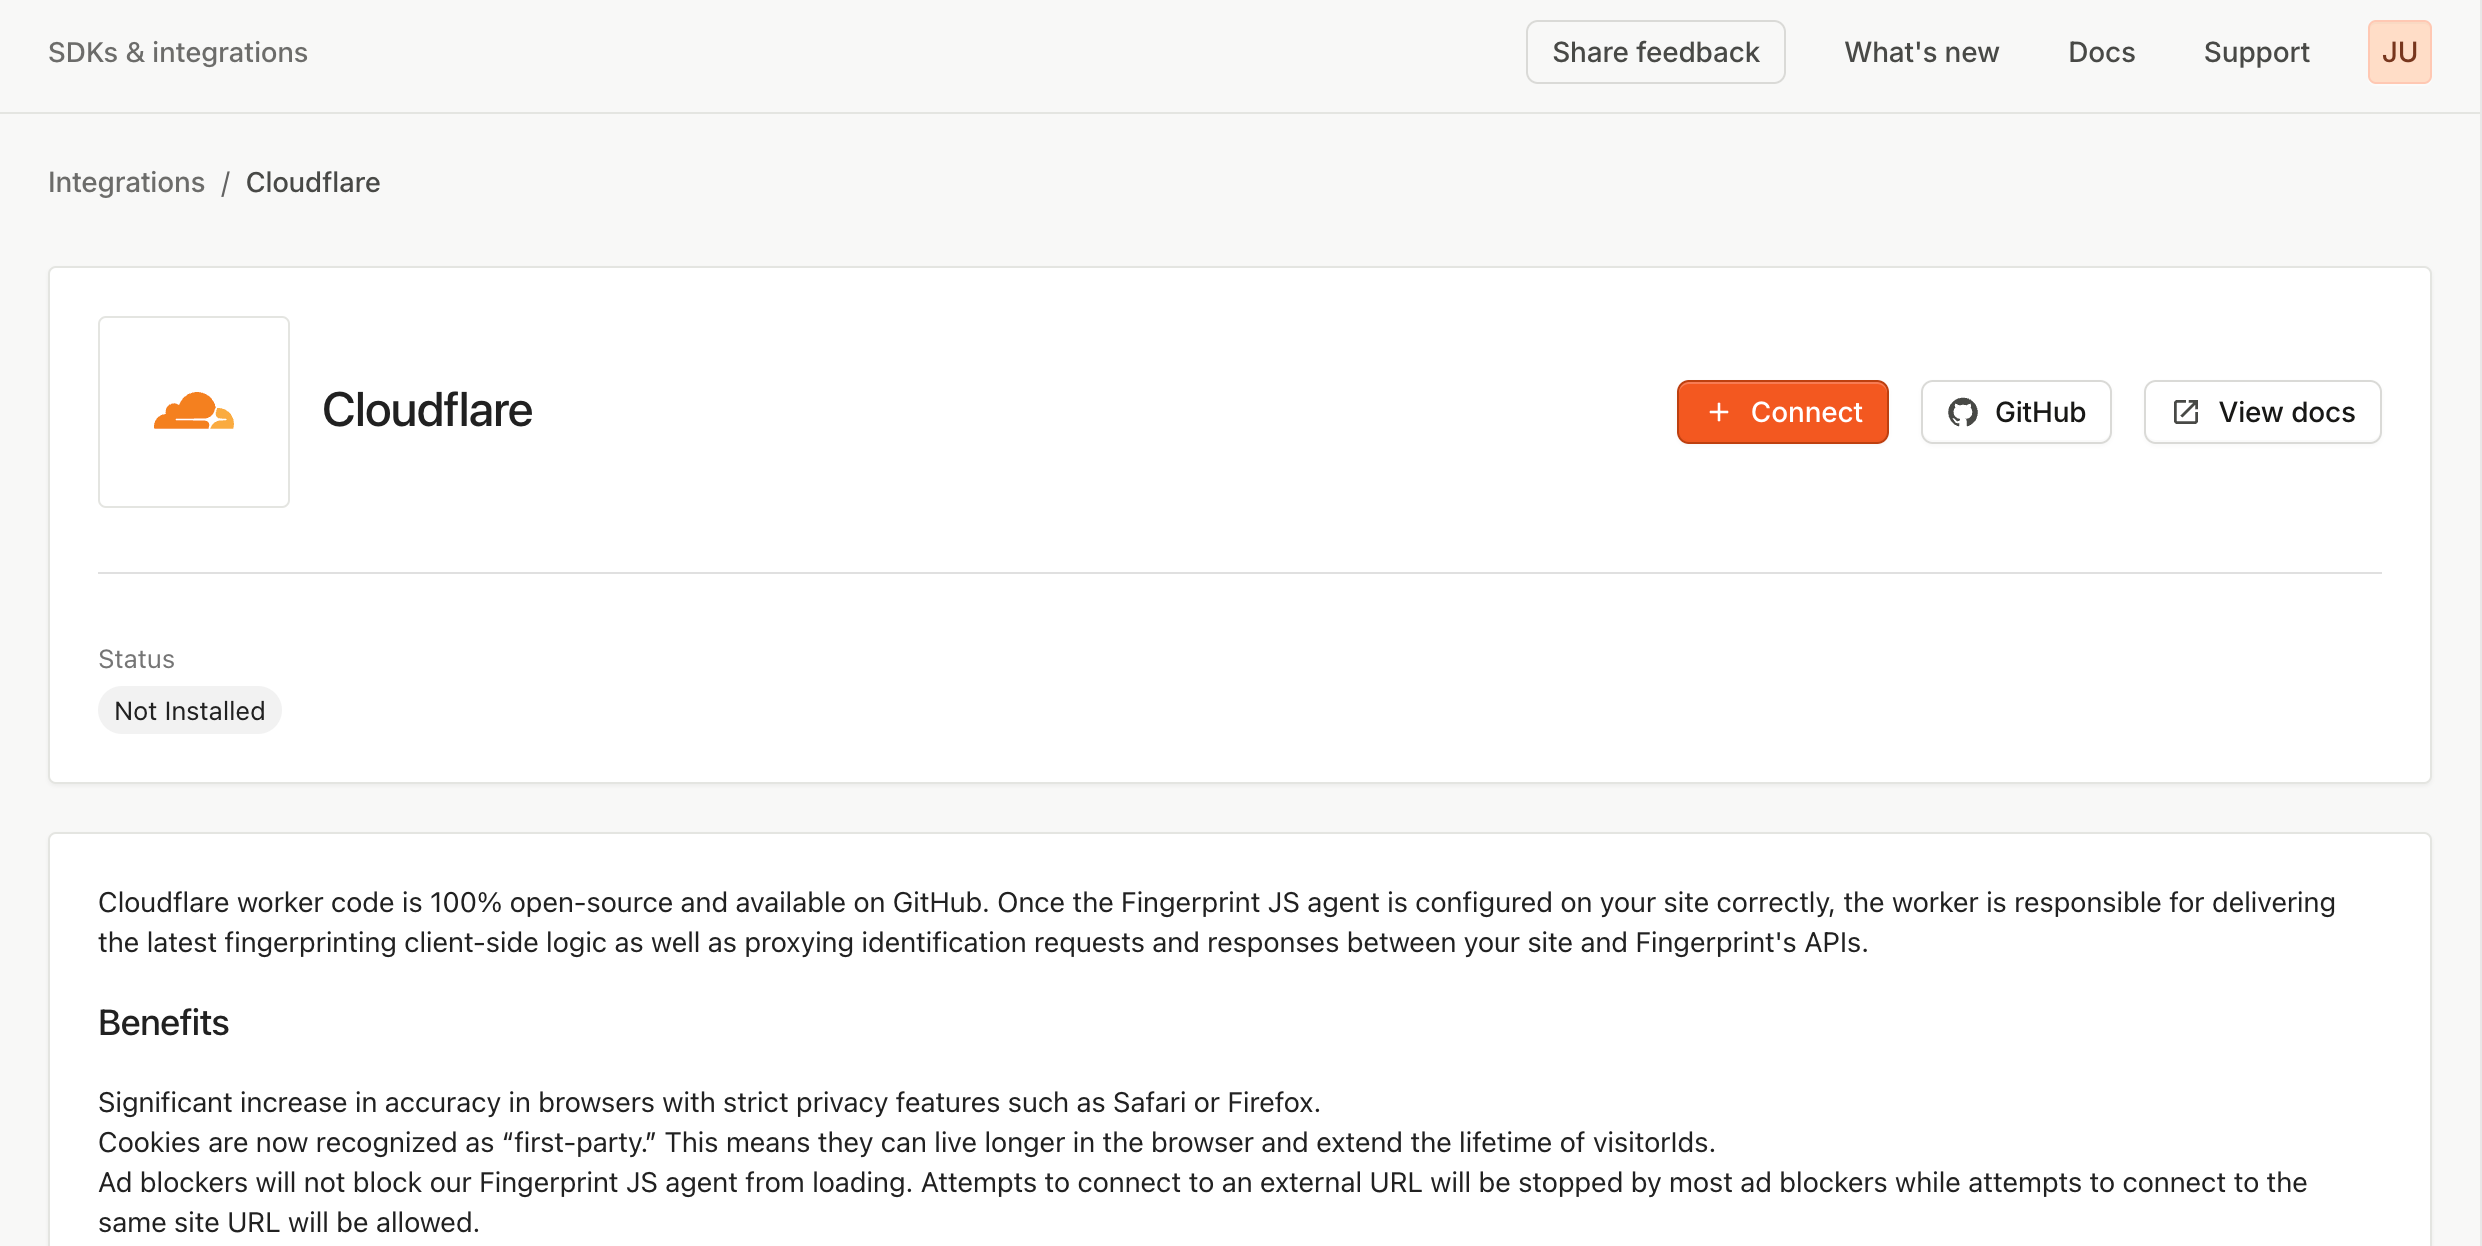
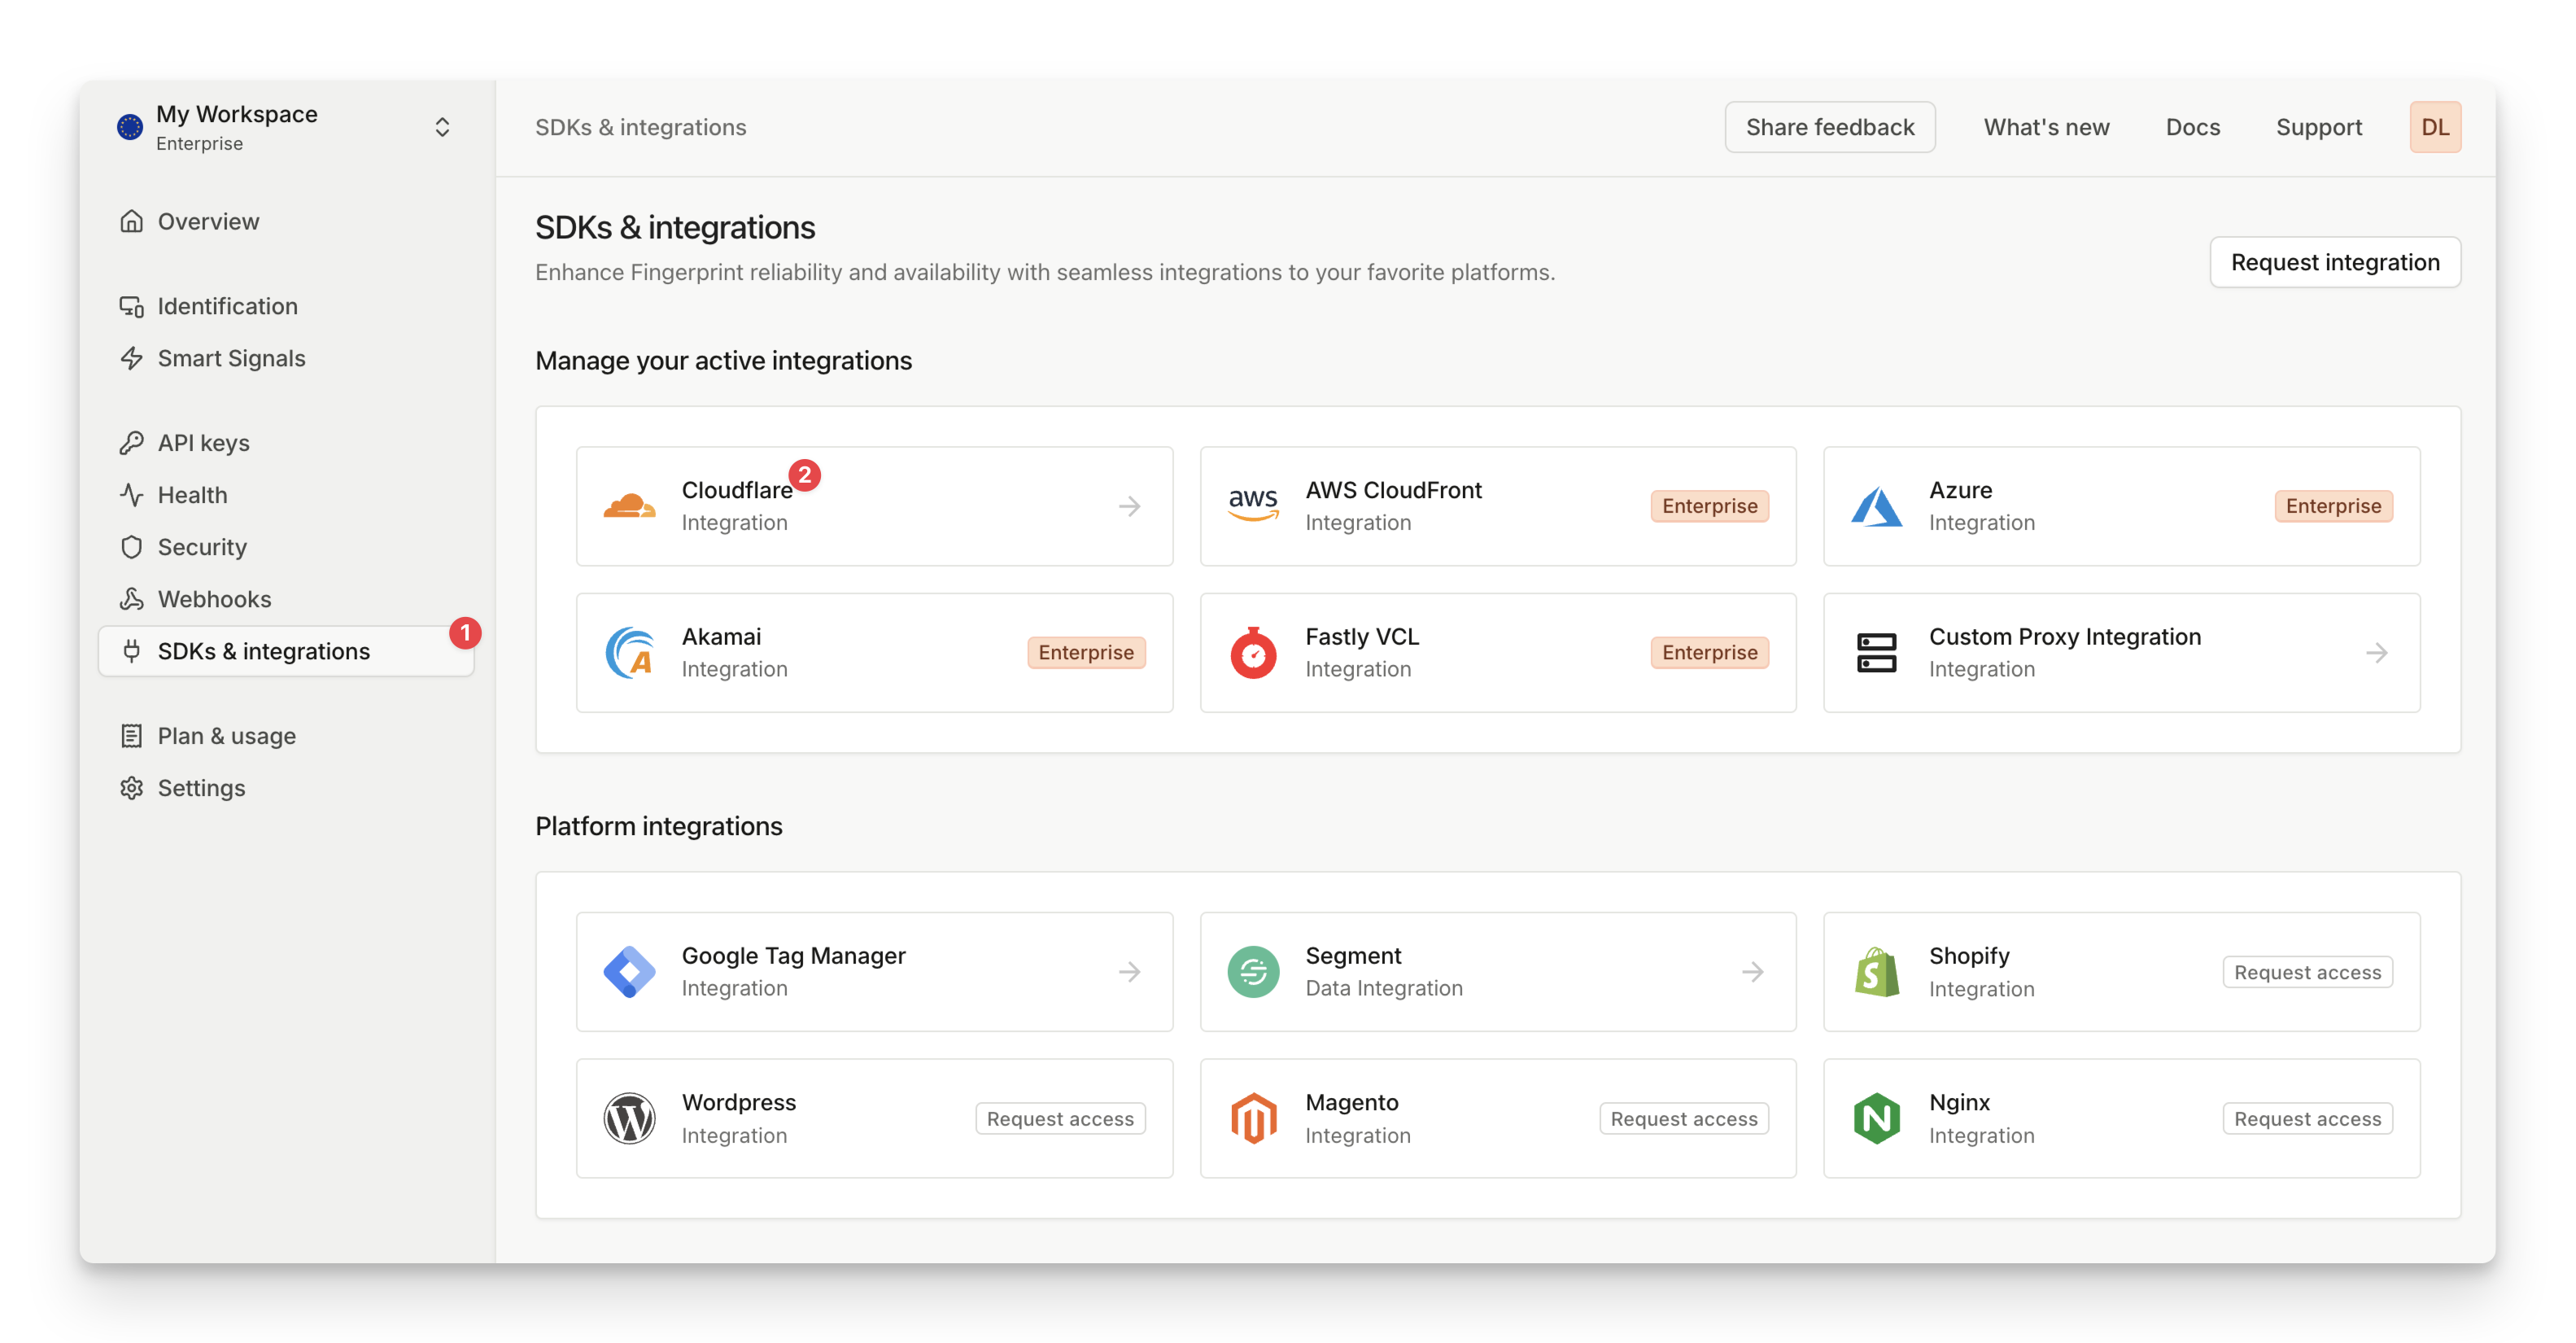 2. In the Cloudflare configuration guide, click **Connect**.
 3. Optionally, [scope the integration to a specific environment](/docs/multiple-environments#proxy-integrations-and-proxy-secrets).
* By default, the integration works for all environments in your workspace.
* If you scope the integration to a specific environment, it will only proxy identification requests made with public API keys from that environment.
4. Add information about your Cloudflare account.
3. Optionally, [scope the integration to a specific environment](/docs/multiple-environments#proxy-integrations-and-proxy-secrets).
* By default, the integration works for all environments in your workspace.
* If you scope the integration to a specific environment, it will only proxy identification requests made with public API keys from that environment.
4. Add information about your Cloudflare account.
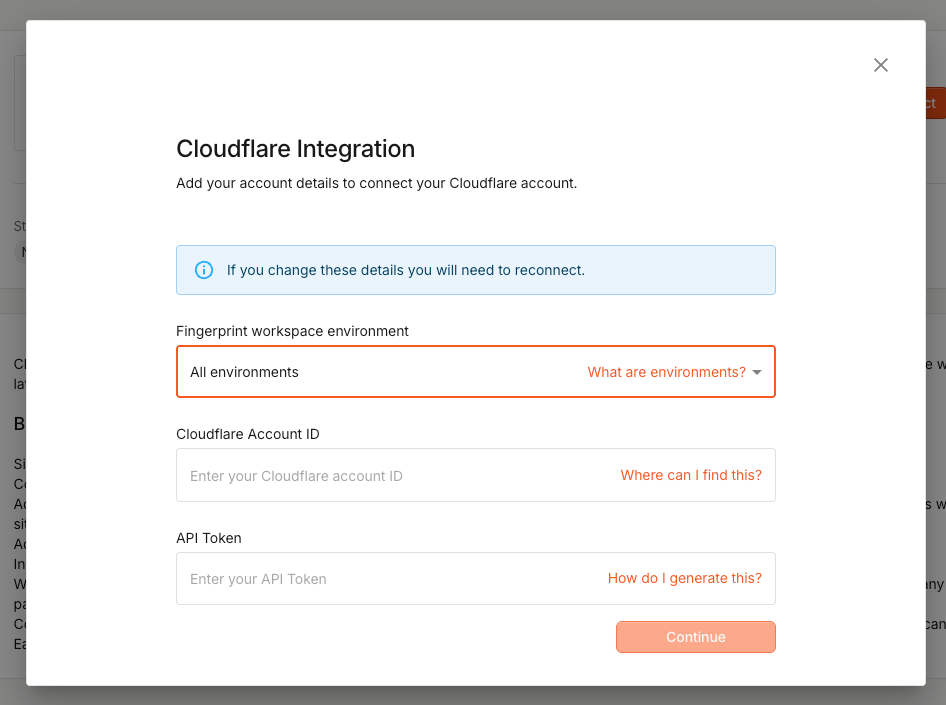
| Name | Example | Short description |
| :-------------------- | :--------------------------------------- | :--------------------------------------------------------------------------------------------------------- |
| Cloudflare Account ID | 88e2a7348d589a61edd0918e57fb136f | The Account ID from the [Cloudflare Dashboard](https://dash.cloudflare.com/). |
| Cloudflare API Token | YQSnnxWAQiiEh9qM58wZNnyQS7FUdoqGIUAbrh7T | API token generated on Cloudflare's [**API Tokens** page](https://dash.cloudflare.com/profile/api-tokens). |
#### Cloudflare Account ID
The account ID is required to deploy workers. Go to [Cloudflare Workers](https://dash.cloudflare.com/?to=/:account/workers) and copy the account ID.
#### Cloudflare API token
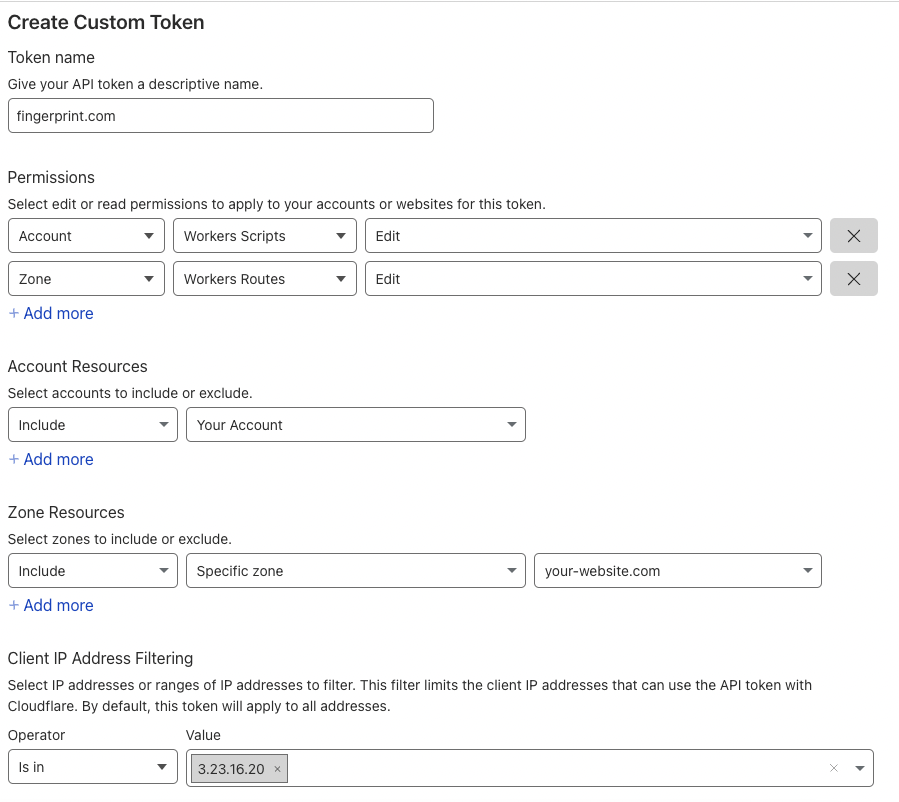
The API token is required to deploy workers. Go to the [**API Tokens** page](https://dash.cloudflare.com/profile/api-tokens), select [**Create Custom Token**](https://dash.cloudflare.com/profile/api-tokens?permissionGroupKeys=%5B%7B"key"%3A"workers_routes"%2C"type"%3A"edit"%7D%2C%7B"key"%3A"workers_scripts"%2C"type"%3A"edit"%7D%5D\&name=fingerprint.com), and follow these steps:
* Type `fingerprint.com` in the name field
* Add the **Workers Scripts** > **Edit** account permission
* Add the **Workers Routes** > **Edit** zone permission
* Select the account in **Account Resources**
* Select the website in **Zone Resources**
* Add IP filtering for `3.23.16.20`
* Do not set a TTL
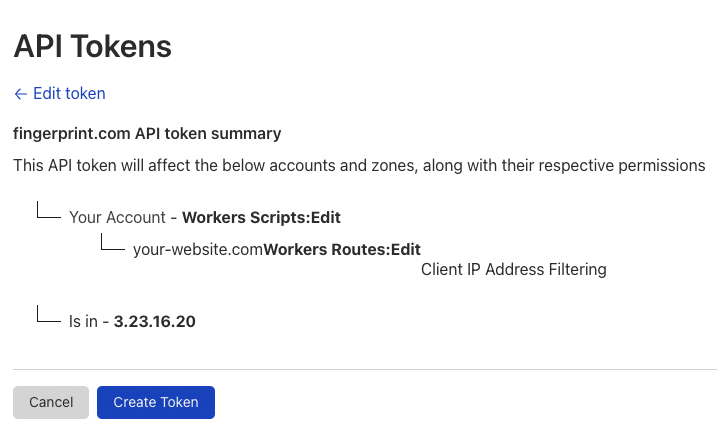
 In the next step, review the summary and click **Create Token**.
 **API token safety**
When creating an API token, grant as few privileges as possible. In the example above, the token can only manage workers in your account. Fingerprint uses your API token only for managing the Fingerprint Cloudflare worker.
Fingerprint encrypts customer data, including API tokens and configuration items. Client IP address filtering adds another layer of security. Allowing the Fingerprint Cloudflare service IP ensures the API token can only be used by Fingerprint services.
5. After entering the account ID and API token, continue to the next step.
**API token safety**
When creating an API token, grant as few privileges as possible. In the example above, the token can only manage workers in your account. Fingerprint uses your API token only for managing the Fingerprint Cloudflare worker.
Fingerprint encrypts customer data, including API tokens and configuration items. Client IP address filtering adds another layer of security. Allowing the Fingerprint Cloudflare service IP ensures the API token can only be used by Fingerprint services.
5. After entering the account ID and API token, continue to the next step.
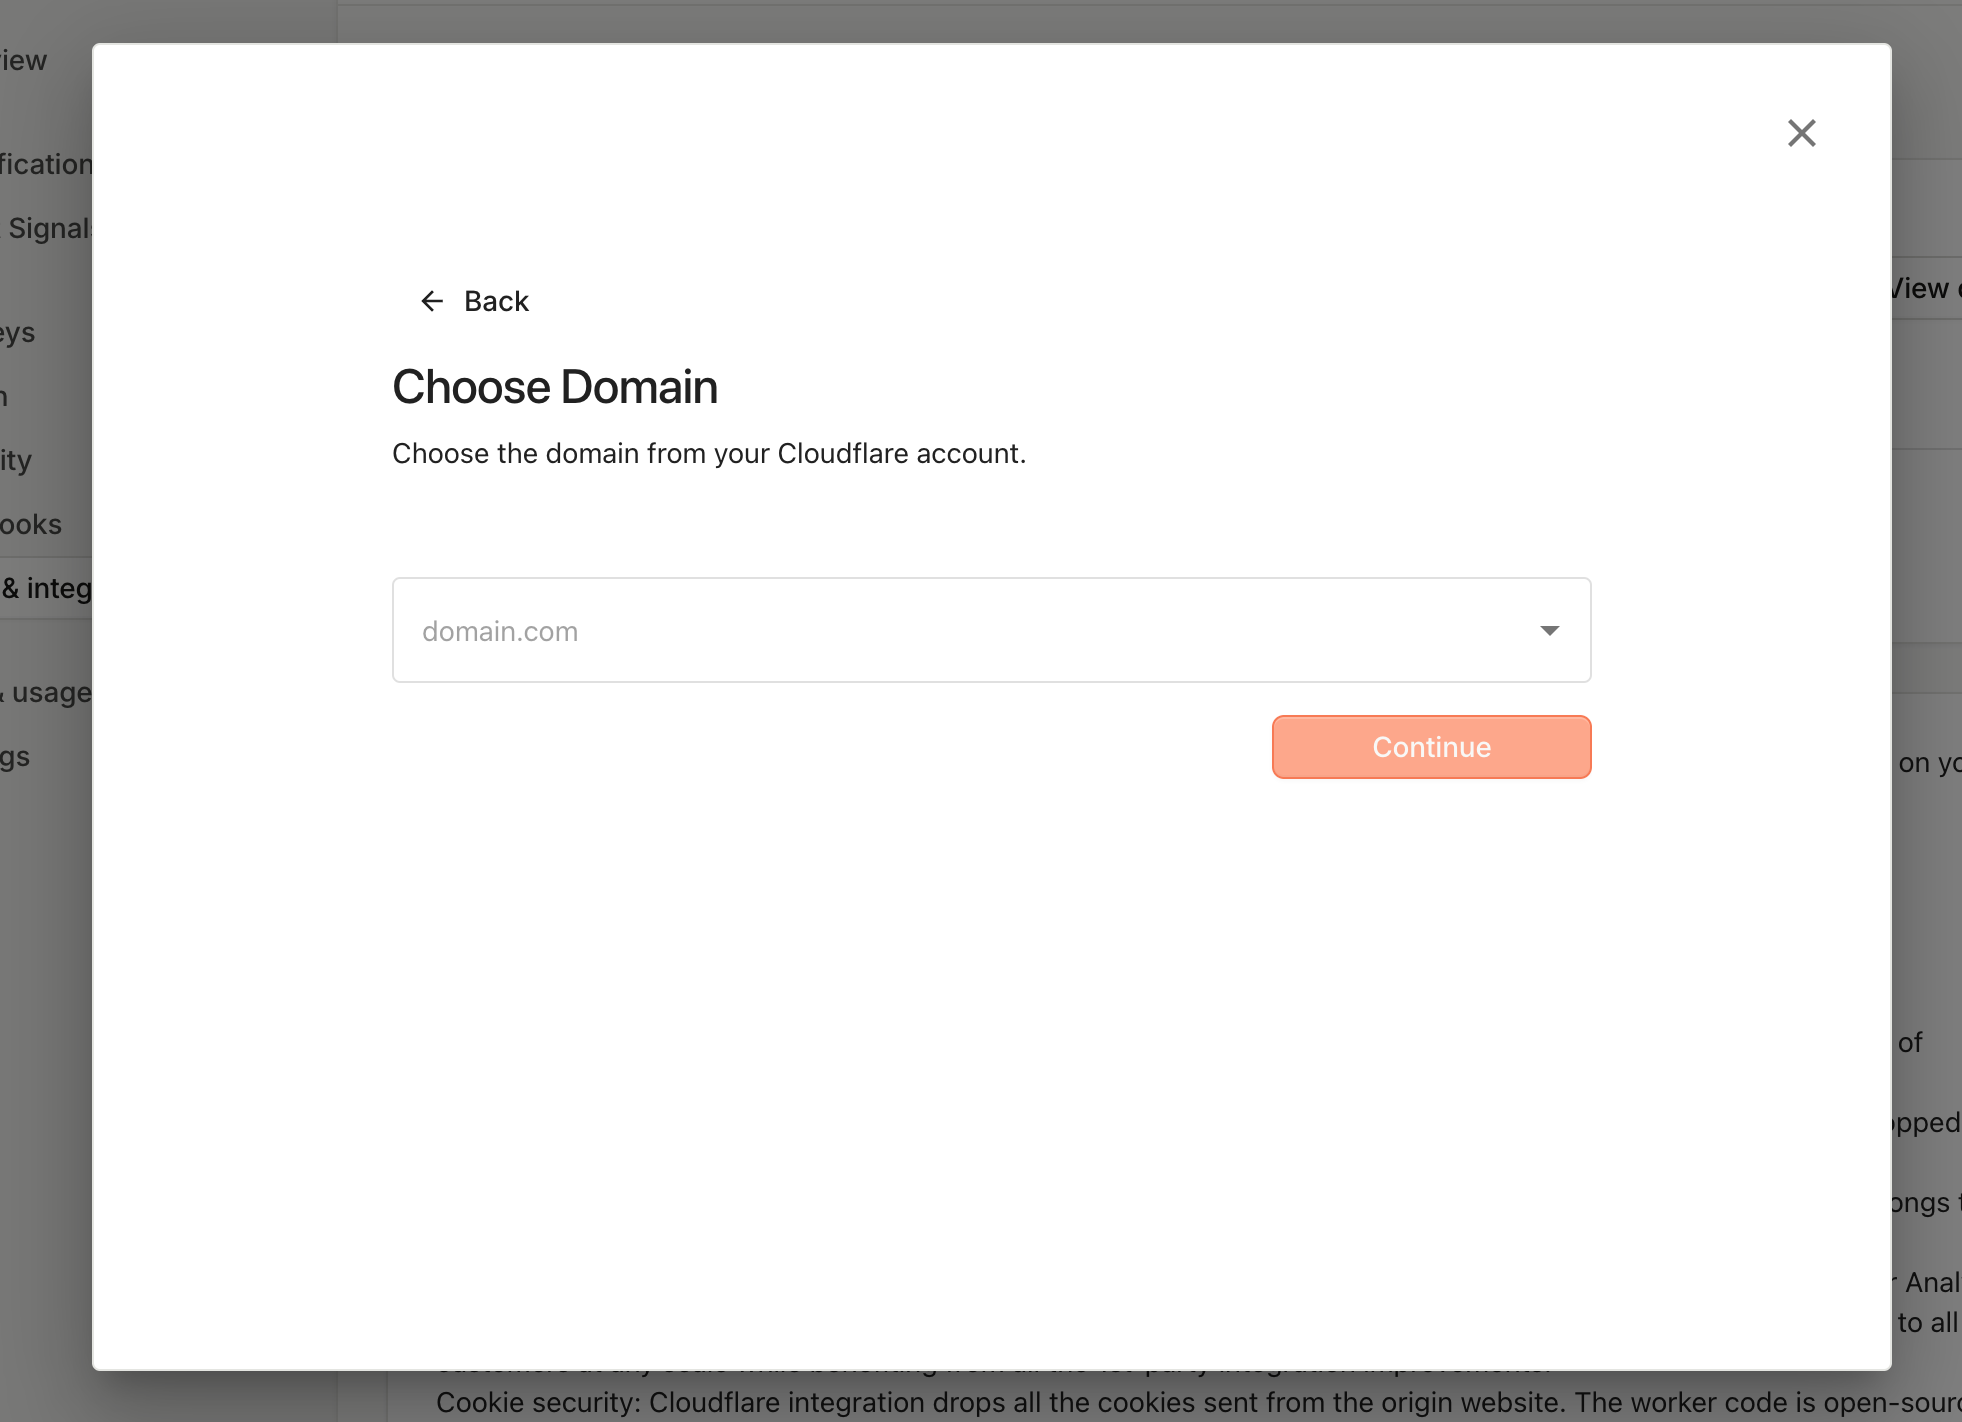 6. Select the same domain you used when creating the API token. If you do not see the domain you want to use, contact [support](https://fingerprint.com/support).
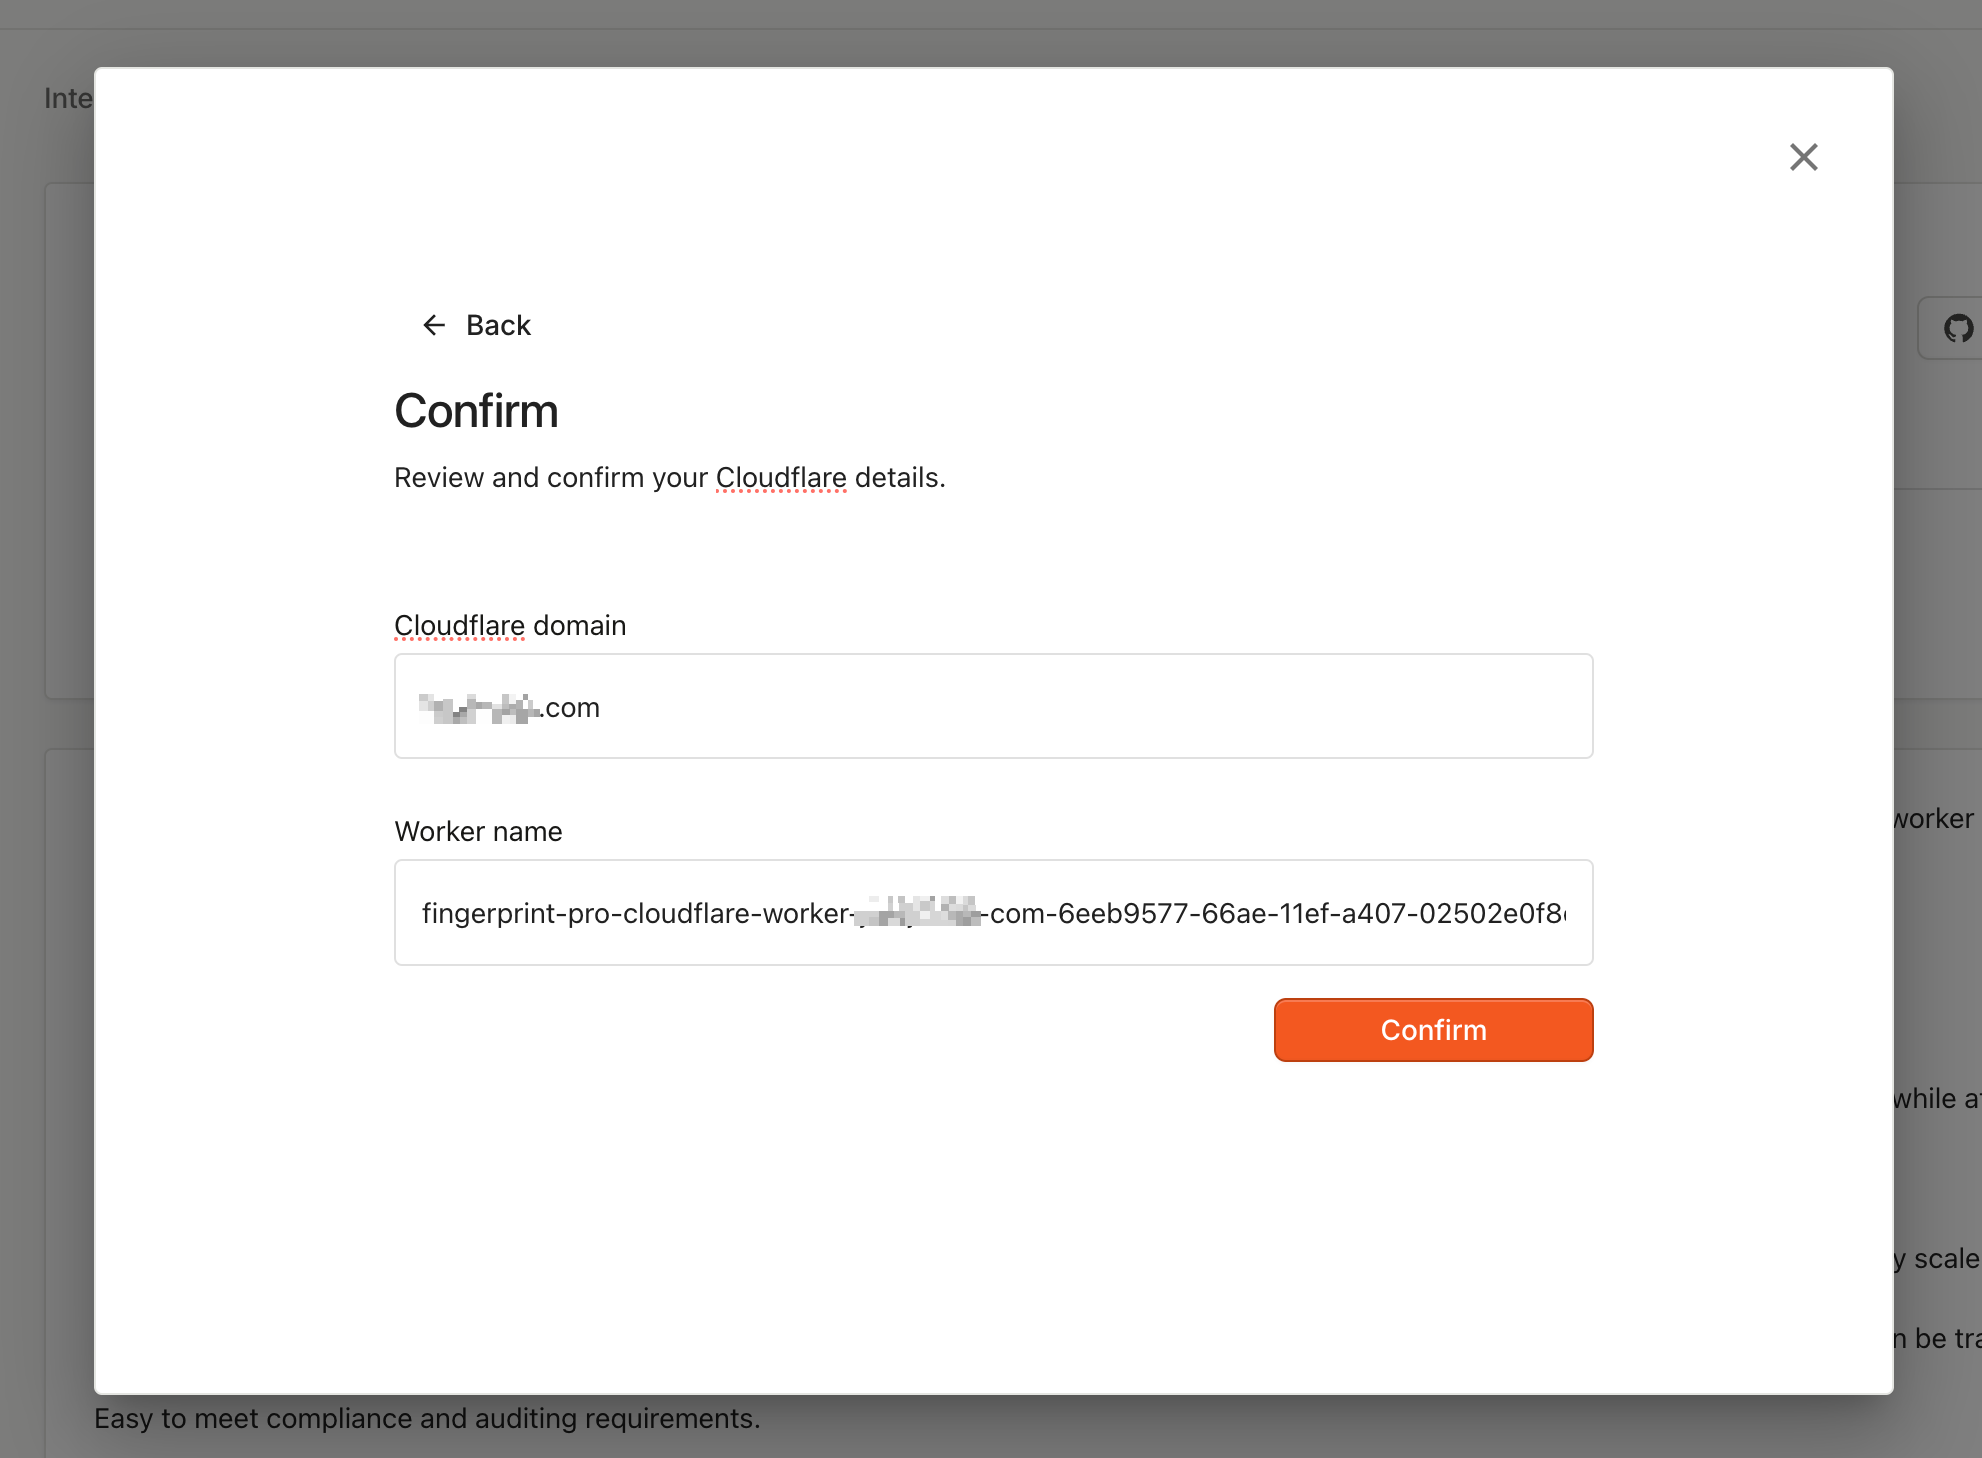 7. Confirm the deployment. This process can take several minutes.
Once deployment completes, Fingerprint creates a worker named like `fingerprint-pro-cloudflare-worker-random-id`. You can see it in the [Cloudflare Workers Dashboard](https://dash.cloudflare.com/?to=/:account/workers/overview).
**Do not disrupt worker authentication or updates**
The integration wizard creates a proxy secret in your Fingerprint dashboard and passes it to your Cloudflare worker through environment variables.
Do not delete the proxy secret in either place. Proxied identification requests without a valid proxy secret fail with an authentication error.
Fingerprint updates your Cloudflare worker to keep visitor identification working correctly as browsers change. Outdated worker configuration can lower accuracy or break visitor identification completely. Do not make changes that would prevent Fingerprint from updating your worker:
* Do not reduce the API token permissions or revoke it
* Do not change the worker name
* Do not change the original worker route or configuration
### Step 2: Configure your JavaScript agent
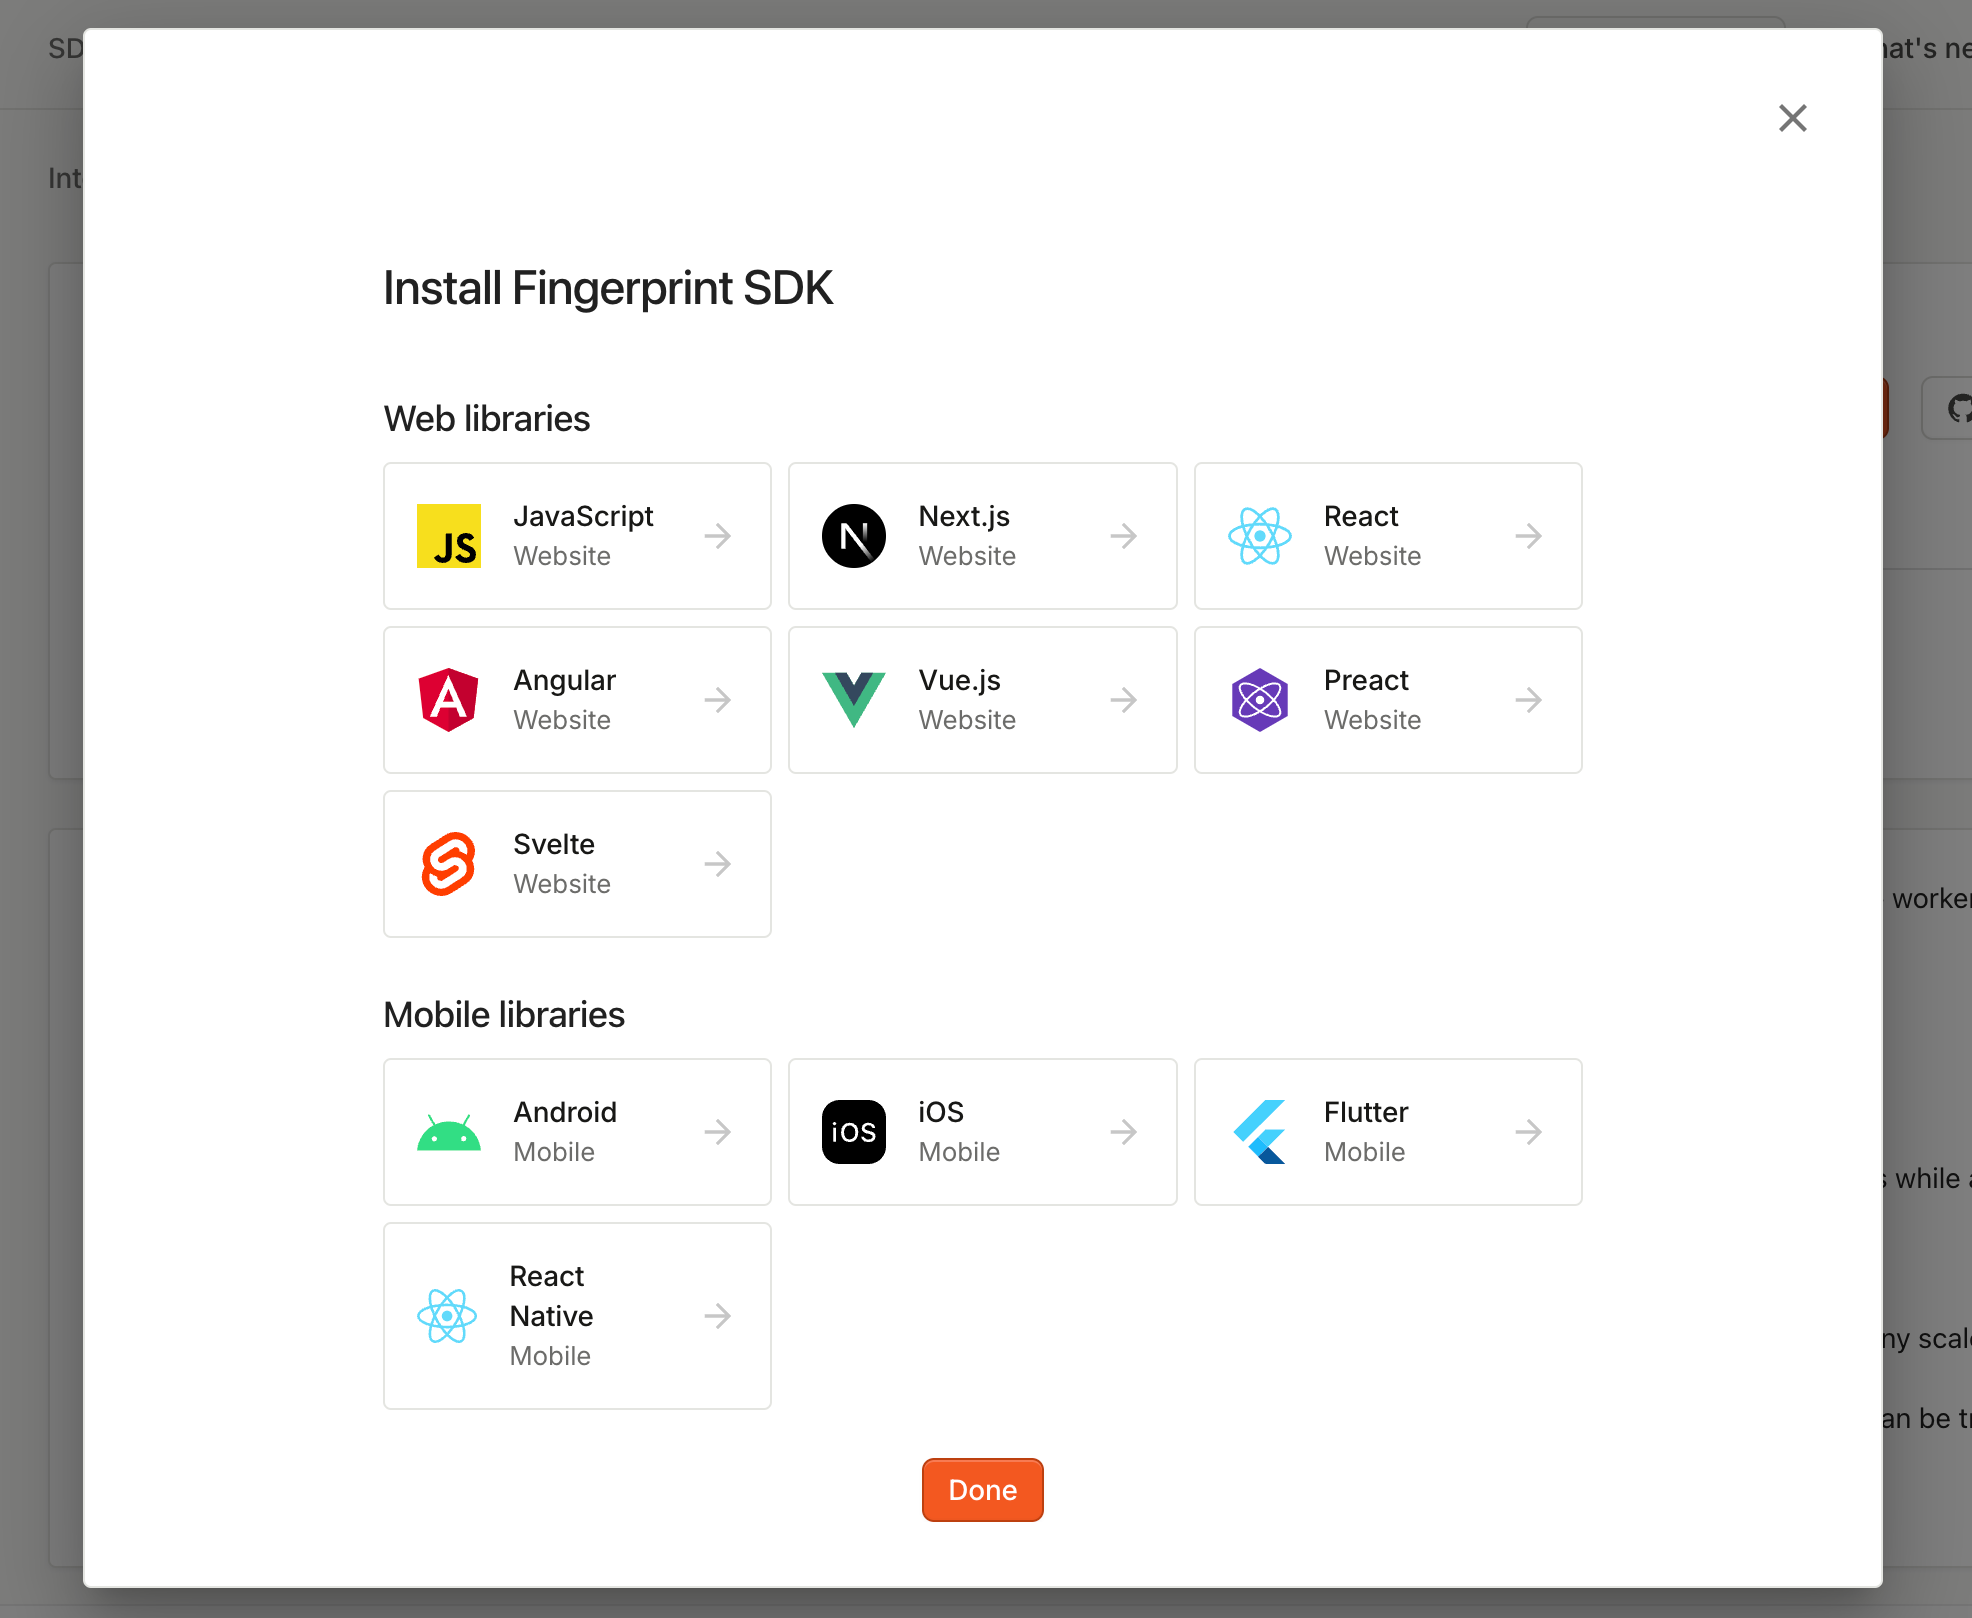
Once the worker is deployed, configure your client-side application to use it. You can always return to **SDKs & integrations** to get code snippets for different frameworks that match your Cloudflare setup.
7. Confirm the deployment. This process can take several minutes.
Once deployment completes, Fingerprint creates a worker named like `fingerprint-pro-cloudflare-worker-random-id`. You can see it in the [Cloudflare Workers Dashboard](https://dash.cloudflare.com/?to=/:account/workers/overview).
**Do not disrupt worker authentication or updates**
The integration wizard creates a proxy secret in your Fingerprint dashboard and passes it to your Cloudflare worker through environment variables.
Do not delete the proxy secret in either place. Proxied identification requests without a valid proxy secret fail with an authentication error.
Fingerprint updates your Cloudflare worker to keep visitor identification working correctly as browsers change. Outdated worker configuration can lower accuracy or break visitor identification completely. Do not make changes that would prevent Fingerprint from updating your worker:
* Do not reduce the API token permissions or revoke it
* Do not change the worker name
* Do not change the original worker route or configuration
### Step 2: Configure your JavaScript agent
Once the worker is deployed, configure your client-side application to use it. You can always return to **SDKs & integrations** to get code snippets for different frameworks that match your Cloudflare setup.
 #### JavaScript agent configuration example
```javascript NPM package theme={"theme":"github-dark-dimmed"}
// The same pattern applies to React SDK, Vue SDK, and other frontend SDKs.
import * as Fingerprint from '@fingerprint/agent';
const fp = Fingerprint.start({
apiKey: 'PUBLIC_API_KEY',
region: 'us',
endpoints: 'https://yourwebsite.com/WORKER_PATH/?region=us',
});
```
```javascript CDN installation theme={"theme":"github-dark-dimmed"}
const fpPromise = import('https://yourwebsite.com/WORKER_PATH/web/v4/PUBLIC_API_KEY').then(
(Fingerprint) =>
Fingerprint.start({
region: 'us',
endpoints: 'https://yourwebsite.com/WORKER_PATH/?region=us',
}),
);
```
* Include the region in the `endpoints` URL query string using the format `?region=REGION`. Replace `REGION` with the [region](/docs/regions) of your application.
**Migrating from JavaScript agent v3**
Cloudflare Proxy Integration remains compatible with JavaScript agent v3, so you can upgrade when it works for your rollout plan.
When you migrate to JavaScript agent v4:
* Remove `scriptUrlPattern` and `endpoint`
* Replace them with a single `endpoints` option that points to the worker route, for example `https://yourwebsite.com/WORKER_PATH/?region=us`
* See [Migrating JavaScript agent from v3 to v4](/reference/migrating-from-v3-to-v4#use-endpoints-instead-of-scripturlpattern) for more details
### Using multiple worker routes
Cloudflare Proxy Integration uses Cloudflare Workers, which supports [multiple routes](https://developers.cloudflare.com/workers/platform/triggers/routes/). You can add more routes if you need to, but do not change the original worker route or configuration created by Fingerprint.
## Monitoring and troubleshooting the integration
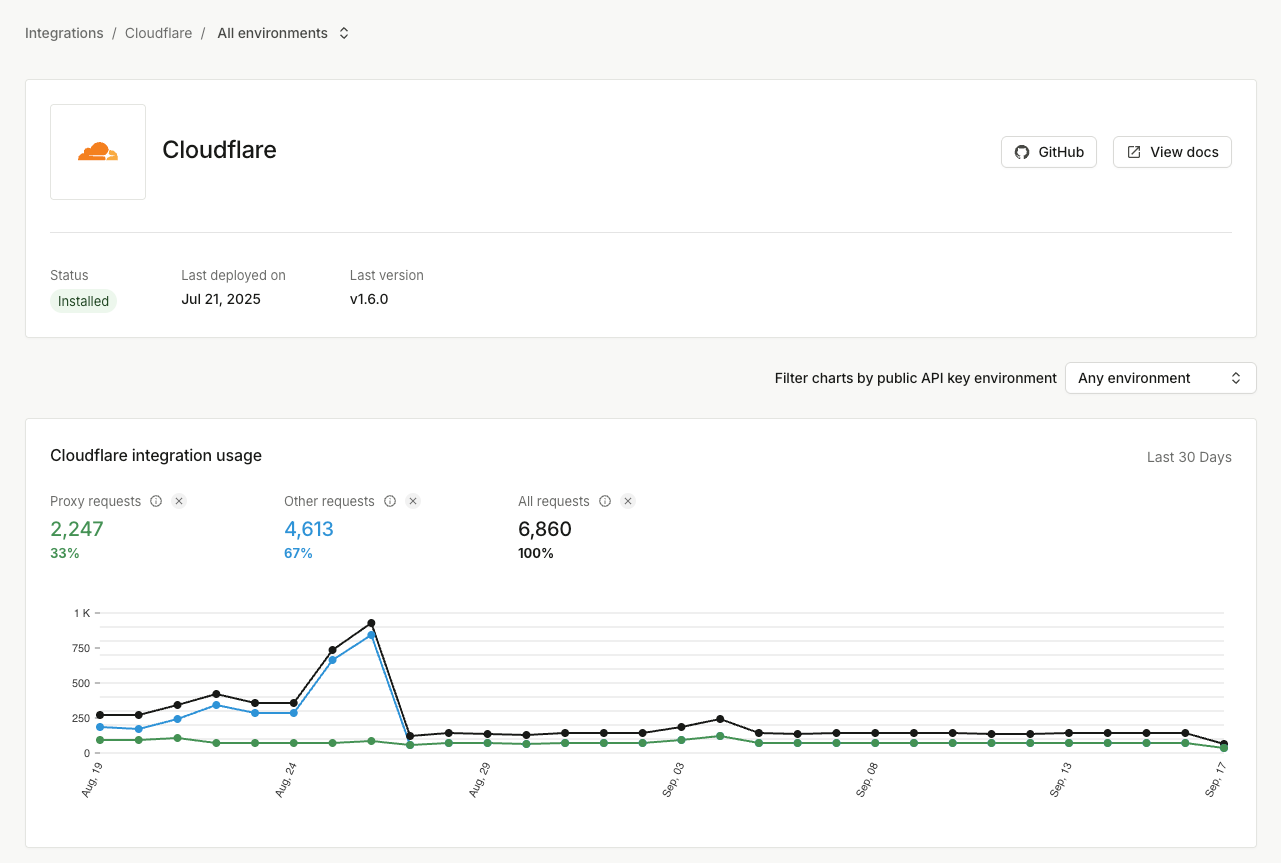
Go to **Dashboard** > [**SDKs & integrations**](https://dashboard.fingerprint.com/integrations) > **Cloudflare** to see the integration status, usage statistics, and configuration. You can monitor:
* Whether the integration is up to date
* How many identification requests go through the integration, and how many do not
* The error rate of proxied identification requests, usually caused by a missing or incorrect proxy secret
The information on the status page is cached, so allow a few minutes for the latest data points to appear.
#### JavaScript agent configuration example
```javascript NPM package theme={"theme":"github-dark-dimmed"}
// The same pattern applies to React SDK, Vue SDK, and other frontend SDKs.
import * as Fingerprint from '@fingerprint/agent';
const fp = Fingerprint.start({
apiKey: 'PUBLIC_API_KEY',
region: 'us',
endpoints: 'https://yourwebsite.com/WORKER_PATH/?region=us',
});
```
```javascript CDN installation theme={"theme":"github-dark-dimmed"}
const fpPromise = import('https://yourwebsite.com/WORKER_PATH/web/v4/PUBLIC_API_KEY').then(
(Fingerprint) =>
Fingerprint.start({
region: 'us',
endpoints: 'https://yourwebsite.com/WORKER_PATH/?region=us',
}),
);
```
* Include the region in the `endpoints` URL query string using the format `?region=REGION`. Replace `REGION` with the [region](/docs/regions) of your application.
**Migrating from JavaScript agent v3**
Cloudflare Proxy Integration remains compatible with JavaScript agent v3, so you can upgrade when it works for your rollout plan.
When you migrate to JavaScript agent v4:
* Remove `scriptUrlPattern` and `endpoint`
* Replace them with a single `endpoints` option that points to the worker route, for example `https://yourwebsite.com/WORKER_PATH/?region=us`
* See [Migrating JavaScript agent from v3 to v4](/reference/migrating-from-v3-to-v4#use-endpoints-instead-of-scripturlpattern) for more details
### Using multiple worker routes
Cloudflare Proxy Integration uses Cloudflare Workers, which supports [multiple routes](https://developers.cloudflare.com/workers/platform/triggers/routes/). You can add more routes if you need to, but do not change the original worker route or configuration created by Fingerprint.
## Monitoring and troubleshooting the integration
Go to **Dashboard** > [**SDKs & integrations**](https://dashboard.fingerprint.com/integrations) > **Cloudflare** to see the integration status, usage statistics, and configuration. You can monitor:
* Whether the integration is up to date
* How many identification requests go through the integration, and how many do not
* The error rate of proxied identification requests, usually caused by a missing or incorrect proxy secret
The information on the status page is cached, so allow a few minutes for the latest data points to appear.
 The Cloudflare integration has limited visibility into your Cloudflare environment. If you run into issues, verify that firewall rules, rate limiting rules, or other Cloudflare restrictions are not disrupting the Fingerprint worker and its path. Contact [support](https://fingerprint.com/support/) if needed.
### Updating the Cloudflare token
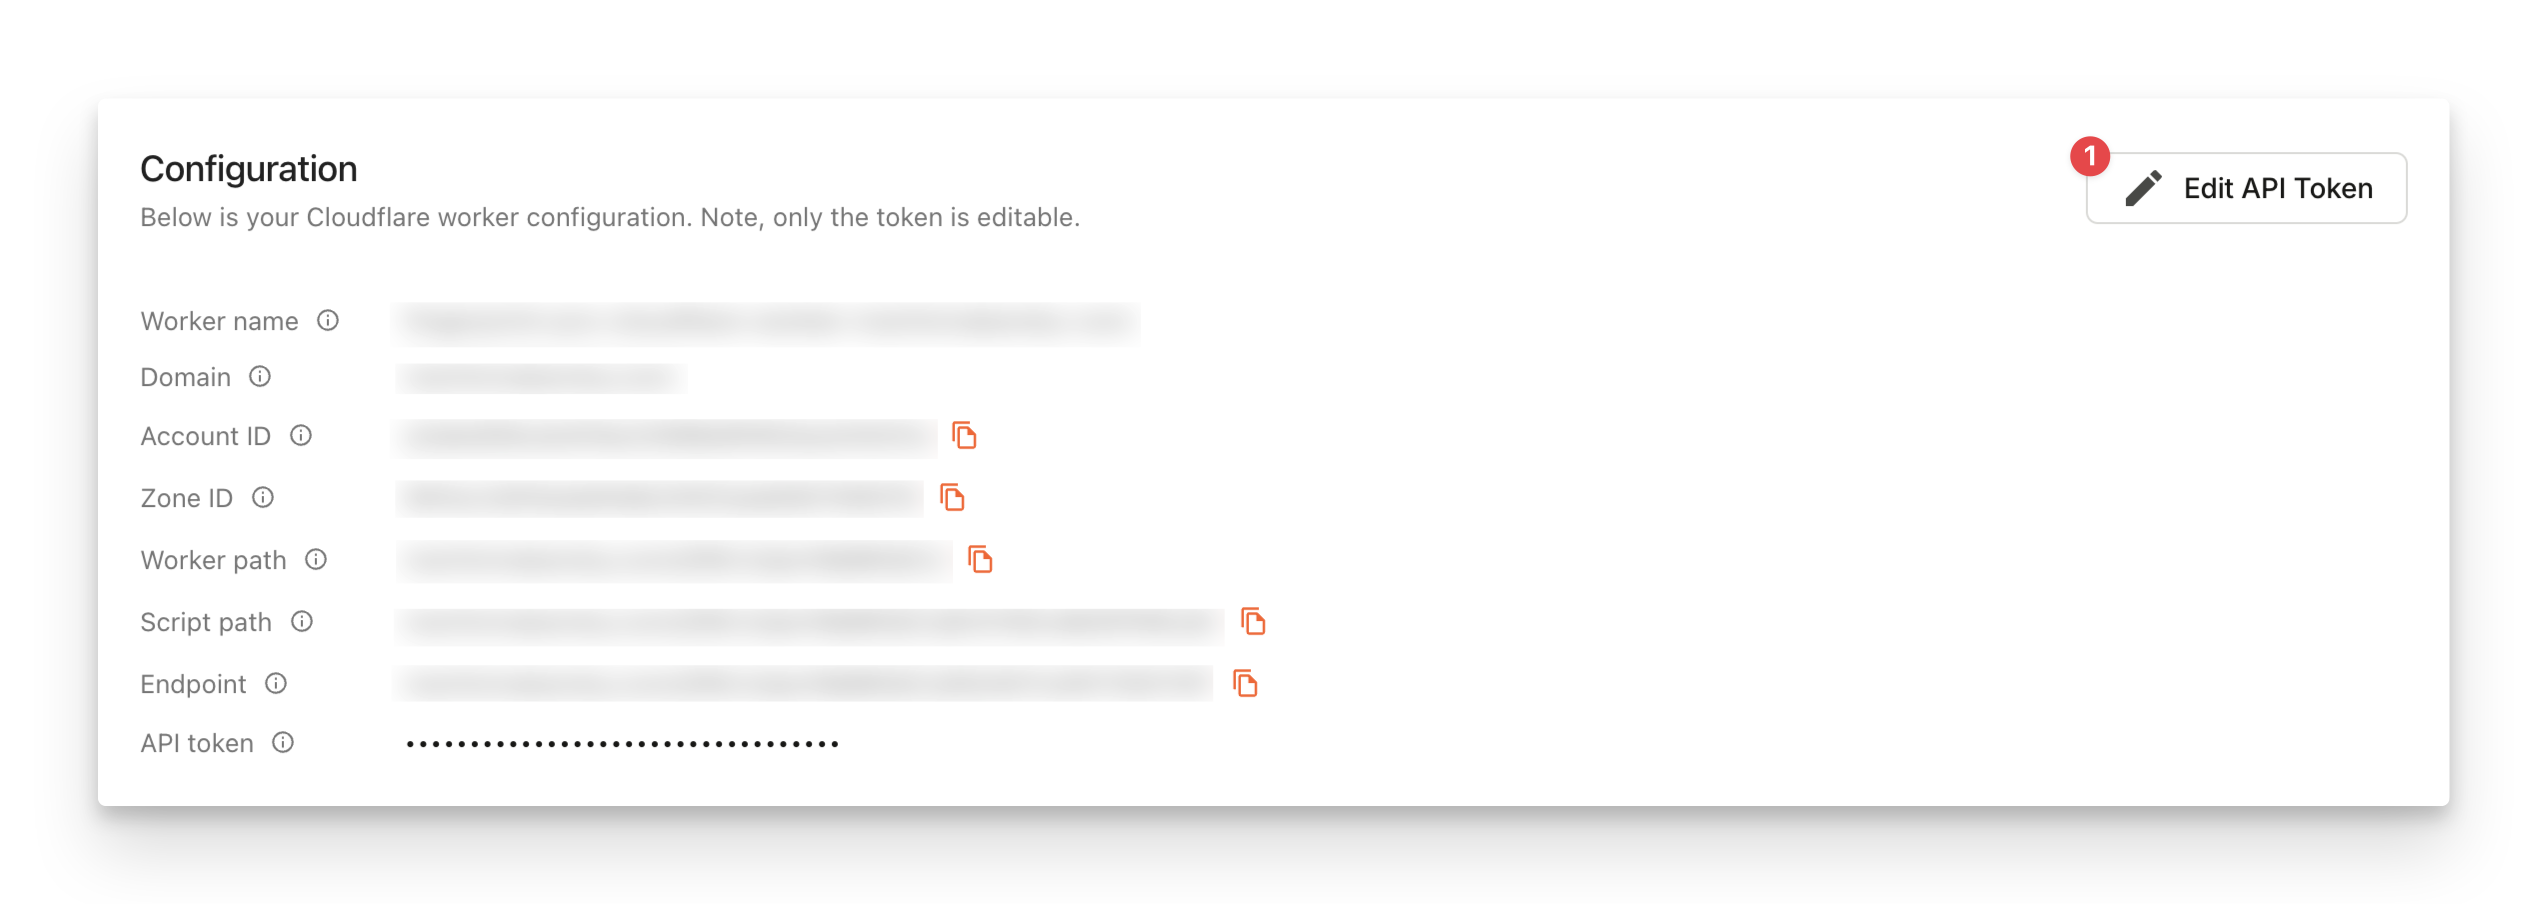
If you accidentally delete the Cloudflare API token you provided to Fingerprint, you can update it in the Fingerprint dashboard.
* Go to [**SDKs & integrations**](https://dashboard.fingerprint.com/integrations) > **Cloudflare** and click **Edit API token**
The Cloudflare integration has limited visibility into your Cloudflare environment. If you run into issues, verify that firewall rules, rate limiting rules, or other Cloudflare restrictions are not disrupting the Fingerprint worker and its path. Contact [support](https://fingerprint.com/support/) if needed.
### Updating the Cloudflare token
If you accidentally delete the Cloudflare API token you provided to Fingerprint, you can update it in the Fingerprint dashboard.
* Go to [**SDKs & integrations**](https://dashboard.fingerprint.com/integrations) > **Cloudflare** and click **Edit API token**
 ### Deleting the integration
If something goes irreversibly wrong with your integration or Cloudflare worker configuration, you can delete everything and create a new integration from scratch.
1. Make sure your Fingerprint JavaScript agent is not using the integration URLs you are about to delete.
2. Go to [**SDKs & integrations**](https://dashboard.fingerprint.com/integrations) > **Cloudflare** and click **Delete integration** at the bottom of the page.
This deletes the Cloudflare worker and all associated records.
## Alternative worker subdomain setup (for DNS-only domains)
The Cloudflare configuration guide above assumes your website is added to Cloudflare and [proxied through Cloudflare](https://developers.cloudflare.com/dns/manage-dns-records/reference/proxied-dns-records/) instead of DNS-only. If your website uses DNS-only mode, the worker is not accessible on the generated path and the provided code snippets do not work.
### Deleting the integration
If something goes irreversibly wrong with your integration or Cloudflare worker configuration, you can delete everything and create a new integration from scratch.
1. Make sure your Fingerprint JavaScript agent is not using the integration URLs you are about to delete.
2. Go to [**SDKs & integrations**](https://dashboard.fingerprint.com/integrations) > **Cloudflare** and click **Delete integration** at the bottom of the page.
This deletes the Cloudflare worker and all associated records.
## Alternative worker subdomain setup (for DNS-only domains)
The Cloudflare configuration guide above assumes your website is added to Cloudflare and [proxied through Cloudflare](https://developers.cloudflare.com/dns/manage-dns-records/reference/proxied-dns-records/) instead of DNS-only. If your website uses DNS-only mode, the worker is not accessible on the generated path and the provided code snippets do not work.
 If you cannot proxy your primary domain through Cloudflare, you can host the Fingerprint worker on a subdomain instead. This still requires that your website is [added to Cloudflare](https://developers.cloudflare.com/fundamentals/setup/manage-domains/add-site/) without proxying.
1. Follow the installation steps above to deploy the proxy integration worker in your Cloudflare account.
2. Go to your [Cloudflare dashboard](https://dash.cloudflare.com/).
3. In the left-hand navigation, click **Workers & Pages**.
4. Click your Fingerprint Cloudflare worker. It will be named like **fingerprint-pro-cloudflare-worker-yourwebsite-com**.
5. At the top, click **Settings**, then find **Domains & Routes**.
6. Click **+ Add** and select **Custom domain**.
7. Enter a subdomain like `metrics.yourwebsite.com` and click **Add domain**. Avoid terms commonly blocked by ad blockers like `fingerprint`, `fpjs`, or `track`.
If you cannot proxy your primary domain through Cloudflare, you can host the Fingerprint worker on a subdomain instead. This still requires that your website is [added to Cloudflare](https://developers.cloudflare.com/fundamentals/setup/manage-domains/add-site/) without proxying.
1. Follow the installation steps above to deploy the proxy integration worker in your Cloudflare account.
2. Go to your [Cloudflare dashboard](https://dash.cloudflare.com/).
3. In the left-hand navigation, click **Workers & Pages**.
4. Click your Fingerprint Cloudflare worker. It will be named like **fingerprint-pro-cloudflare-worker-yourwebsite-com**.
5. At the top, click **Settings**, then find **Domains & Routes**.
6. Click **+ Add** and select **Custom domain**.
7. Enter a subdomain like `metrics.yourwebsite.com` and click **Add domain**. Avoid terms commonly blocked by ad blockers like `fingerprint`, `fpjs`, or `track`.
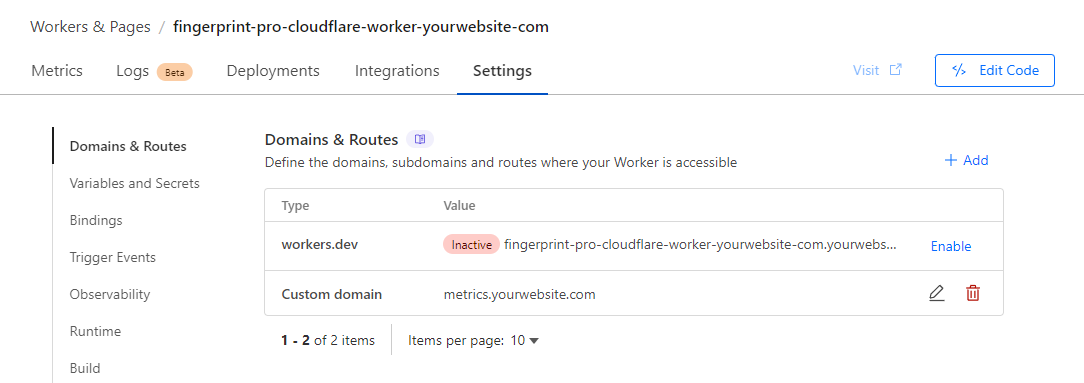 Your new subdomain will be proxied through Cloudflare, even though your primary domain is not:
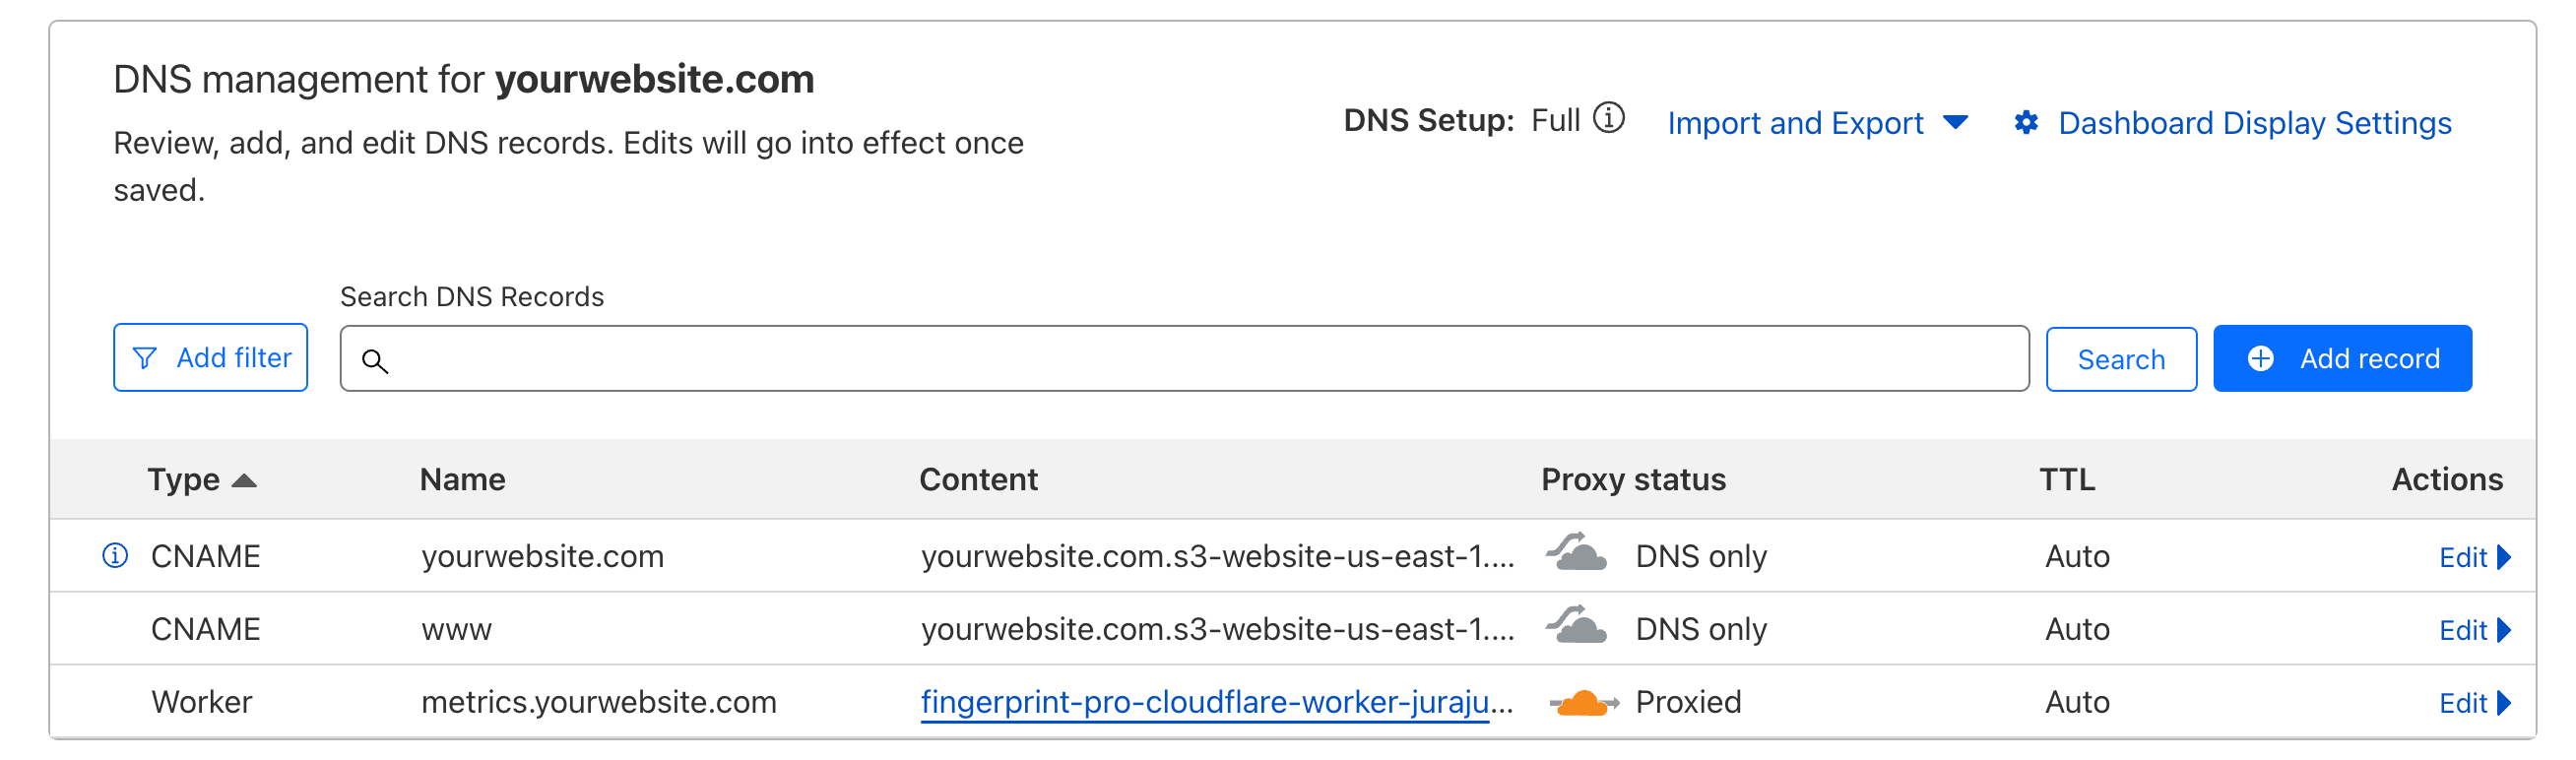 Your Fingerprint worker is now accessible on the chosen subdomain. Update the code snippets shown on [**SDKs & integrations**](https://dashboard.fingerprint.com/integrations) accordingly. For example, `endpoints: https://yourwebsite.com/VWmFUKL1dfIjc8gg/?region=us` becomes `endpoints: https://metrics.yourwebsite.com/VWmFUKL1dfIjc8gg/?region=us`.