> ## Documentation Index
> Fetch the complete documentation index at: https://docs.fingerprint.com/llms.txt
> Use this file to discover all available pages before exploring further.
# Overview
**Azure proxy integration v1 is no longer supported.**
Please use Azure Proxy Integration v2 instead.
If you are currently using Azure integration v1, please see **[Migrating Azure proxy integration from v1 to v2](/docs/azure-proxy-integration-migration-from-v1-to-v2)**.
Fingerprint Azure Proxy Integration is responsible for proxying identification and agent-download requests between your website and Fingerprint through your Azure infrastructure.
The proxy integration must be served through Azure Front Door to ensure the true client IP address is captured and used for identification. Your website itself does not need to run on Azure or Front Door, although serving both through the same Front Door distribution is optimal for ease of setup and maximum accuracy benefits.
This guide explains the benefits and components of the Azure proxy integration and shows how to set it up step-by-step. It assumes a basic familiarity with Azure.
This guide assumes you are using [JavaScript agent v4](/reference/js-agent). If you are still
using JavaScript agent v3, see [Azure Proxy Integration
(v3)](/docs/v3/azure-proxy-integration) or migrate to [JavaScript agent v4](/reference/migrating-from-v3-to-v4).
**Limitations**
Support for the Azure Proxy Integration is provided only to customers on the **Enterprise** Plan. Other customers are encouraged to use [Custom subdomain setup](/docs/custom-subdomain-setup) or [Cloudflare Proxy Integration](/docs/cloudflare-integration).
**Update expectations**
The underlying data contract in the identification logic can change to keep up with browser and device releases. Using the Azure Proxy Integration might require occasional manual updates on your side. Ignoring these updates will lead to lower accuracy or service disruption.
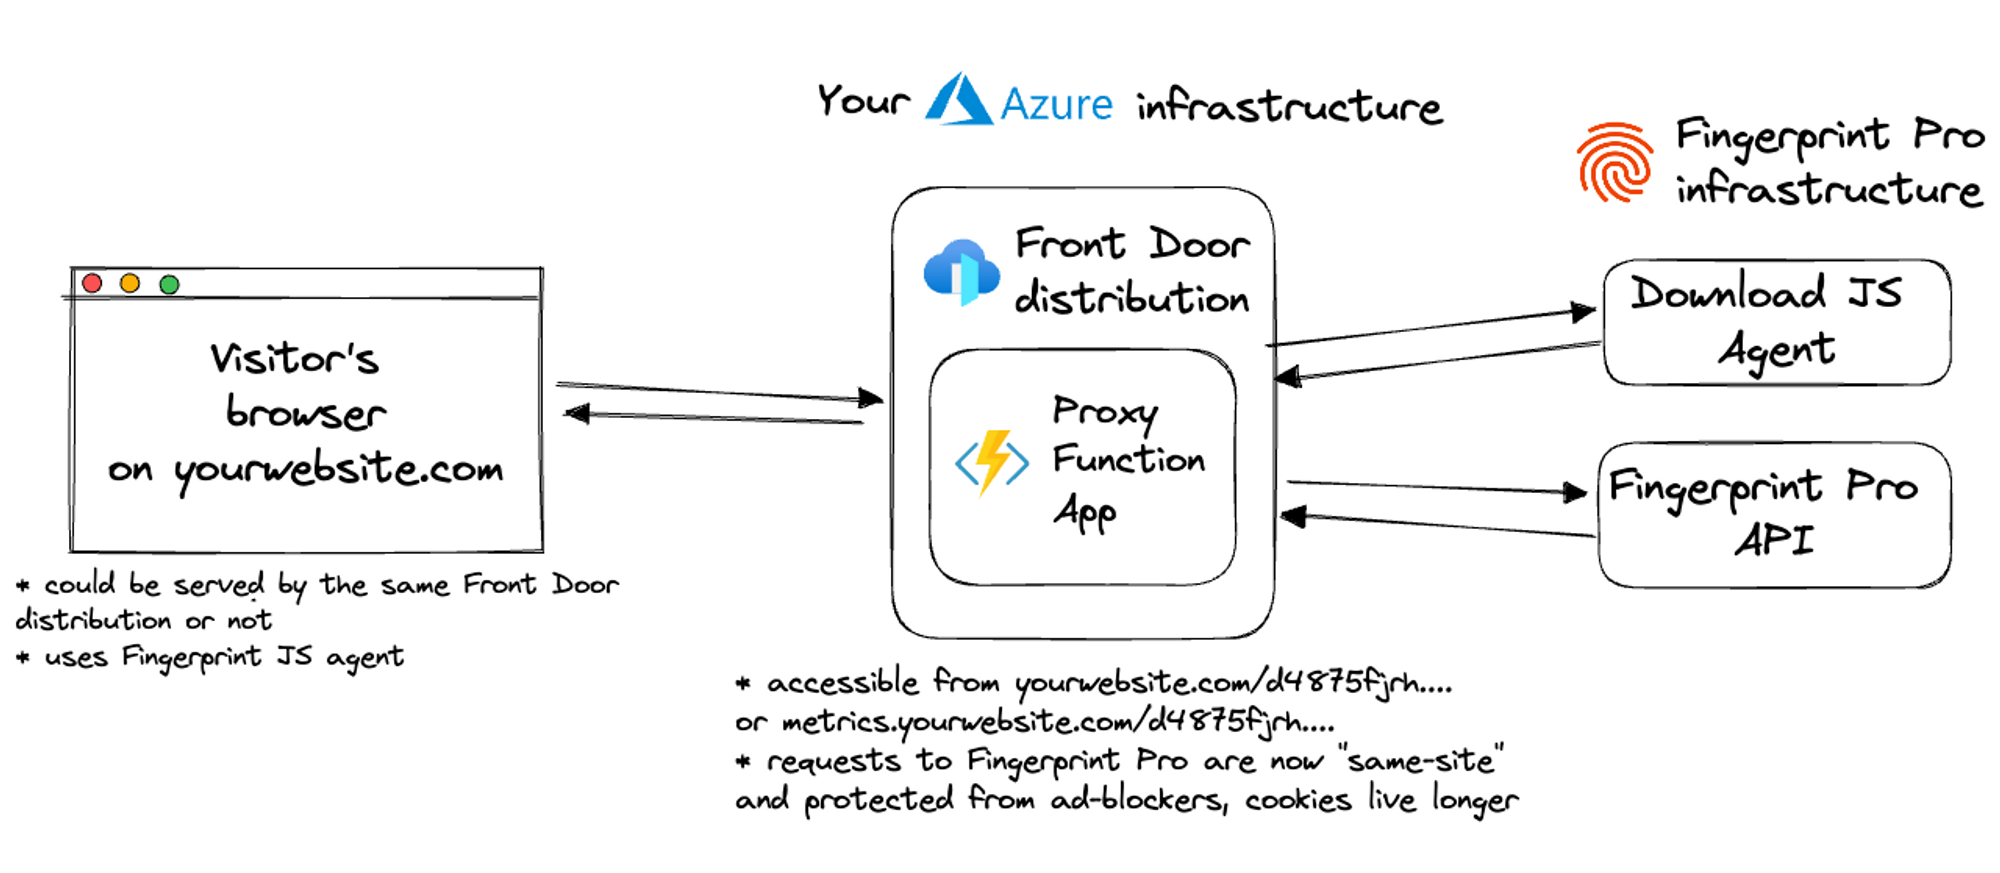 The integration consists of several components:
* Your website, which may be running on Azure Front Door but doesn't have to.
* [Azure functions](https://learn.microsoft.com/en-us/azure/azure-functions/functions-overview):
* `proxy` — responsible for proxying requests to our CDN and API.
* `management` — updates the main integration function.
* [Front Door distribution](https://learn.microsoft.com/en-us/azure/frontdoor/front-door-overview) which delivers the functions through Microsoft's content delivery network:
* If your website is already running on Front Door, you can use the same distribution for the proxy integration. This is the recommended setup to maximize the accuracy benefits of the integration. See [Step 5](#step-5-configure-front-door-to-deliver-the-proxy-function) for more details.
* If your website is not running on Front Door, you can create a new Front Door distribution just for the proxy integration (see [Step 5](#step-5-configure-front-door-to-deliver-the-proxy-function)).
* [Azure storage](https://learn.microsoft.com/en-us/azure/storage/common/storage-introduction) account stores the functions' source code. The source code is uploaded to storage during [deployment ](https://github.com/fingerprintjs/azure-frontdoor-proxy/blob/main/azuredeploy.json) and then kept up to date by the management Azure function.
* [Application Insights](https://learn.microsoft.com/en-us/azure/azure-monitor/app/app-insights-overview?tabs=net) monitors your Azure function
* [App Service Plan](https://learn.microsoft.com/en-us/azure/app-service/overview-hosting-plans) defines the operating system, the number and size of virtual machine instances, and the pricing tier used by the functions.
The proxy integration source code is 100% open-source and [available on GitHub](https://github.com/fingerprintjs/azure-frontdoor-proxy).
## The benefits of using the Azure Integration
* Ad blockers will not block the Fingerprint JavaScript agent from loading or performing identification requests. Ad blockers can block requests to Fingerprint domains but will allow requests to your own domain or subdomain.
* Significant increase in accuracy in browsers with strict privacy features such as Safari or Firefox.
* Cookies are now recognized as "first-party." This means they can live in the browser even when third-party cookies are blocked and extend the lifetime of visitor information.
* Insight and control over the identification requests in your own infrastructure.
* With the Azure Integration, you can manage an unlimited number of subdomains or paths and provide Fingerprint services to all your customers at any scale while benefiting from all the 1st-party integration improvements.
* Cookie security: Azure integration drops all the cookies sent from the origin website. The Azure function code is open-source so this behavior can be transparently verified and audited.
* Easy to meet compliance and auditing requirements.
## Prerequisites
* An Azure account.
* If you have an existing Front Door distribution that serves the web app's content you can use it to also serve the proxy function. Otherwise, you will create a new Front Door distribution that is configured to serve the proxy function on a subdomain of your website. Both scenarios are covered in [Step 5](#step-5-configure-front-door-to-deliver-the-proxy-function).
## Integration setup overview
The integration setup consists of several manual and automatic steps. Each of the following steps is discussed in detail in a separate section below.
1. Issue a *Proxy Secret* in the Fingerprint dashboard.
2. Create a route prefix used by the Azure configuration and JavaScript agent configuration on your website.
3. Deploy the Azure function and other related resources using our deployment template.
4. Verify the Azure function deployment.
5. Configure your Front Door distribution to deliver the proxy Azure function.
6. Configure the Fingerprint JavaScript agent on your website.
If you run into trouble implementing the integration, you can [contact our support](mailto:support@fingerprint.com) for assistance.
## Step 1. Issue a Proxy Secret
You need to issue a *Proxy Secret* to authenticate requests to Fingerprint API from your Azure function.
1. Go to the Fingerprint [dashboard](https://dashboard.fingerprint.com/) and select your workspace.
2. In the left-side menu, go to **API keys**.
3. Click **Create proxy key**.
4. Give it a name, for example, `Azure proxy integration`.
1. Optionally, you can [choose an environment](/docs/multiple-environments#proxy-integrations-and-proxy-secrets) for the proxy secret.
2. By default, the proxy secret works for all environments in your workspace.
3. A proxy secret scoped to a specific environment can only authenticate identification requests made with a public API key from the same environment.
5. Click **Create API Key**.
You will later use this value in the `FPJS_PROXY_SECRET` variable, so store it somewhere safe. You cannot retrieve the secret later.
## Step 2. Create a route prefix
You need to create a route prefix that you will use throughout your Azure proxy integration configuration (Steps 3,4,5) and the JavaScript agent configuration on your website ([Step 6](#step-6-configure-the-fingerprint-javascript-agent-on-your-website)). Its value is arbitrary. Just decide its value and write it down somewhere.
For the rest of the guide, the route prefix will be referred to as `FPJS_ROUTE_PREFIX` to keep things easier to follow. However, the actual value used in production should be a random string value like `ore54guier`.
A random string value is required because some ad blockers might automatically block requests from any URL containing fingerprint-related terms like "fingerprint", "fpjs", "track", etc.
## Step 3. Deploy the Azure function
You can use a [deployment template](https://github.com/fingerprintjs/azure-frontdoor-proxy/blob/main/azuredeploy.json) to deploy the Azure function automatically using the Resource Manager.
The integration consists of several components:
* Your website, which may be running on Azure Front Door but doesn't have to.
* [Azure functions](https://learn.microsoft.com/en-us/azure/azure-functions/functions-overview):
* `proxy` — responsible for proxying requests to our CDN and API.
* `management` — updates the main integration function.
* [Front Door distribution](https://learn.microsoft.com/en-us/azure/frontdoor/front-door-overview) which delivers the functions through Microsoft's content delivery network:
* If your website is already running on Front Door, you can use the same distribution for the proxy integration. This is the recommended setup to maximize the accuracy benefits of the integration. See [Step 5](#step-5-configure-front-door-to-deliver-the-proxy-function) for more details.
* If your website is not running on Front Door, you can create a new Front Door distribution just for the proxy integration (see [Step 5](#step-5-configure-front-door-to-deliver-the-proxy-function)).
* [Azure storage](https://learn.microsoft.com/en-us/azure/storage/common/storage-introduction) account stores the functions' source code. The source code is uploaded to storage during [deployment ](https://github.com/fingerprintjs/azure-frontdoor-proxy/blob/main/azuredeploy.json) and then kept up to date by the management Azure function.
* [Application Insights](https://learn.microsoft.com/en-us/azure/azure-monitor/app/app-insights-overview?tabs=net) monitors your Azure function
* [App Service Plan](https://learn.microsoft.com/en-us/azure/app-service/overview-hosting-plans) defines the operating system, the number and size of virtual machine instances, and the pricing tier used by the functions.
The proxy integration source code is 100% open-source and [available on GitHub](https://github.com/fingerprintjs/azure-frontdoor-proxy).
## The benefits of using the Azure Integration
* Ad blockers will not block the Fingerprint JavaScript agent from loading or performing identification requests. Ad blockers can block requests to Fingerprint domains but will allow requests to your own domain or subdomain.
* Significant increase in accuracy in browsers with strict privacy features such as Safari or Firefox.
* Cookies are now recognized as "first-party." This means they can live in the browser even when third-party cookies are blocked and extend the lifetime of visitor information.
* Insight and control over the identification requests in your own infrastructure.
* With the Azure Integration, you can manage an unlimited number of subdomains or paths and provide Fingerprint services to all your customers at any scale while benefiting from all the 1st-party integration improvements.
* Cookie security: Azure integration drops all the cookies sent from the origin website. The Azure function code is open-source so this behavior can be transparently verified and audited.
* Easy to meet compliance and auditing requirements.
## Prerequisites
* An Azure account.
* If you have an existing Front Door distribution that serves the web app's content you can use it to also serve the proxy function. Otherwise, you will create a new Front Door distribution that is configured to serve the proxy function on a subdomain of your website. Both scenarios are covered in [Step 5](#step-5-configure-front-door-to-deliver-the-proxy-function).
## Integration setup overview
The integration setup consists of several manual and automatic steps. Each of the following steps is discussed in detail in a separate section below.
1. Issue a *Proxy Secret* in the Fingerprint dashboard.
2. Create a route prefix used by the Azure configuration and JavaScript agent configuration on your website.
3. Deploy the Azure function and other related resources using our deployment template.
4. Verify the Azure function deployment.
5. Configure your Front Door distribution to deliver the proxy Azure function.
6. Configure the Fingerprint JavaScript agent on your website.
If you run into trouble implementing the integration, you can [contact our support](mailto:support@fingerprint.com) for assistance.
## Step 1. Issue a Proxy Secret
You need to issue a *Proxy Secret* to authenticate requests to Fingerprint API from your Azure function.
1. Go to the Fingerprint [dashboard](https://dashboard.fingerprint.com/) and select your workspace.
2. In the left-side menu, go to **API keys**.
3. Click **Create proxy key**.
4. Give it a name, for example, `Azure proxy integration`.
1. Optionally, you can [choose an environment](/docs/multiple-environments#proxy-integrations-and-proxy-secrets) for the proxy secret.
2. By default, the proxy secret works for all environments in your workspace.
3. A proxy secret scoped to a specific environment can only authenticate identification requests made with a public API key from the same environment.
5. Click **Create API Key**.
You will later use this value in the `FPJS_PROXY_SECRET` variable, so store it somewhere safe. You cannot retrieve the secret later.
## Step 2. Create a route prefix
You need to create a route prefix that you will use throughout your Azure proxy integration configuration (Steps 3,4,5) and the JavaScript agent configuration on your website ([Step 6](#step-6-configure-the-fingerprint-javascript-agent-on-your-website)). Its value is arbitrary. Just decide its value and write it down somewhere.
For the rest of the guide, the route prefix will be referred to as `FPJS_ROUTE_PREFIX` to keep things easier to follow. However, the actual value used in production should be a random string value like `ore54guier`.
A random string value is required because some ad blockers might automatically block requests from any URL containing fingerprint-related terms like "fingerprint", "fpjs", "track", etc.
## Step 3. Deploy the Azure function
You can use a [deployment template](https://github.com/fingerprintjs/azure-frontdoor-proxy/blob/main/azuredeploy.json) to deploy the Azure function automatically using the Resource Manager.
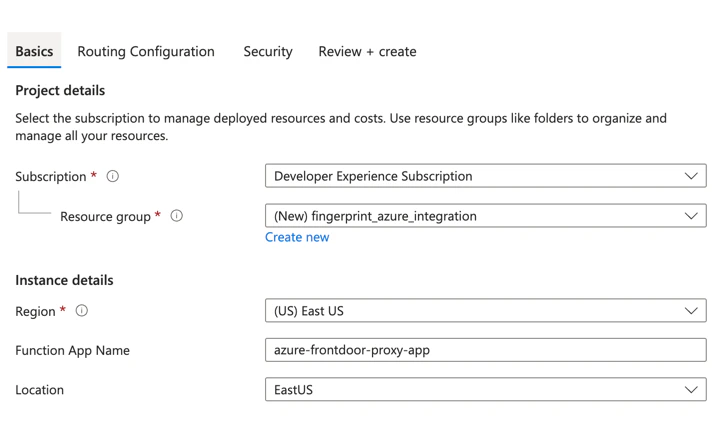 [Click here to open the template deployment dialog.](https://portal.azure.com/#create/Microsoft.Template/uri/https%3A%2F%2Fraw.githubusercontent.com%2Ffingerprintjs%2Fazure-frontdoor-proxy%2Fmain%2Fazuredeploy.json/createUIDefinitionUri/https%3A%2F%2Fraw.githubusercontent.com%2Ffingerprintjs%2Fazure-frontdoor-proxy%2Fmain%2FcreateUiDefinition.json)
### Basics step
1. Select your Azure **Subscription**.
2. Select or create a **Resource group** (we suggest using a separate resource group for the integration).
3. Specify **Region** and **Location**.
4. Set **Function App Name,** for example, `azure-frontdoor-proxy-app`. The final function name will have the resource group ID at the end of it, for example, `azure-frontdoor-proxy-app-appi4fghxf32z36q`.
5. Click **Next** to navigate to the next step.
### Routing configuration step
1. Set **Route Prefix** to your chosen value of `FPJS_ROUTE_PREFIX`, the value you created in [Step 2](#step-2-create-a-route-prefix) of this guide.
2. Click **Next** to navigate to the next step.
### Scaling configuration step
1. Set **Maximum instance count** to the highest number of instances the integration can scale out to under load. The template provides a default value.
This setting is a ceiling, not a reservation. A higher value does not increase your baseline cost because instances that never start are never charged. Raising it can improve resilience to traffic spikes by letting the proxy scale out instead of throttling requests. Lowering it caps the maximum number of instances that can run concurrently during a spike.
If you are unsure, leave the default. Consider raising it if you expect high or bursty request volumes, or lowering it if you want to bound peak-time scale-out. For guidance on choosing a value for your traffic, see [Azure Functions Flex Consumption scaling](https://learn.microsoft.com/en-us/azure/azure-functions/event-driven-scaling).
2. Click **Next** to navigate to the next step.
**Changing the maximum instance count after deployment**
You can adjust this value at any time without redeploying the integration:
1. In the [Azure portal](https://portal.azure.com), open the **Resource group** you deployed the integration into and select the function app (for example, `azure-frontdoor-proxy-app-appi4fghxf32z36q`).
2. In the left menu, go to **Settings** > **Scale and concurrency**.
3. Under **Maximum instance count**, enter the new value.
4. Select **Save**. The change takes effect for subsequent scaling decisions; you do not need to restart the app.
### Security step
1. Set **Proxy Secret** to the value of the secret generated in [Step 1](#step-1-issue-a-proxy-secret) of this guide.
2. Click **Review + Create** to validate the function.
3. Click **Create** to deploy the function.
**Note: Proxy secret required**
Proxied identification requests without a valid proxy secret will result in an authentication error and fail to record identification results.
**Other deployment options**
The function code is available on [GitHub](https://github.com/fingerprintjs/azure-frontdoor-proxy) so you can build the function locally and use [Azure Function Core Tools](https://github.com/Azure/azure-functions-core-tools) to publish it on your Azure infrastructure. See the official [Azure guide here](https://learn.microsoft.com/en-us/azure/azure-functions/functions-run-local?tabs=v4%2Clinux%2Ccsharp%2Cportal%2Cbash#publish).
Also, you can automate the deployment by using the [deployment template](https://github.com/fingerprintjs/azure-frontdoor-proxy/blob/main/azuredeploy.json) in infrastructure-as-code tools like [Terraform](https://registry.terraform.io/providers/hashicorp/azurerm/latest/docs/resources/resource_group_template_deployment).
## Step 4. Verify your deployment
Once deployed, you can use the function in your web resources.
[Click here to open the template deployment dialog.](https://portal.azure.com/#create/Microsoft.Template/uri/https%3A%2F%2Fraw.githubusercontent.com%2Ffingerprintjs%2Fazure-frontdoor-proxy%2Fmain%2Fazuredeploy.json/createUIDefinitionUri/https%3A%2F%2Fraw.githubusercontent.com%2Ffingerprintjs%2Fazure-frontdoor-proxy%2Fmain%2FcreateUiDefinition.json)
### Basics step
1. Select your Azure **Subscription**.
2. Select or create a **Resource group** (we suggest using a separate resource group for the integration).
3. Specify **Region** and **Location**.
4. Set **Function App Name,** for example, `azure-frontdoor-proxy-app`. The final function name will have the resource group ID at the end of it, for example, `azure-frontdoor-proxy-app-appi4fghxf32z36q`.
5. Click **Next** to navigate to the next step.
### Routing configuration step
1. Set **Route Prefix** to your chosen value of `FPJS_ROUTE_PREFIX`, the value you created in [Step 2](#step-2-create-a-route-prefix) of this guide.
2. Click **Next** to navigate to the next step.
### Scaling configuration step
1. Set **Maximum instance count** to the highest number of instances the integration can scale out to under load. The template provides a default value.
This setting is a ceiling, not a reservation. A higher value does not increase your baseline cost because instances that never start are never charged. Raising it can improve resilience to traffic spikes by letting the proxy scale out instead of throttling requests. Lowering it caps the maximum number of instances that can run concurrently during a spike.
If you are unsure, leave the default. Consider raising it if you expect high or bursty request volumes, or lowering it if you want to bound peak-time scale-out. For guidance on choosing a value for your traffic, see [Azure Functions Flex Consumption scaling](https://learn.microsoft.com/en-us/azure/azure-functions/event-driven-scaling).
2. Click **Next** to navigate to the next step.
**Changing the maximum instance count after deployment**
You can adjust this value at any time without redeploying the integration:
1. In the [Azure portal](https://portal.azure.com), open the **Resource group** you deployed the integration into and select the function app (for example, `azure-frontdoor-proxy-app-appi4fghxf32z36q`).
2. In the left menu, go to **Settings** > **Scale and concurrency**.
3. Under **Maximum instance count**, enter the new value.
4. Select **Save**. The change takes effect for subsequent scaling decisions; you do not need to restart the app.
### Security step
1. Set **Proxy Secret** to the value of the secret generated in [Step 1](#step-1-issue-a-proxy-secret) of this guide.
2. Click **Review + Create** to validate the function.
3. Click **Create** to deploy the function.
**Note: Proxy secret required**
Proxied identification requests without a valid proxy secret will result in an authentication error and fail to record identification results.
**Other deployment options**
The function code is available on [GitHub](https://github.com/fingerprintjs/azure-frontdoor-proxy) so you can build the function locally and use [Azure Function Core Tools](https://github.com/Azure/azure-functions-core-tools) to publish it on your Azure infrastructure. See the official [Azure guide here](https://learn.microsoft.com/en-us/azure/azure-functions/functions-run-local?tabs=v4%2Clinux%2Ccsharp%2Cportal%2Cbash#publish).
Also, you can automate the deployment by using the [deployment template](https://github.com/fingerprintjs/azure-frontdoor-proxy/blob/main/azuredeploy.json) in infrastructure-as-code tools like [Terraform](https://registry.terraform.io/providers/hashicorp/azurerm/latest/docs/resources/resource_group_template_deployment).
## Step 4. Verify your deployment
Once deployed, you can use the function in your web resources.
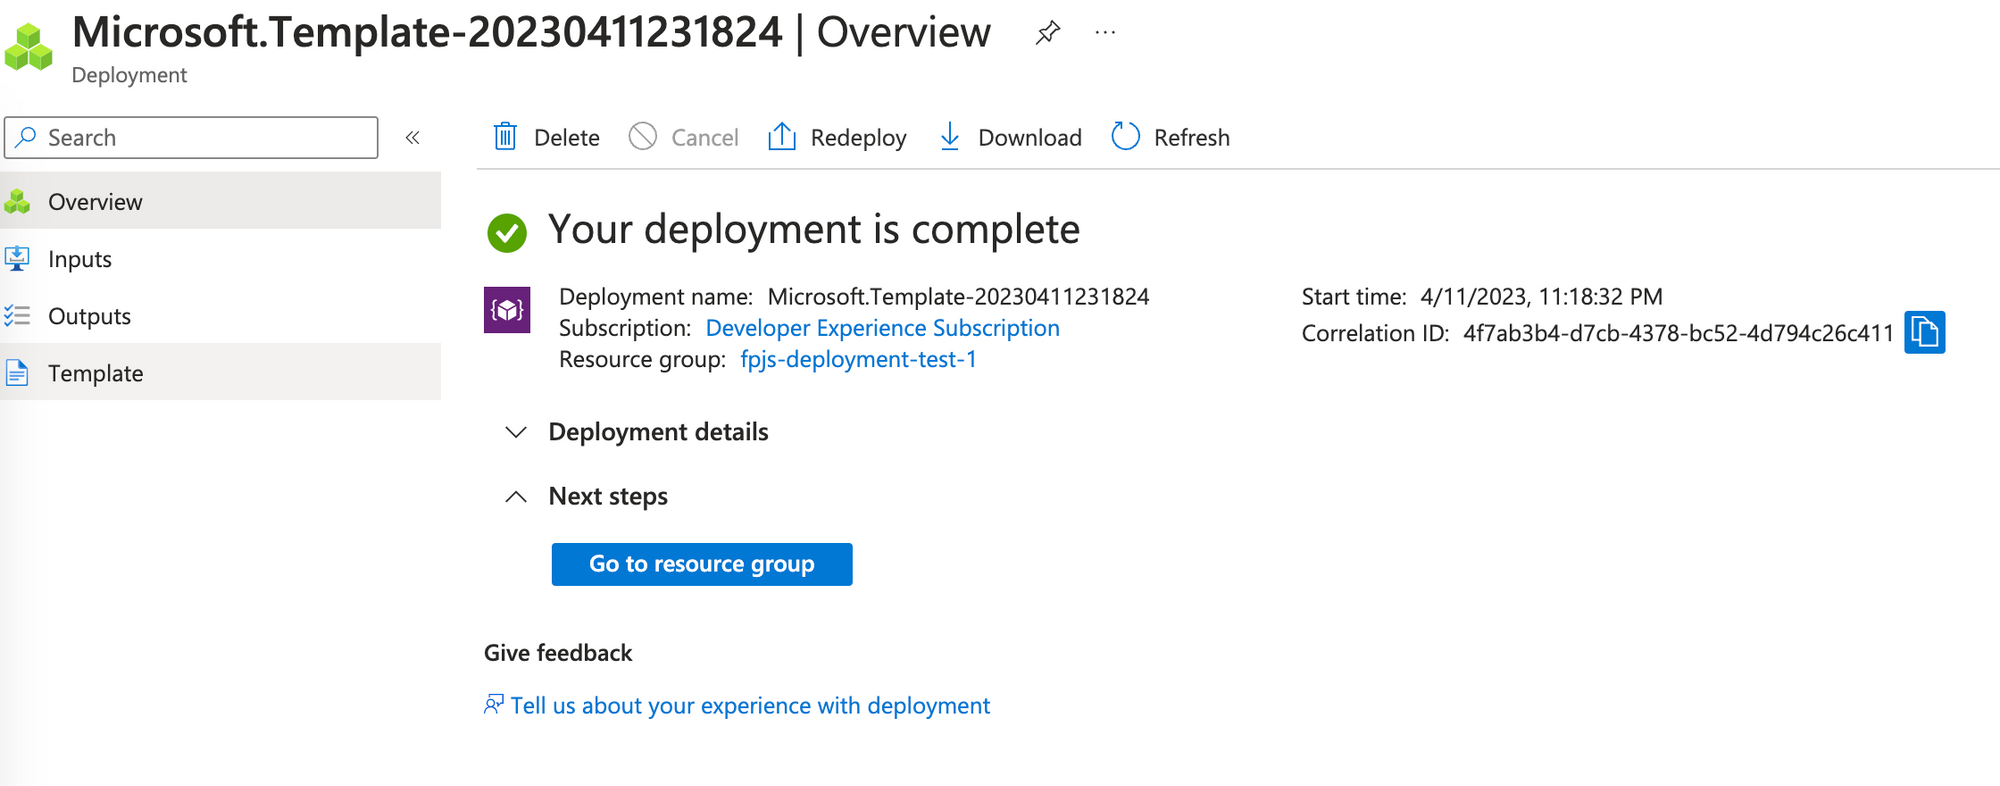 1. Click **Go to resource group** to open the resource group with Fingerprint resources, used in [Step 3](#step-3-deploy-the-azure-function).
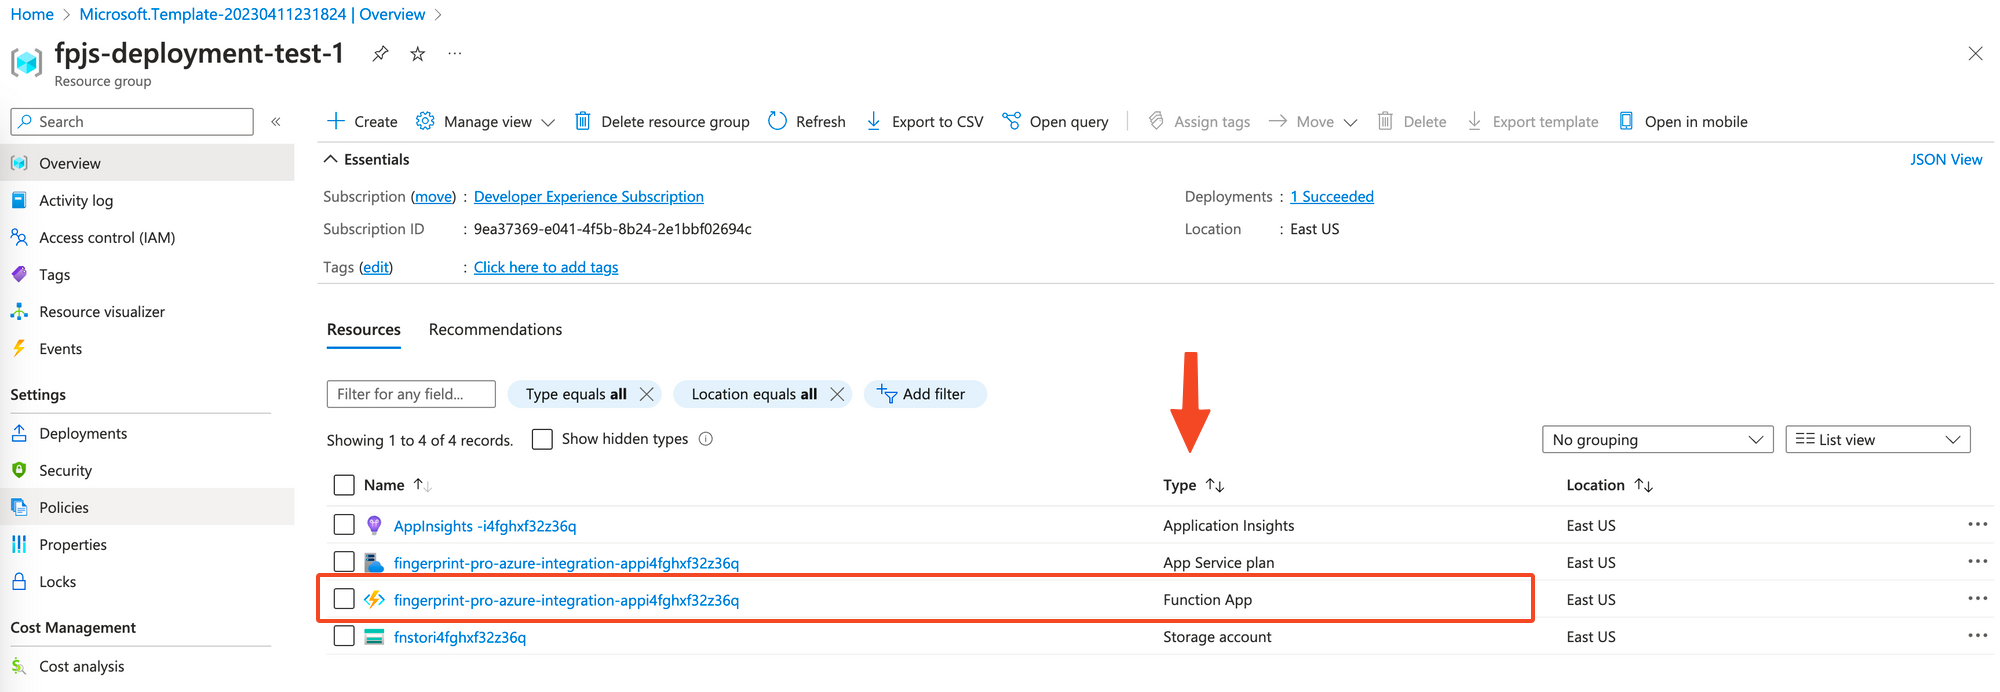 2. In the resources list, use the **Type** column to find your **Function App**. Its name will match the name given in [Step 3](#step-3-deploy-the-azure-function). Click on the name to navigate to the function app page.
3. Inside the function app page, click **Overview** in the left-side menu.
The overview page lists two functions:
* `proxy` — the main integration function responsible for proxying requests from your website to our CDN and API.
* `management` — responsible for updating the main integration function. By default it uses [timer](https://learn.microsoft.com/en-us/azure/azure-functions/functions-bindings-timer?pivots=programming-language-javascript\&tabs=python-v2%2Cin-process) trigger to check for new releases every 30 minutes. Azure Functions are set to a timeout of 10 minutes, which is necessary for the management function to perform updates correctly with each new release.
**Do not disable the management function**
The management function (`management`) is responsible for updating the integration. It makes sure visitor identification on your website keeps up with new browser releases and fingerprinting evasion techniques. An outdated integration can lead to lower accuracy or break visitor identification completely. Don't disable or delete the management function.
Click **proxy** to open the function.
4. Inside the function page, click **Get Function Url** and copy the `default (function key)` URL. It will look like this: `https://fingerprint-pro-azure-integration-appi4fghxf32z36q.azurewebsites.net/{*restOfPath}`.
5. Build the function's status page URL by replacing the `{*restOfPath}` with `FPJS_ROUTE_PREFIX/status`.\
For example `https://fp-pro-integration-appi4fghxf32z36q.azurewebsites.net/FPJS_ROUTE_PREFIX/status`.
6. Open the status page in your browser. If your function is running and the proxy secret and route prefix are configured, it will say: "*All environment variables are set*".
## Step 5. Configure Front Door to deliver the proxy function
To get all the first-party accuracy benefits of the integration, you need to access the proxy function through your website's domain. The proxy integration is designed to work with the Azure Front Door CDN service. Front Door replicates the Azure function to data centers across the globe and delivers it to visitors based on their geographic location.
Using Front Door is required to ensure the true client IP address is captured and used for identification. Proxied identification requests with a local or bogon IP address will be rejected.
* If your website is already running on Front Door, you can use the same distribution and domain for the proxy integration → Follow only [Step 5.2](#step-5-2-add-a-route-to-front-door).
This is the recommended setup. Your website and the proxy function will not only share a domain but also be served by the same CDN (from IP addresses in the same range). This has implications for cookie lifetimes in Safari — they will be saved in the browser for one year instead of 7 days.
* If your website is not running on Front Door, you can create a new Front Door distribution and website subdomain just for the proxy integration → Follow steps 5.1, 5.2, and 5.3.
This setup results in Safari cookie lifetime being limited to 7 days, because your website and the proxy function are likely to have different IP ranges. This is still an improvement over third-party cookies getting blocked entirely by Safari, but we recommend serving your website and the proxy function using the same Front Door distribution if possible.
### Step 5.1 Create a Front Door distribution
If your website is already behind Front Door, you can skip this step.
1. Go to the **Front Door** service.
2. Click **Create** to create a new Front Door instance.
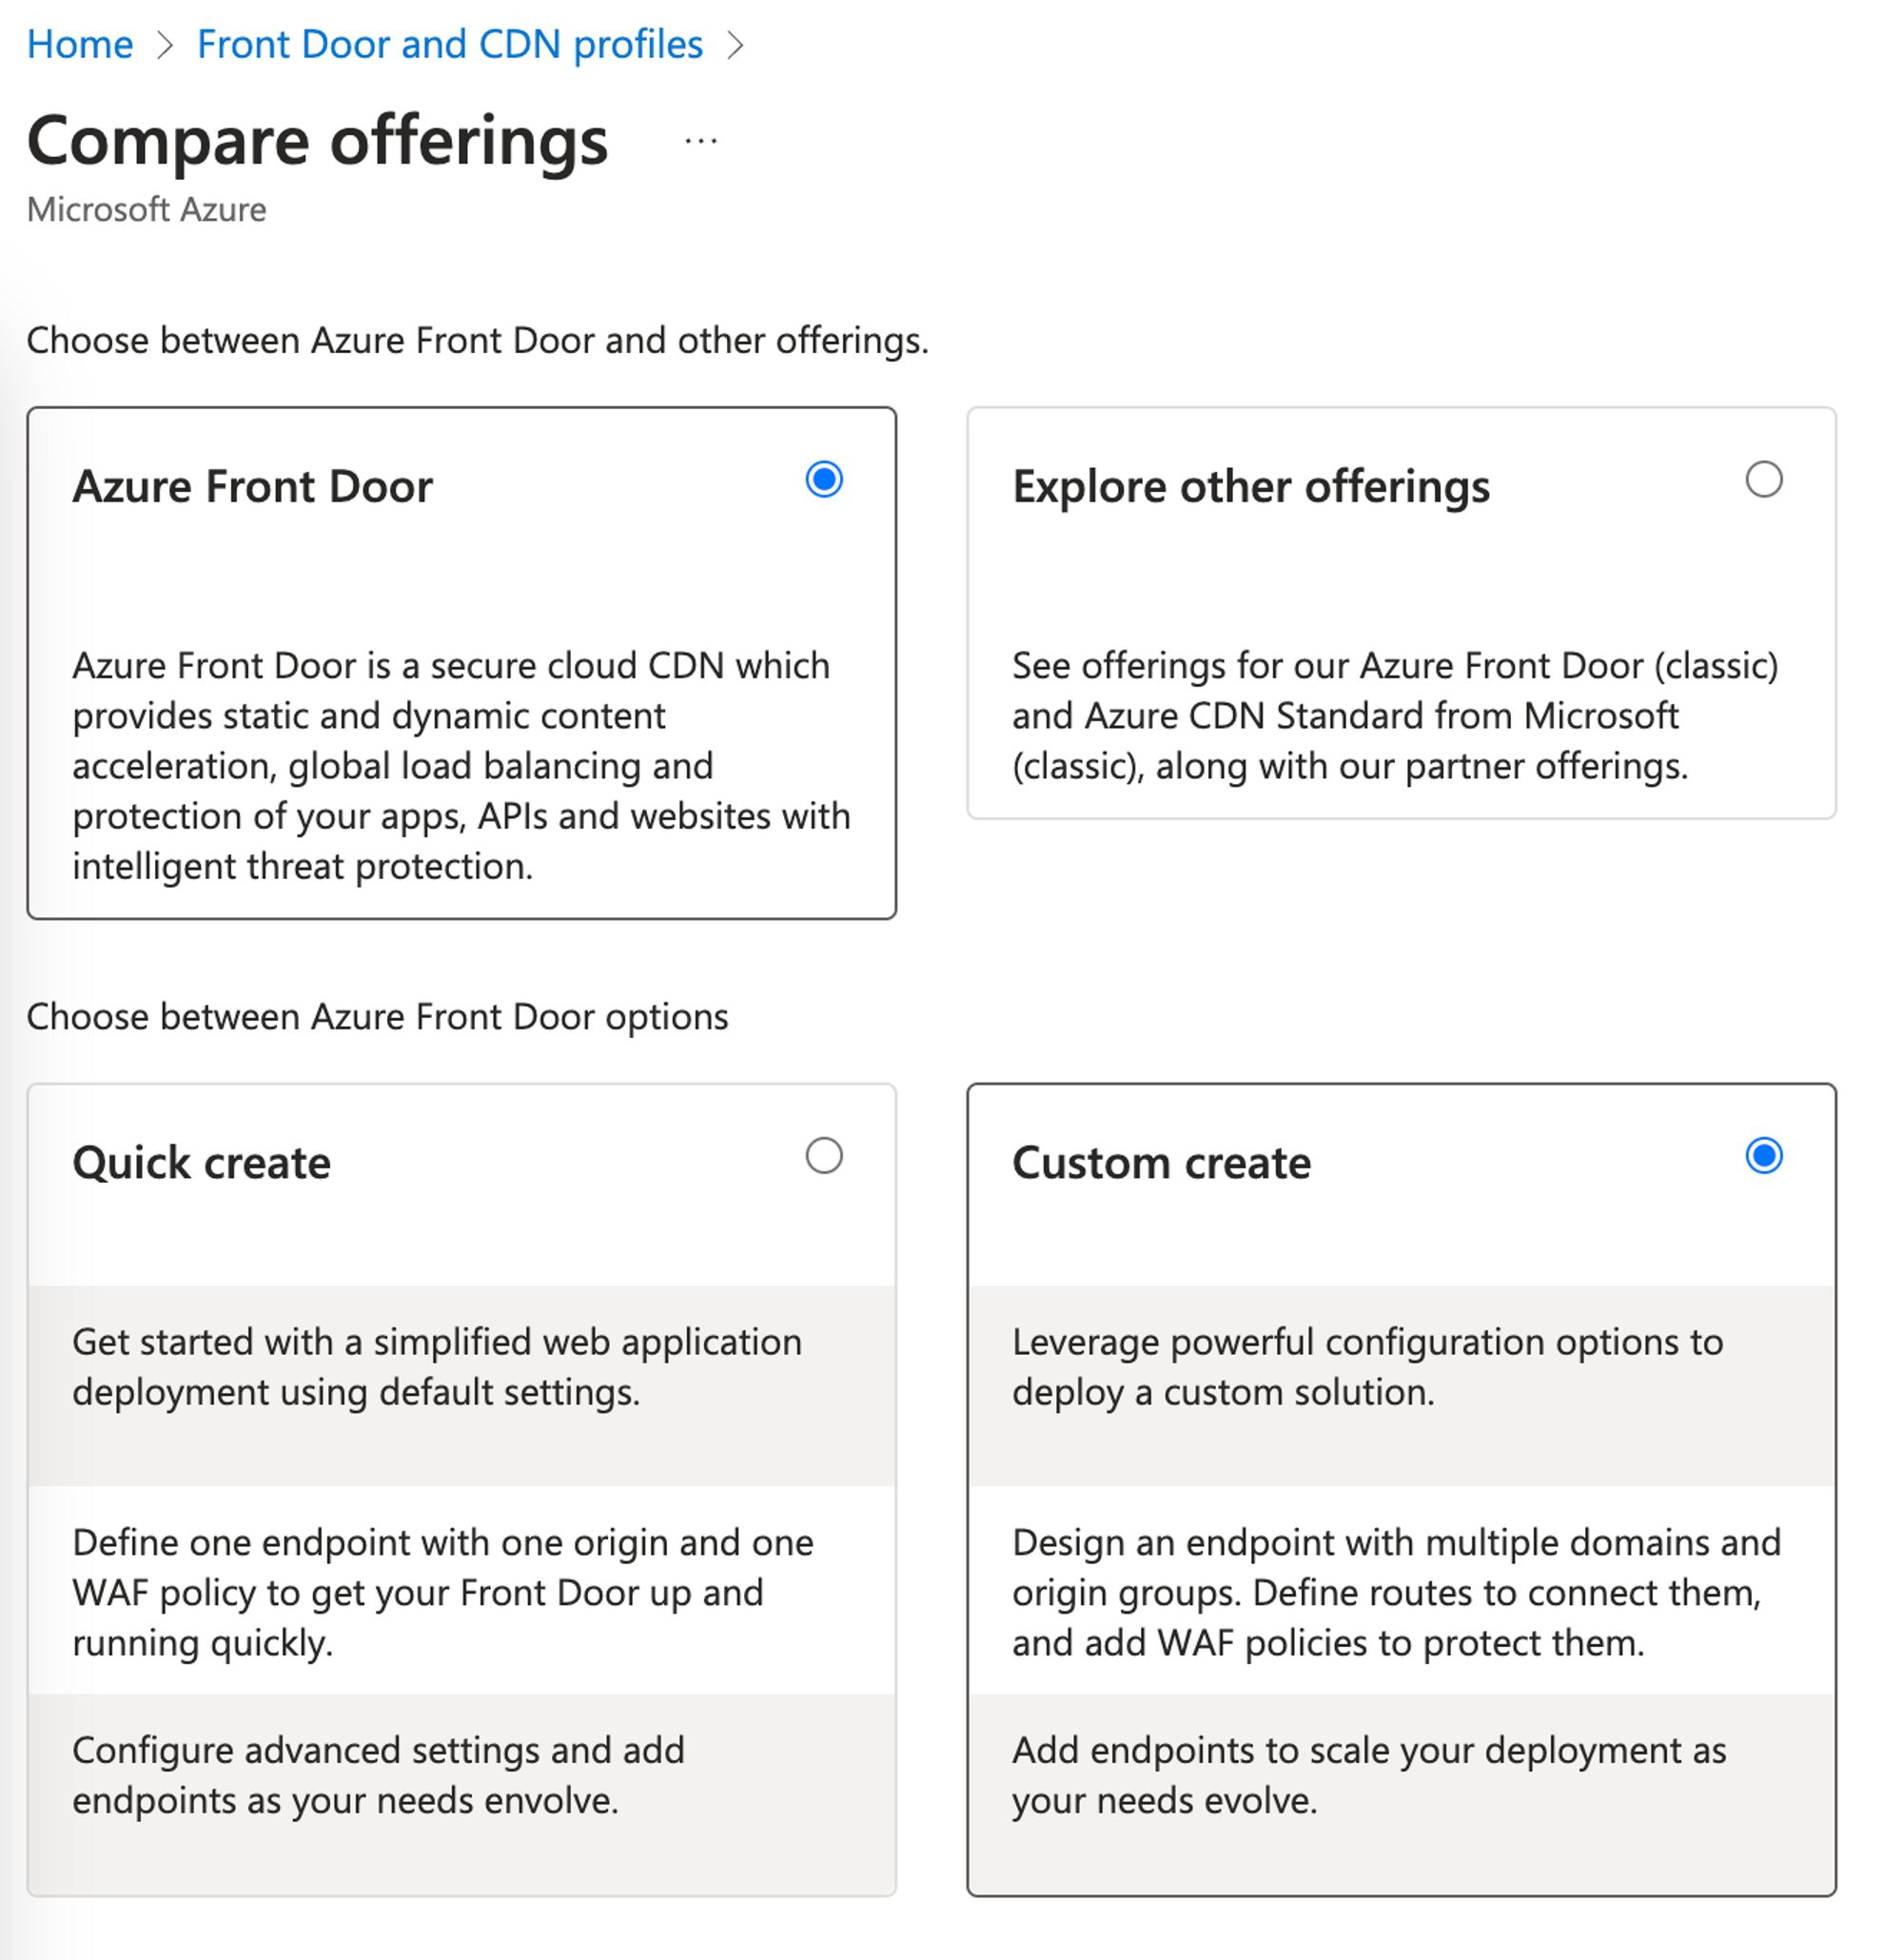
3. Set offering to **Azure Front Door**.
4. Set Front Door options to **Custom create**.
5. Click **Continue to create a Front Door**.
2. In the resources list, use the **Type** column to find your **Function App**. Its name will match the name given in [Step 3](#step-3-deploy-the-azure-function). Click on the name to navigate to the function app page.
3. Inside the function app page, click **Overview** in the left-side menu.
The overview page lists two functions:
* `proxy` — the main integration function responsible for proxying requests from your website to our CDN and API.
* `management` — responsible for updating the main integration function. By default it uses [timer](https://learn.microsoft.com/en-us/azure/azure-functions/functions-bindings-timer?pivots=programming-language-javascript\&tabs=python-v2%2Cin-process) trigger to check for new releases every 30 minutes. Azure Functions are set to a timeout of 10 minutes, which is necessary for the management function to perform updates correctly with each new release.
**Do not disable the management function**
The management function (`management`) is responsible for updating the integration. It makes sure visitor identification on your website keeps up with new browser releases and fingerprinting evasion techniques. An outdated integration can lead to lower accuracy or break visitor identification completely. Don't disable or delete the management function.
Click **proxy** to open the function.
4. Inside the function page, click **Get Function Url** and copy the `default (function key)` URL. It will look like this: `https://fingerprint-pro-azure-integration-appi4fghxf32z36q.azurewebsites.net/{*restOfPath}`.
5. Build the function's status page URL by replacing the `{*restOfPath}` with `FPJS_ROUTE_PREFIX/status`.\
For example `https://fp-pro-integration-appi4fghxf32z36q.azurewebsites.net/FPJS_ROUTE_PREFIX/status`.
6. Open the status page in your browser. If your function is running and the proxy secret and route prefix are configured, it will say: "*All environment variables are set*".
## Step 5. Configure Front Door to deliver the proxy function
To get all the first-party accuracy benefits of the integration, you need to access the proxy function through your website's domain. The proxy integration is designed to work with the Azure Front Door CDN service. Front Door replicates the Azure function to data centers across the globe and delivers it to visitors based on their geographic location.
Using Front Door is required to ensure the true client IP address is captured and used for identification. Proxied identification requests with a local or bogon IP address will be rejected.
* If your website is already running on Front Door, you can use the same distribution and domain for the proxy integration → Follow only [Step 5.2](#step-5-2-add-a-route-to-front-door).
This is the recommended setup. Your website and the proxy function will not only share a domain but also be served by the same CDN (from IP addresses in the same range). This has implications for cookie lifetimes in Safari — they will be saved in the browser for one year instead of 7 days.
* If your website is not running on Front Door, you can create a new Front Door distribution and website subdomain just for the proxy integration → Follow steps 5.1, 5.2, and 5.3.
This setup results in Safari cookie lifetime being limited to 7 days, because your website and the proxy function are likely to have different IP ranges. This is still an improvement over third-party cookies getting blocked entirely by Safari, but we recommend serving your website and the proxy function using the same Front Door distribution if possible.
### Step 5.1 Create a Front Door distribution
If your website is already behind Front Door, you can skip this step.
1. Go to the **Front Door** service.
2. Click **Create** to create a new Front Door instance.
3. Set offering to **Azure Front Door**.
4. Set Front Door options to **Custom create**.
5. Click **Continue to create a Front Door**.
 6. Switch to the **Basics** tab:
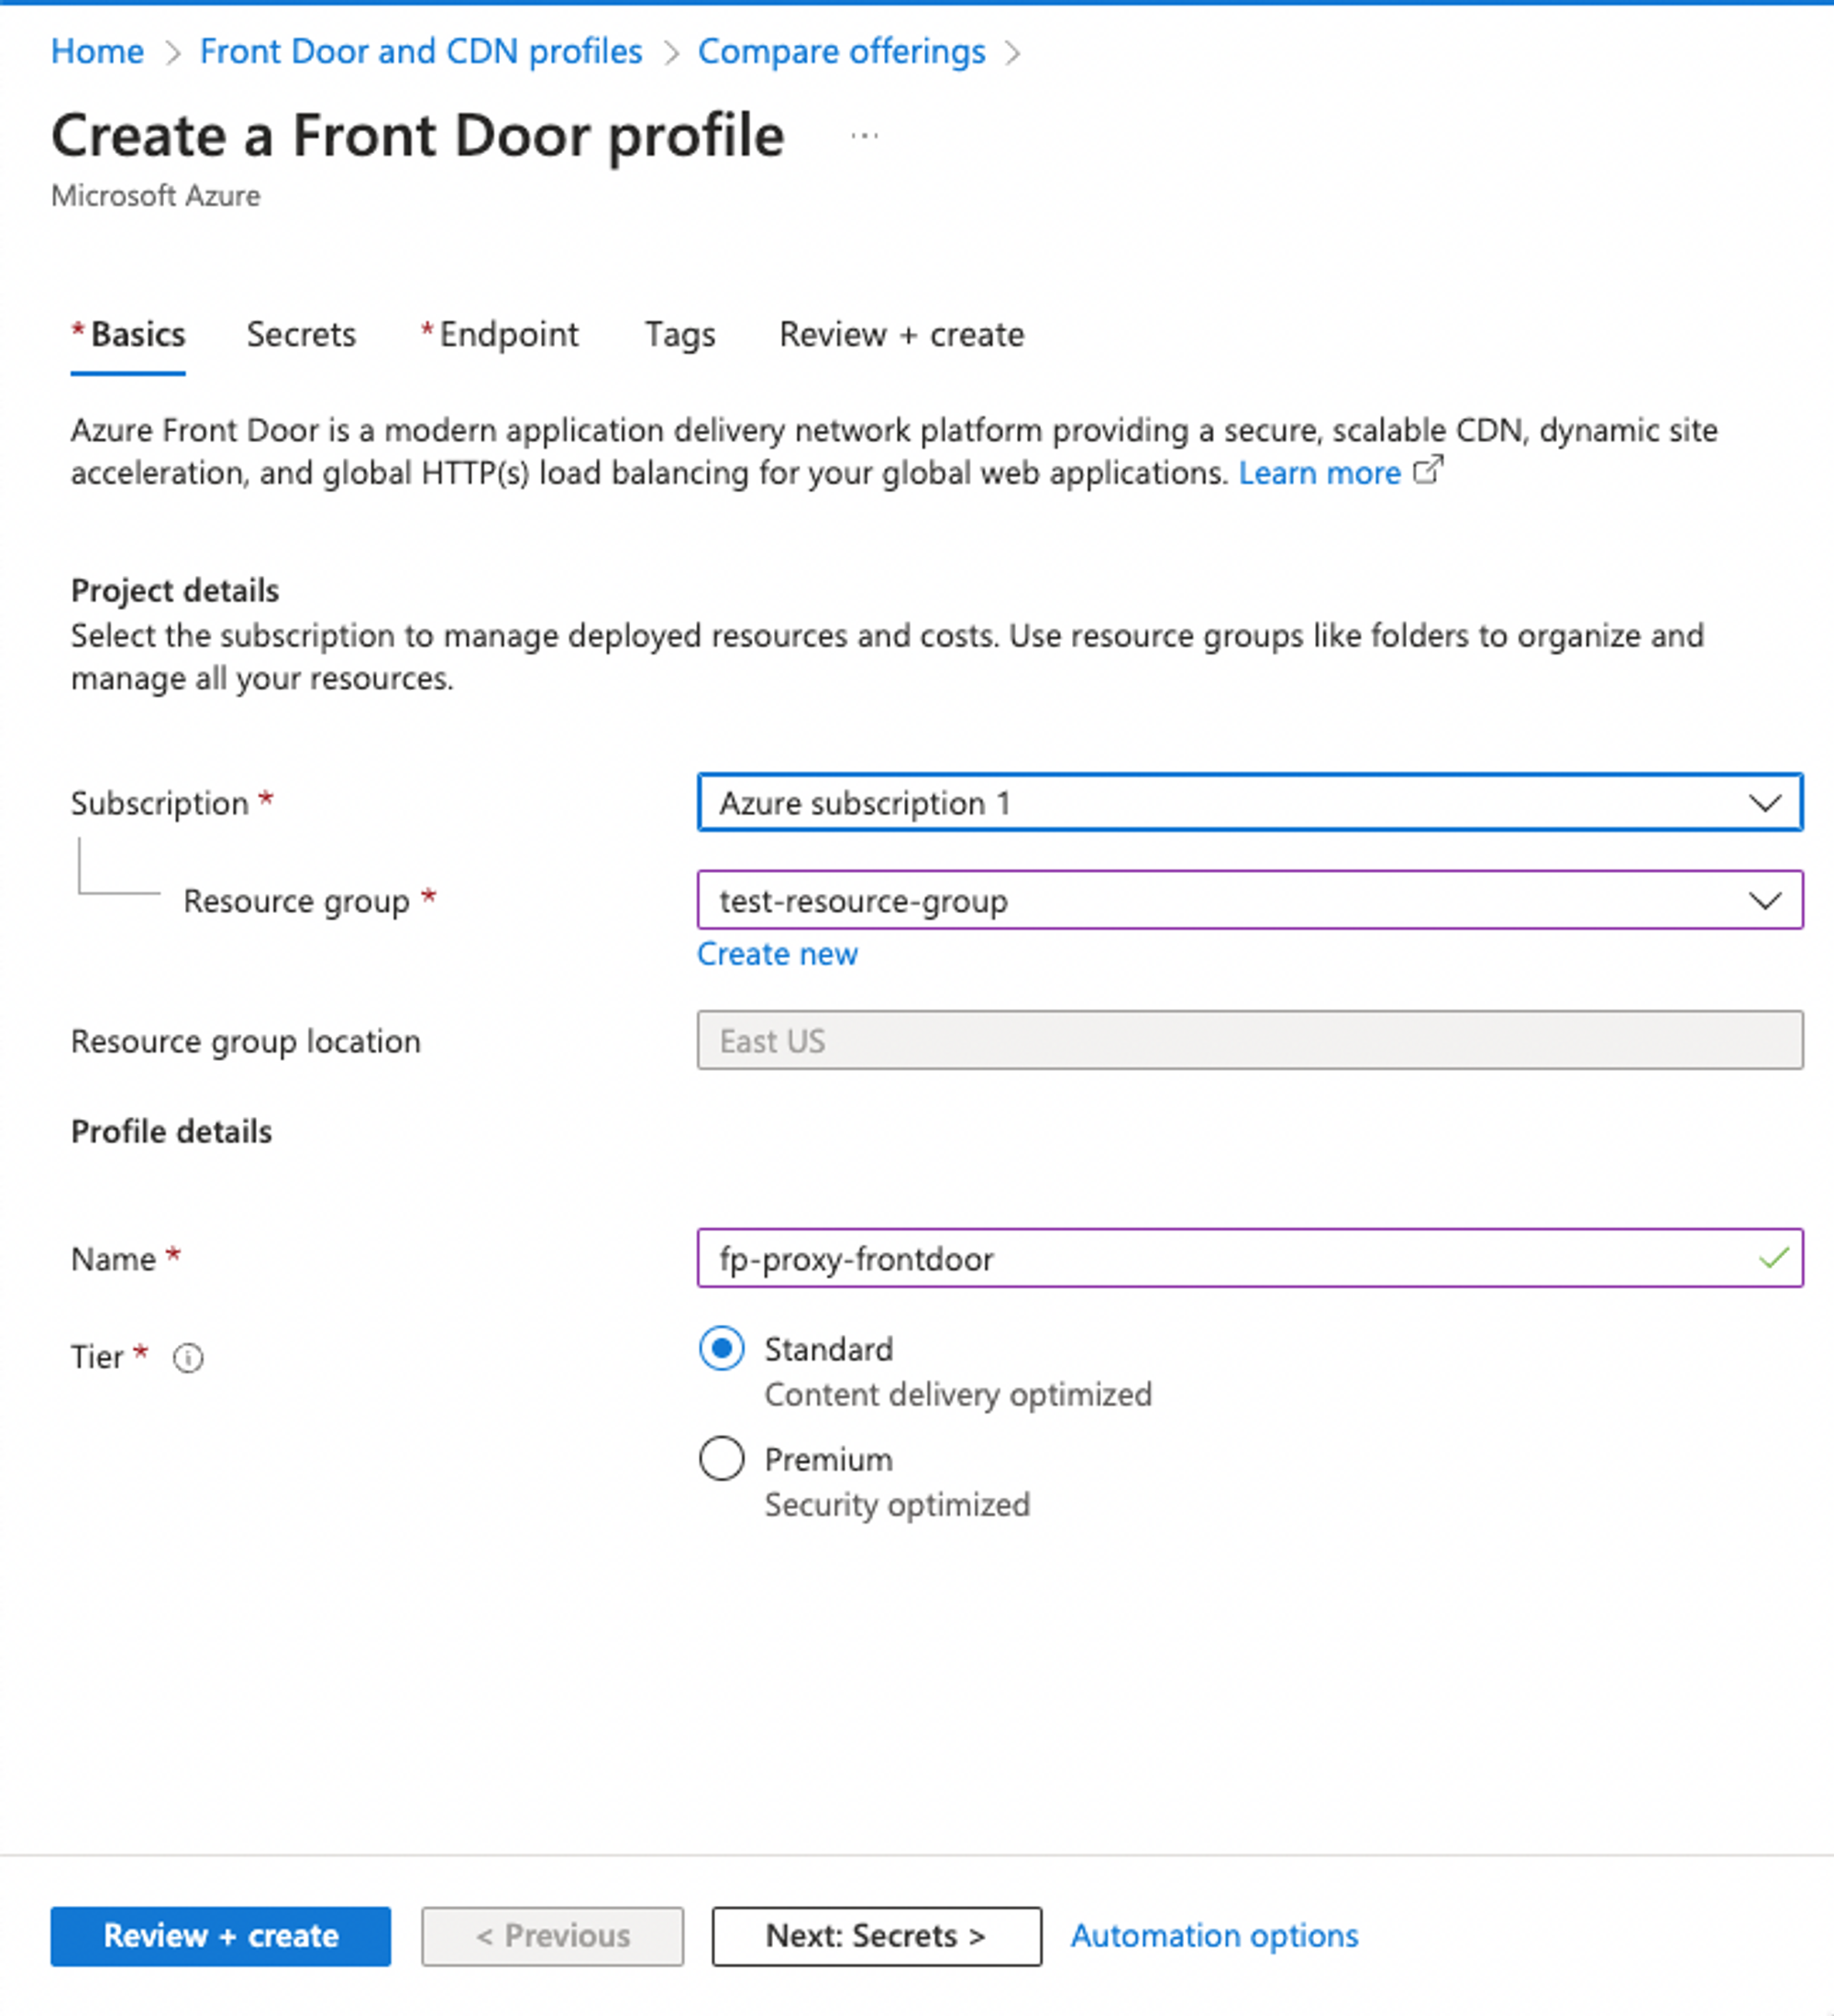
1. Select the **Resource group** with your Fingerprint integration (or create a new one).
2. Set **Name** for the Front Door profile, for example, `fp-proxy-frontdoor`.
7. Select a **Tier** according to your requirements. The **Standard** tier is enough for typical Fingerprint integration scenarios.
6. Switch to the **Basics** tab:
1. Select the **Resource group** with your Fingerprint integration (or create a new one).
2. Set **Name** for the Front Door profile, for example, `fp-proxy-frontdoor`.
7. Select a **Tier** according to your requirements. The **Standard** tier is enough for typical Fingerprint integration scenarios.
 8. Switch to the **Endpoint** tab.
9. Click **Add an endpoint**:
1. Set **Endpoint name**.
2. Keep **Enable this endpoint** selected.
3. Click **Add** to save the endpoint. Your endpoint will show up as a tile in the **Endpoint** tab.\\
8. Switch to the **Endpoint** tab.
9. Click **Add an endpoint**:
1. Set **Endpoint name**.
2. Keep **Enable this endpoint** selected.
3. Click **Add** to save the endpoint. Your endpoint will show up as a tile in the **Endpoint** tab.\\
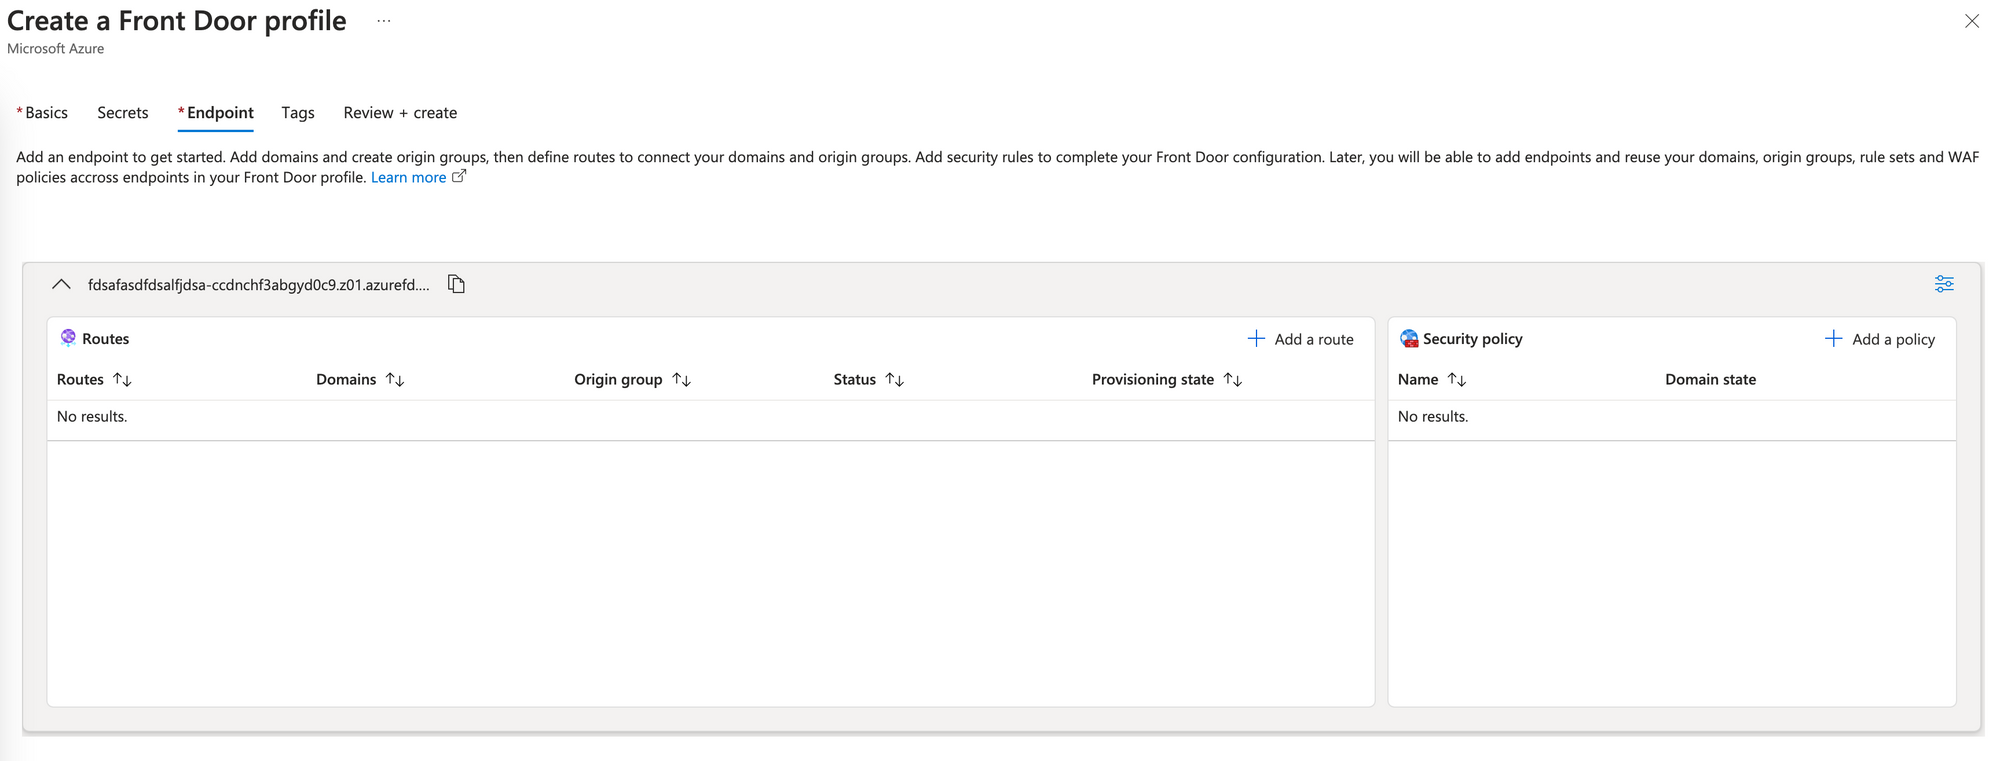 10. Inside the endpoint, click **Add a route**:
1. Configure the route according to [Step 5.2](#step-5-2-add-a-route-to-front-door), including the subdomain setup. You can then skip Step 5.2.
2. Click **Review + create** to validate your Front Door configuration.
11. Review the profile's summary and click **Create**.
### Step 5.2 Add a route to Front Door
1. Open your Front Door distribution.
2. On the left-side menu, go to **Settings** → **Front Door manager**.
3. Inside your Front Door endpoint, click **Add a route**.
4. Set **Name** to something descriptive like `fingerprint-integration-route`.
5. Keep **Enable route** selected (only applicable when creating a route on a pre-existing Front Door distribution, don't worry if you don't see the checkbox).
6. Set **Domains** to all domains you want to access the integration from. If your website is already behind Front Door, pick your existing domain. Azure might complain about the routes overlapping until you set **Patterns to match**.\
Alternatively, if you need to create a new subdomain for the integration, click **Add a new domain** instead.
1. If your DNS is managed outside Azure, switch **DNS management** to **All other DNS services**.
2. Set **Custom domain** to the subdomain you want to use for your integration, for example: `metrics.yourwebsite.com`. Use something general, not `fingerprint.yourwebsite.com` or similar which could be blocked by ad blockers.
3. Keep the other default settings and click **Add** to save the custom domain.
7. In **Patterns to match** add `/FPJS_ROUTE_PREFIX/*` and `/FPJS_ROUTE_PREFIX`.
8. Set **Accepted protocols** to `HTTPS only`.
9. Keep **Redirect all traffic to use HTTPS** selected.
10. Click **Add a new origin group.**
1. Set the **Name** to something descriptive like `fp-origin-group`.
2. Click **Add an origin**. A new form will open on top of the current one.
3. Set the origin **Name** to something descriptive, like `fp-origin`.
4. Set **Origin type** to `App services`.
5. Set **Host name** to the Fingerprint integration Function app created in Step 3. The origin host header will be filled automatically.
6. Keep the default values for all other settings.
7. Click **Add** to save the origin.
8. Back inside the **Add an origin group** form, keep **Enable health probes** selected.
9. Set health probe **Path** to `/FPJS_ROUTE_PREFIX/status`.
10. Set **Protocol** to `HTTPS`.
11. Set **Probe method** to `GET`.
12. Click **Add** to save the origin group.
11. Set **Forwarding protocol** to `HTTPS only`.
12. Click **Add** to save the route.
If you used the same domain and Front Door as your website for the integration, continue to Step 6. If you created a new Front Door and subdomain for the integration, you still need to verify your subdomain in Step 5.3.
### Step 5.3 Verify the integration subdomain
If you are using your website's domain for the integration, you can skip this step.
1. Inside **Front Door manager** → **Endpoint** → **Routes**, open your newly created subdomain.
10. Inside the endpoint, click **Add a route**:
1. Configure the route according to [Step 5.2](#step-5-2-add-a-route-to-front-door), including the subdomain setup. You can then skip Step 5.2.
2. Click **Review + create** to validate your Front Door configuration.
11. Review the profile's summary and click **Create**.
### Step 5.2 Add a route to Front Door
1. Open your Front Door distribution.
2. On the left-side menu, go to **Settings** → **Front Door manager**.
3. Inside your Front Door endpoint, click **Add a route**.
4. Set **Name** to something descriptive like `fingerprint-integration-route`.
5. Keep **Enable route** selected (only applicable when creating a route on a pre-existing Front Door distribution, don't worry if you don't see the checkbox).
6. Set **Domains** to all domains you want to access the integration from. If your website is already behind Front Door, pick your existing domain. Azure might complain about the routes overlapping until you set **Patterns to match**.\
Alternatively, if you need to create a new subdomain for the integration, click **Add a new domain** instead.
1. If your DNS is managed outside Azure, switch **DNS management** to **All other DNS services**.
2. Set **Custom domain** to the subdomain you want to use for your integration, for example: `metrics.yourwebsite.com`. Use something general, not `fingerprint.yourwebsite.com` or similar which could be blocked by ad blockers.
3. Keep the other default settings and click **Add** to save the custom domain.
7. In **Patterns to match** add `/FPJS_ROUTE_PREFIX/*` and `/FPJS_ROUTE_PREFIX`.
8. Set **Accepted protocols** to `HTTPS only`.
9. Keep **Redirect all traffic to use HTTPS** selected.
10. Click **Add a new origin group.**
1. Set the **Name** to something descriptive like `fp-origin-group`.
2. Click **Add an origin**. A new form will open on top of the current one.
3. Set the origin **Name** to something descriptive, like `fp-origin`.
4. Set **Origin type** to `App services`.
5. Set **Host name** to the Fingerprint integration Function app created in Step 3. The origin host header will be filled automatically.
6. Keep the default values for all other settings.
7. Click **Add** to save the origin.
8. Back inside the **Add an origin group** form, keep **Enable health probes** selected.
9. Set health probe **Path** to `/FPJS_ROUTE_PREFIX/status`.
10. Set **Protocol** to `HTTPS`.
11. Set **Probe method** to `GET`.
12. Click **Add** to save the origin group.
11. Set **Forwarding protocol** to `HTTPS only`.
12. Click **Add** to save the route.
If you used the same domain and Front Door as your website for the integration, continue to Step 6. If you created a new Front Door and subdomain for the integration, you still need to verify your subdomain in Step 5.3.
### Step 5.3 Verify the integration subdomain
If you are using your website's domain for the integration, you can skip this step.
1. Inside **Front Door manager** → **Endpoint** → **Routes**, open your newly created subdomain.
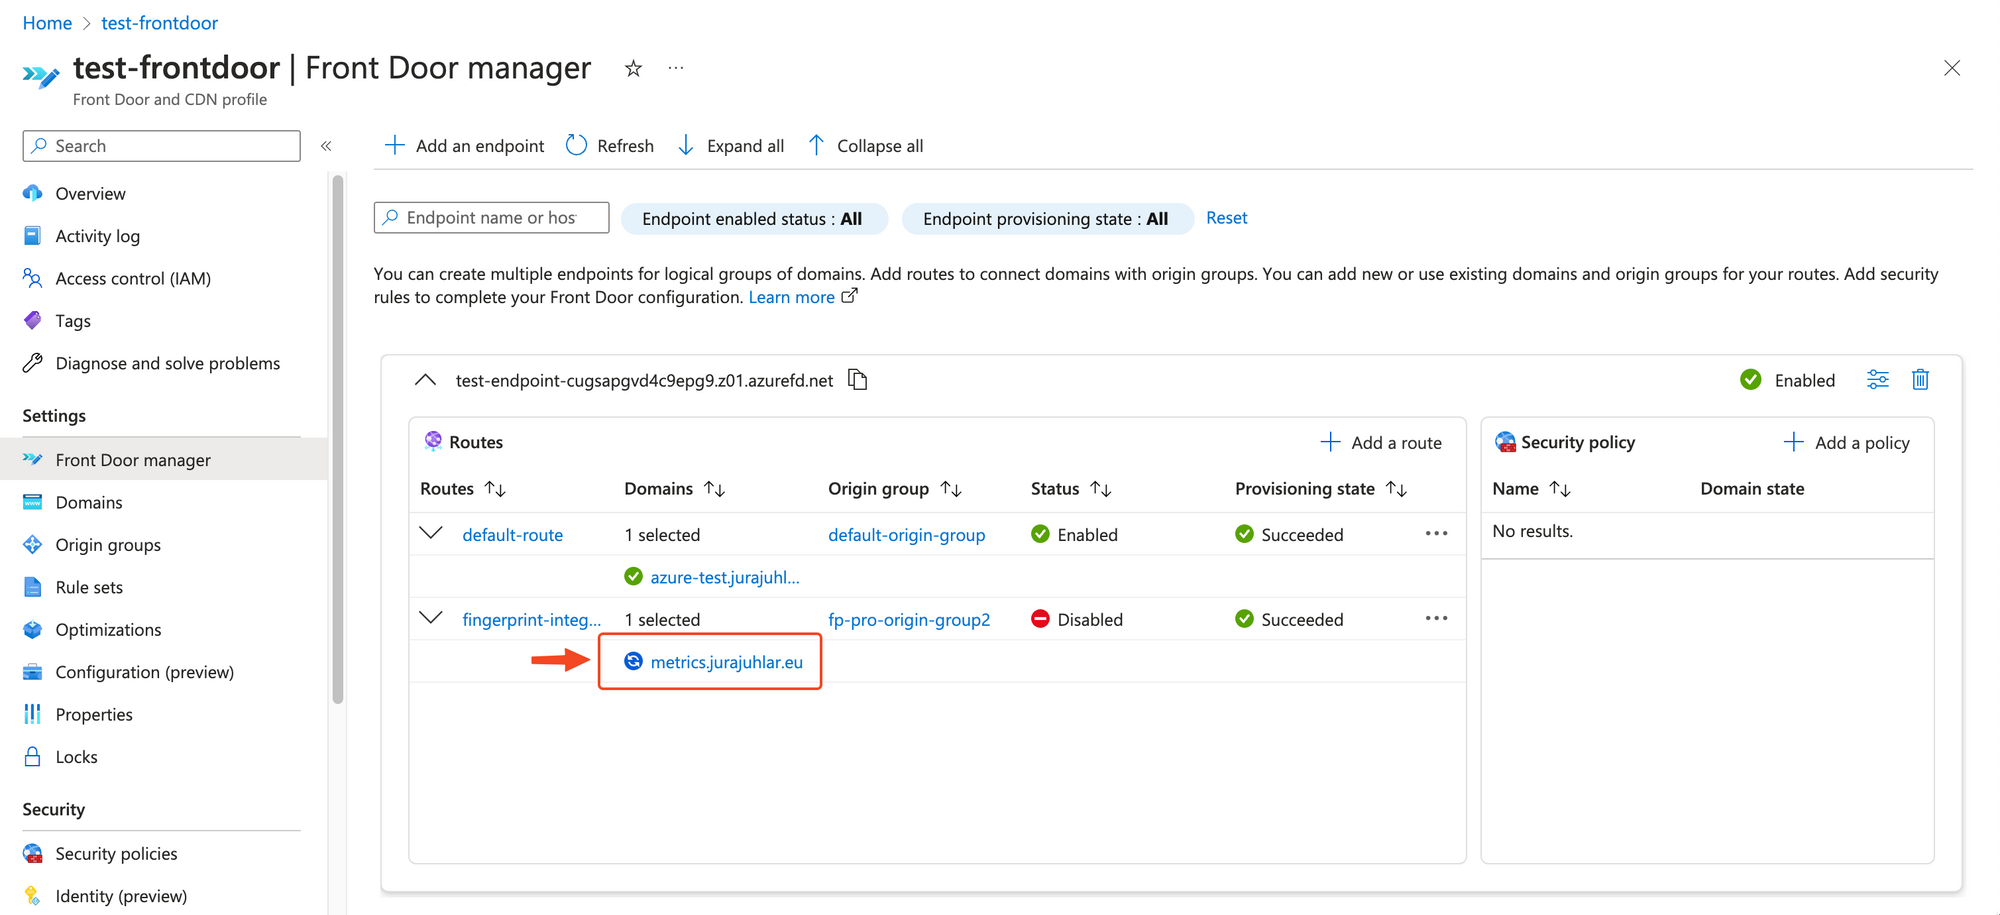 2. Under **Validation state**, click **Pending.**
3. Take the displayed **Record type** and **Record name** and add them as a `TXT` record into your website's DNS records. This proves your ownership of the domain to Azure.
4. Inside your website's DNS records, add a `CNAME` record with your chosen subdomain (for example `metrics.yourwebsite.com`) pointing to the endpoint of your Front Door distribution (for example `your-endpoint-cugsapgvd4c9epg9.z01.azurefd.net`). This redirects traffic from your subdomain to Front Door.
5. Wait until the DNS changes propagate and the domain validation state switches to **Approved**.
## Step 6. Configure the Fingerprint JavaScript agent on your website
**Migrating from JavaScript agent v3**
Azure Proxy Integration remains compatible with JavaScript agent v3, so you can upgrade when it works for your rollout plan.
When you migrate to JavaScript agent v4:
* Remove `scriptUrlPattern` and `endpoint`
* Replace them with a single `endpoints` option that points to the worker route, for example `https://yourwebsite.com/ROUTE_PREFIX/?region=us`
* See [Migrating JavaScript agent from v3 to v4](/reference/migrating-from-v3-to-v4#use-endpoints-instead-of-scripturlpattern) for more details
Use the route prefix created in [Step 2](#step-2-create-a-route-prefix) to construct the agent-download and result-endpoint URLs.
If your website and the proxy integration are behind the same Front Door distribution and domain, the JavaScript agent configuration will use URLs inside your domain, for example:
```javascript NPM package theme={"theme":"github-dark-dimmed"}
import * as Fingerprint from '@fingerprint/agent'
// Initialize the agent at application startup.
const fp = Fingerprint.start({
apiKey: 'PUBLIC_API_KEY',
region: 'us',
endpoints: 'https://yourwebsite.com/FPJS_ROUTE_PREFIX/?region=us'
});
```
```javascript CDN theme={"theme":"github-dark-dimmed"}
const url = 'https://yourwebsite.com/FPJS_ROUTE_PREFIX/web/v4/PUBLIC_API_KEY';
const fpPromise = import(url)
.then(Fingerprint => Fingerprint.start({
apiKey: 'PUBLIC_API_KEY',
region: 'us',
endpoints: 'https://yourwebsite.com/FPJS_ROUTE_PREFIX/?region=us',
}));
```
If your website is not behind Front Door and you have set up a new Front Door distribution on a subdomain according to steps [5.1](#step-5-1-create-a-front-door-distribution), [5.2](#step-5-2-add-a-route-to-front-door), [5.3](#step-5-3-verify-the-integration-subdomain), the JavaScript agent configuration will use that subdomain to interact with Fingerprint, for example:
```javascript NPM package theme={"theme":"github-dark-dimmed"}
import * as Fingerprint from '@fingerprint/agent'
// Initialize the agent at application startup.
const fp = Fingerprint.start({
apiKey: 'PUBLIC_API_KEY',
region: 'us',
endpoints: 'https://metrics.yourwebsite.com/FPJS_ROUTE_PREFIX/?region=us'
});
```
```javascript CDN theme={"theme":"github-dark-dimmed"}
const url = 'https://metrics.yourwebsite.com/FPJS_ROUTE_PREFIX/web/v4/PUBLIC_API_KEY';
const fpPromise = import(url)
.then(Fingerprint => Fingerprint.start({
apiKey: 'PUBLIC_API_KEY',
region: 'us',
endpoints: 'https://metrics.yourwebsite.com/FPJS_ROUTE_PREFIX/?region=us',
}));
```
**Parameter URL nuances**
* Pass a `region` query parameter to the `endpoints` URL in the following format: `?region=eu`. The value needs to reflect the [region](/docs/regions) of your workspace.
If everything is configured correctly, the agent will successfully receive data using the Azure integration as its endpoint.
## Monitoring the integration
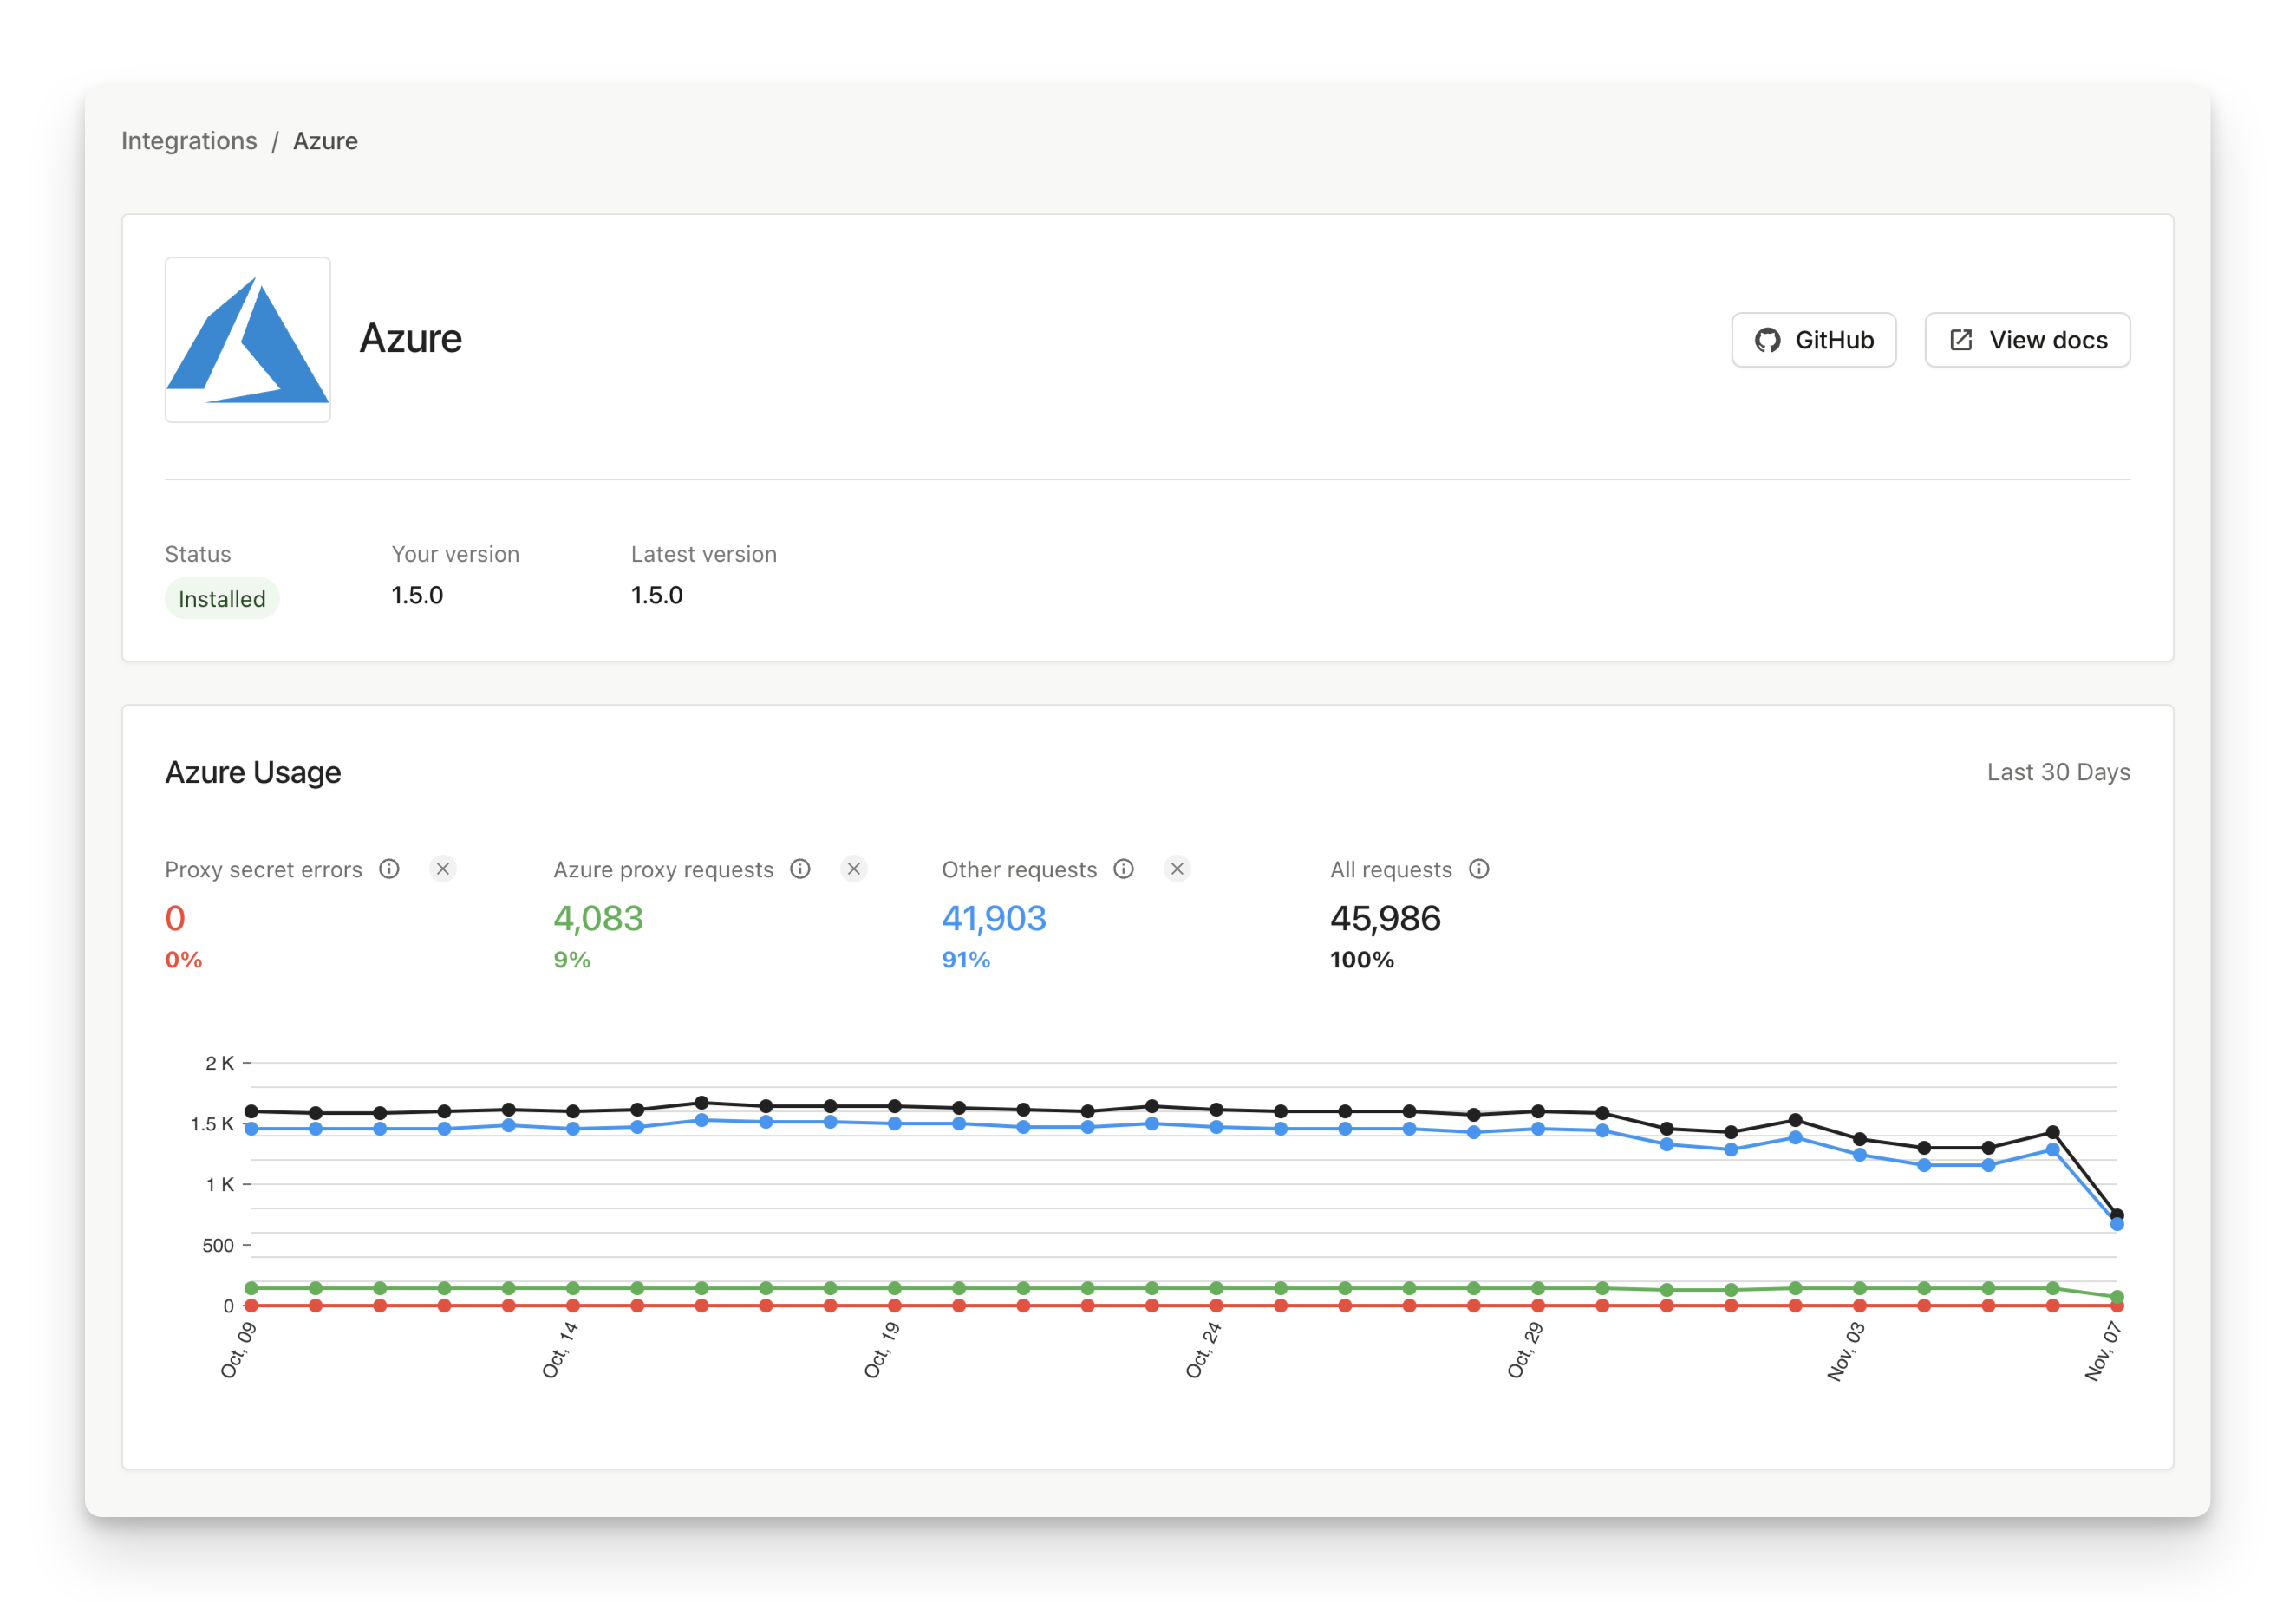
Go to **Dashboard** > [**SDKs & integrations**](https://dashboard.fingerprint.com/integrations) > **Azure** to see the status of your integration. Here you can monitor:
* If the integration is up to date.
* How many identification requests are coming through the integration (and how many are not).
* The error rate of proxied identification requests (caused by missing or incorrect proxy secret).
The information on the status page is cached so allow a few minutes for the latest data points to be reflected.
2. Under **Validation state**, click **Pending.**
3. Take the displayed **Record type** and **Record name** and add them as a `TXT` record into your website's DNS records. This proves your ownership of the domain to Azure.
4. Inside your website's DNS records, add a `CNAME` record with your chosen subdomain (for example `metrics.yourwebsite.com`) pointing to the endpoint of your Front Door distribution (for example `your-endpoint-cugsapgvd4c9epg9.z01.azurefd.net`). This redirects traffic from your subdomain to Front Door.
5. Wait until the DNS changes propagate and the domain validation state switches to **Approved**.
## Step 6. Configure the Fingerprint JavaScript agent on your website
**Migrating from JavaScript agent v3**
Azure Proxy Integration remains compatible with JavaScript agent v3, so you can upgrade when it works for your rollout plan.
When you migrate to JavaScript agent v4:
* Remove `scriptUrlPattern` and `endpoint`
* Replace them with a single `endpoints` option that points to the worker route, for example `https://yourwebsite.com/ROUTE_PREFIX/?region=us`
* See [Migrating JavaScript agent from v3 to v4](/reference/migrating-from-v3-to-v4#use-endpoints-instead-of-scripturlpattern) for more details
Use the route prefix created in [Step 2](#step-2-create-a-route-prefix) to construct the agent-download and result-endpoint URLs.
If your website and the proxy integration are behind the same Front Door distribution and domain, the JavaScript agent configuration will use URLs inside your domain, for example:
```javascript NPM package theme={"theme":"github-dark-dimmed"}
import * as Fingerprint from '@fingerprint/agent'
// Initialize the agent at application startup.
const fp = Fingerprint.start({
apiKey: 'PUBLIC_API_KEY',
region: 'us',
endpoints: 'https://yourwebsite.com/FPJS_ROUTE_PREFIX/?region=us'
});
```
```javascript CDN theme={"theme":"github-dark-dimmed"}
const url = 'https://yourwebsite.com/FPJS_ROUTE_PREFIX/web/v4/PUBLIC_API_KEY';
const fpPromise = import(url)
.then(Fingerprint => Fingerprint.start({
apiKey: 'PUBLIC_API_KEY',
region: 'us',
endpoints: 'https://yourwebsite.com/FPJS_ROUTE_PREFIX/?region=us',
}));
```
If your website is not behind Front Door and you have set up a new Front Door distribution on a subdomain according to steps [5.1](#step-5-1-create-a-front-door-distribution), [5.2](#step-5-2-add-a-route-to-front-door), [5.3](#step-5-3-verify-the-integration-subdomain), the JavaScript agent configuration will use that subdomain to interact with Fingerprint, for example:
```javascript NPM package theme={"theme":"github-dark-dimmed"}
import * as Fingerprint from '@fingerprint/agent'
// Initialize the agent at application startup.
const fp = Fingerprint.start({
apiKey: 'PUBLIC_API_KEY',
region: 'us',
endpoints: 'https://metrics.yourwebsite.com/FPJS_ROUTE_PREFIX/?region=us'
});
```
```javascript CDN theme={"theme":"github-dark-dimmed"}
const url = 'https://metrics.yourwebsite.com/FPJS_ROUTE_PREFIX/web/v4/PUBLIC_API_KEY';
const fpPromise = import(url)
.then(Fingerprint => Fingerprint.start({
apiKey: 'PUBLIC_API_KEY',
region: 'us',
endpoints: 'https://metrics.yourwebsite.com/FPJS_ROUTE_PREFIX/?region=us',
}));
```
**Parameter URL nuances**
* Pass a `region` query parameter to the `endpoints` URL in the following format: `?region=eu`. The value needs to reflect the [region](/docs/regions) of your workspace.
If everything is configured correctly, the agent will successfully receive data using the Azure integration as its endpoint.
## Monitoring the integration
Go to **Dashboard** > [**SDKs & integrations**](https://dashboard.fingerprint.com/integrations) > **Azure** to see the status of your integration. Here you can monitor:
* If the integration is up to date.
* How many identification requests are coming through the integration (and how many are not).
* The error rate of proxied identification requests (caused by missing or incorrect proxy secret).
The information on the status page is cached so allow a few minutes for the latest data points to be reflected.
 ## Updating the route prefix and proxy secret
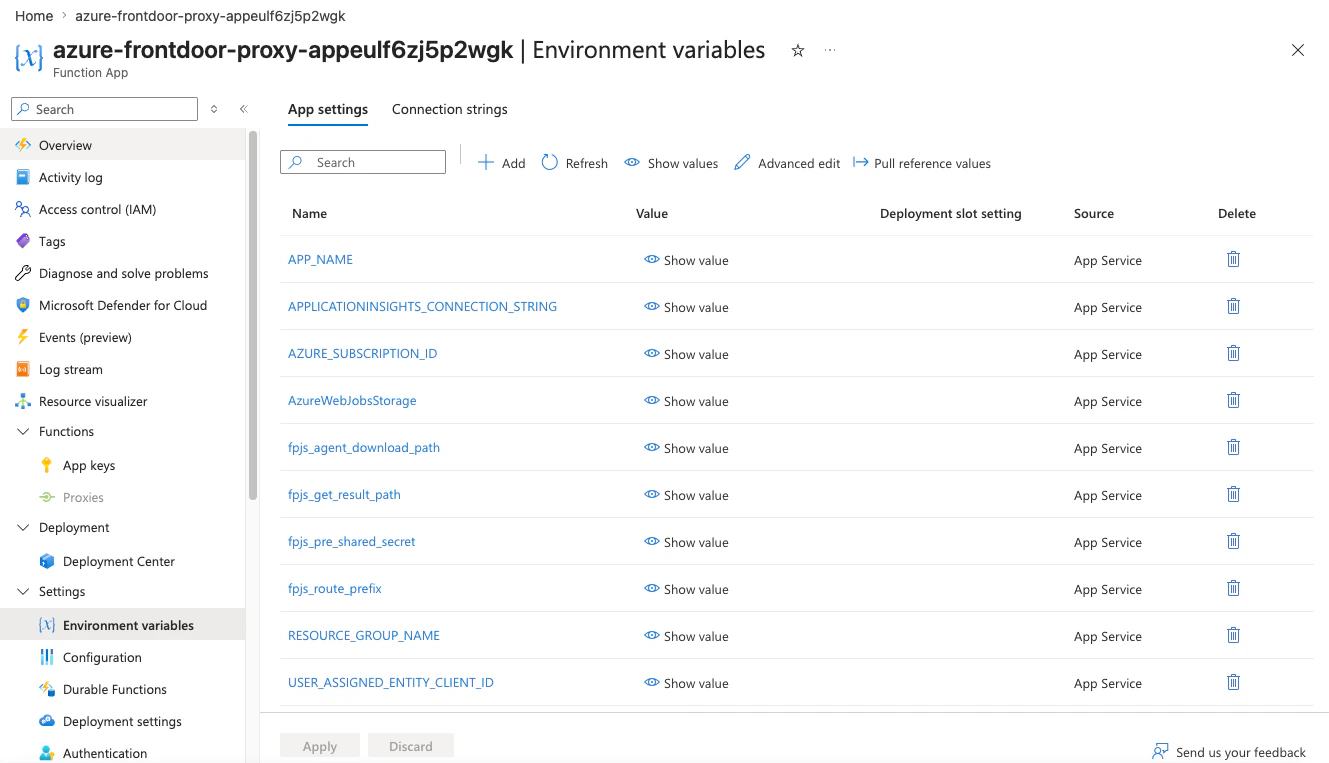
To change the Function App parameters:
1. Open your Function App page.
2. Using the left-side menu, expand **Settings** and click **Environment variables**.
3. Edit parameter values inside the **App settings**.
4. Click **Save**.
The function will restart with the new settings applied.
## Updating the route prefix and proxy secret
To change the Function App parameters:
1. Open your Function App page.
2. Using the left-side menu, expand **Settings** and click **Environment variables**.
3. Edit parameter values inside the **App settings**.
4. Click **Save**.
The function will restart with the new settings applied.
 ## Caching and compression for the Front Door route
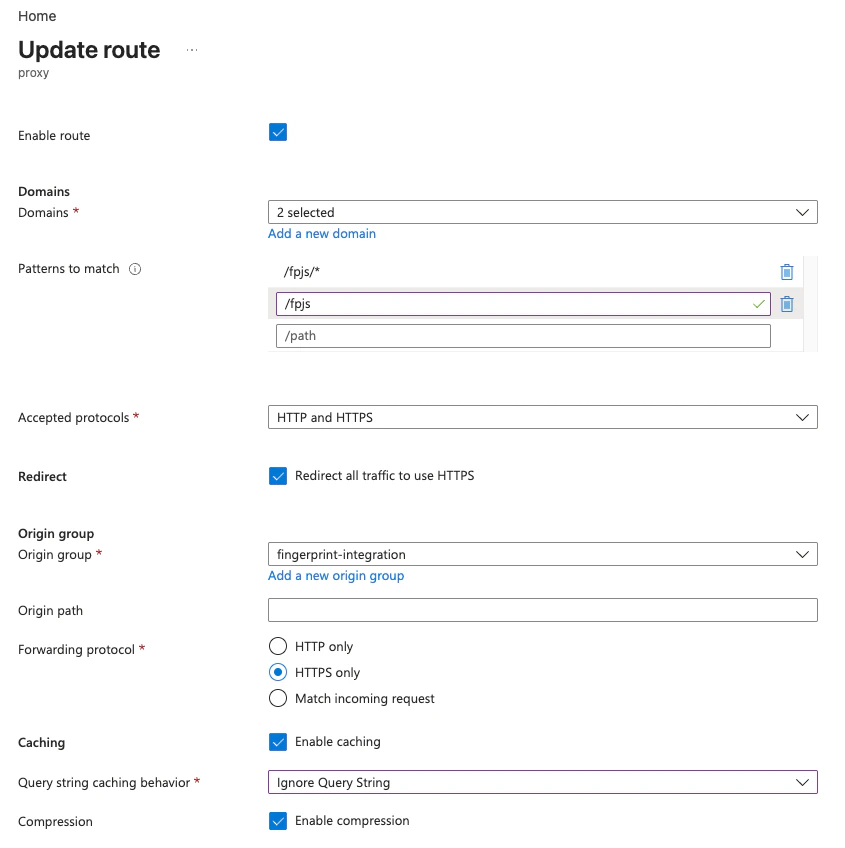
Enable caching for the Front Door route that points to the Fingerprint proxy Azure function.
1. Go to your Front Door distribution.
2. In the left side menu, under **Settings**, go to **Optimizations**.
## Caching and compression for the Front Door route
Enable caching for the Front Door route that points to the Fingerprint proxy Azure function.
1. Go to your Front Door distribution.
2. In the left side menu, under **Settings**, go to **Optimizations**.
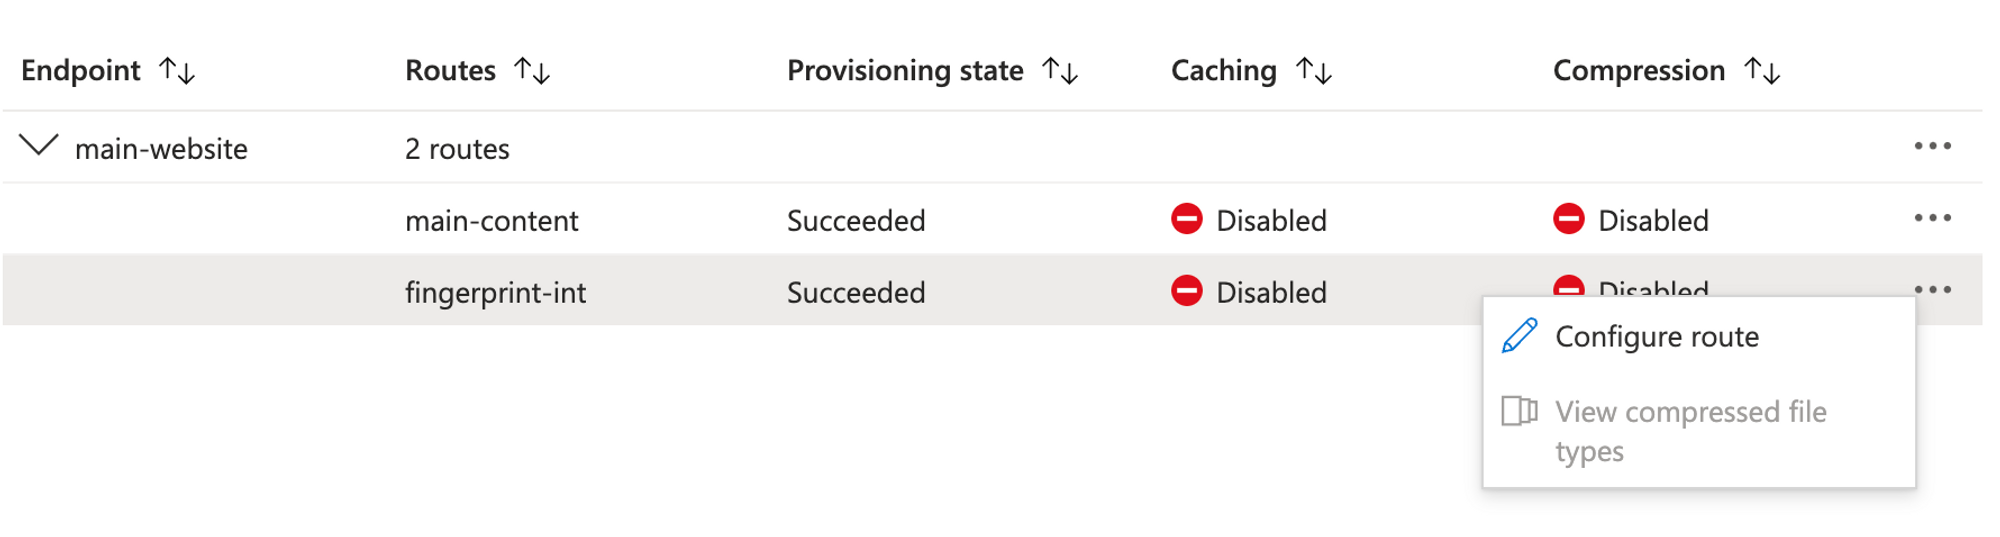
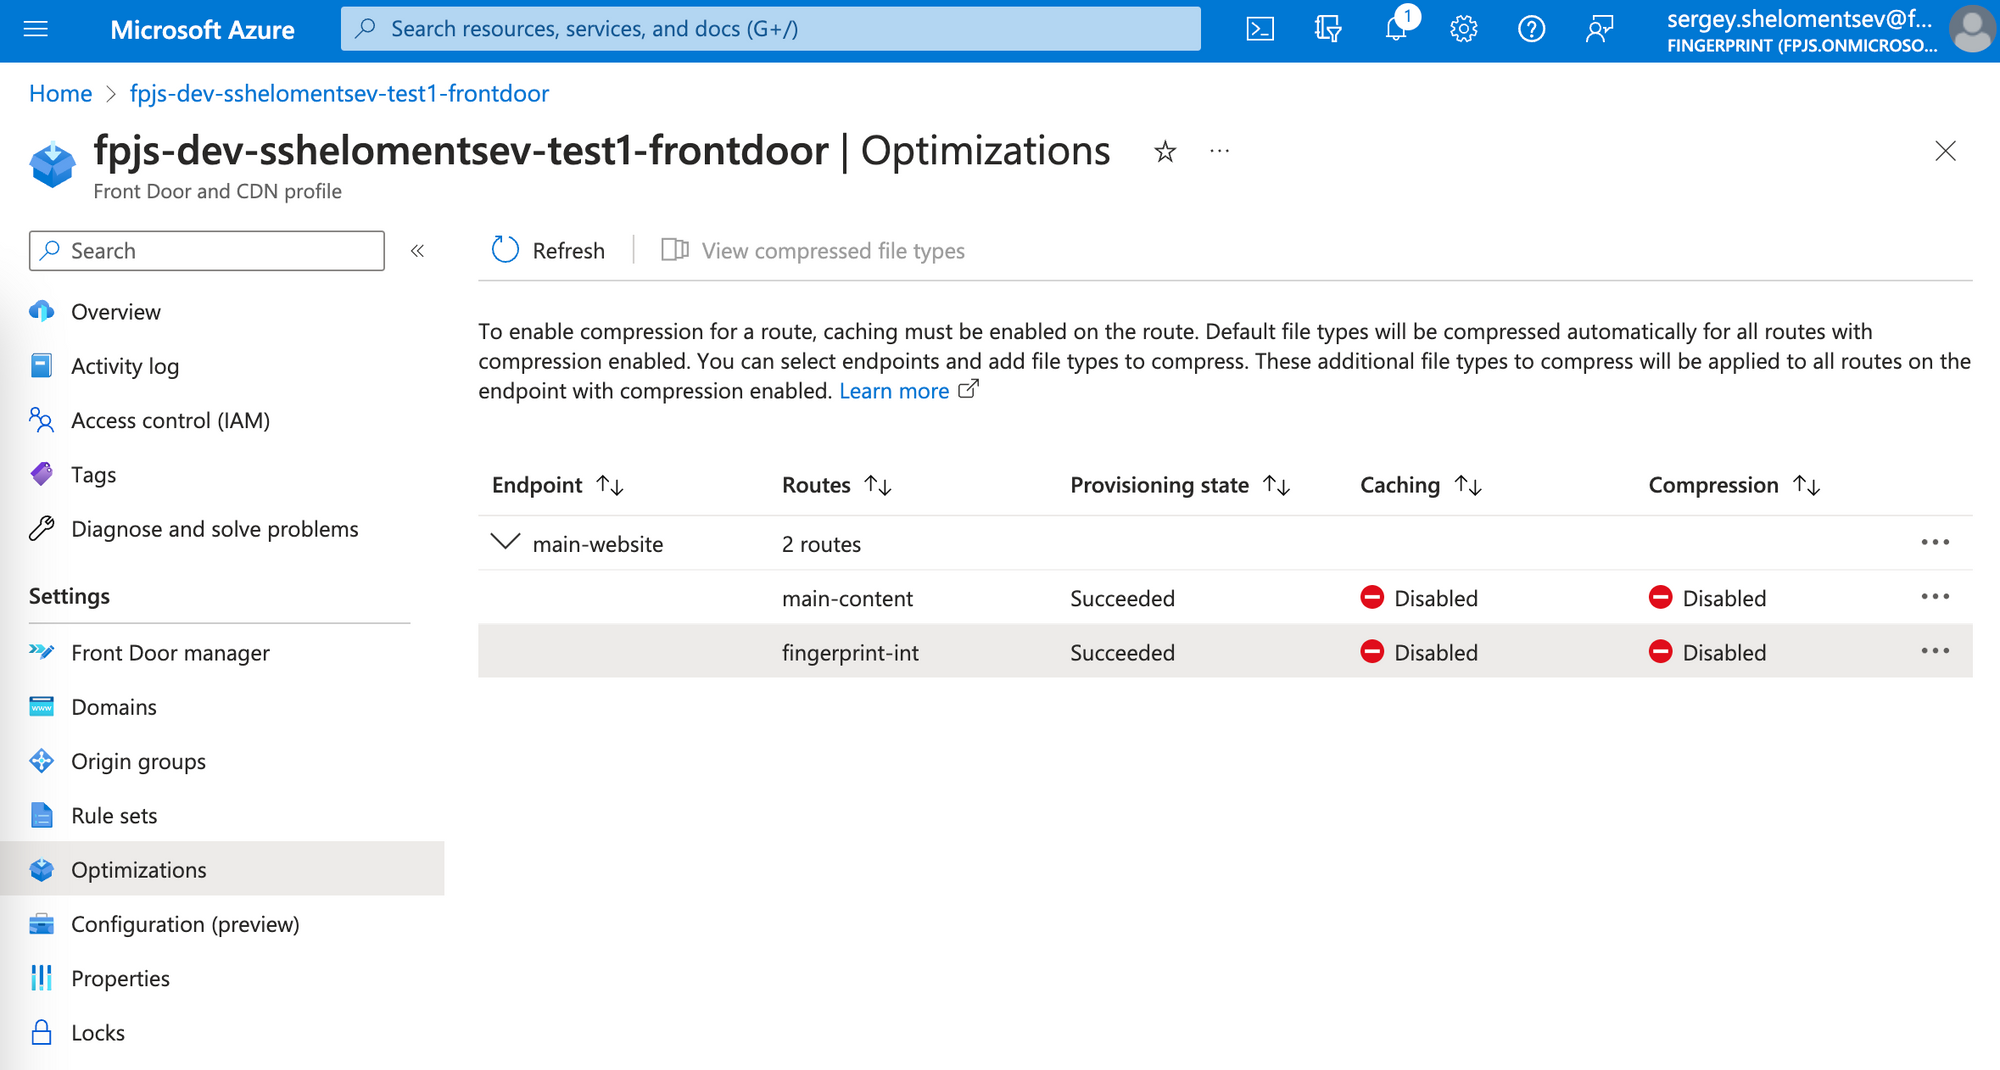 3. Find the route that points to the proxy function and click **Context menu (⋯)** → **Configure route**.
 4. On the Update route page, select **Enable caching.**
5. Set **Query string caching behavior** to `Ignore Query String`.
6. Select **Enable compression**.
7. Click **Update**.
4. On the Update route page, select **Enable caching.**
5. Set **Query string caching behavior** to `Ignore Query String`.
6. Select **Enable compression**.
7. Click **Update**.
 ## Azure cost calculation
You can use the [Azure pricing calculator](https://azure.microsoft.com/en-us/pricing/calculator/) to estimate your expenses.
### Azure Functions
* The number of executions is roughly equal to visitor identification events multiplied by two.
* Memory size is 128 MB.
* Execution time depends on your availability settings.
* The typical duration of the agent download request is 200ms.
* The typical duration of the Fingerprint Identification API request is 500ms.
### Storage account
* A Storage account is used to store function code in your infrastructure.
* Our template has the following settings:
* The storage type is `Block Blob Storage`.
* Performance is `Standard`.
* Storage Account Type is `General Purpose V2`.
* Redundancy is `LRS`.
* The capacity used is approximately 10 MB.
### Azure Front Door
1. The **number of requests** from your client to Front Door is roughly equal to visitor identification events multiplied by three. There are up to 3 requests for each visitor identification.
* The first request downloads the agent script. This request is typically cached by the browser.
* The second request calls the identification endpoint. Caching the identification request is up to you, but most of our [frontend libraries](/docs/frontend-libraries) have a caching mechanism built in.
* Potentially, a third helper request may be used to improve accuracy. This request is typically cached by the browser.
2. The number of requests from your client to Front Door is roughly equal to visitor identification events multiplied by two.
3. Data transfer from Front Door edge to origin (your Azure Function):
* Each identification request has a payload size of 5-10 KB.
4. Data transfer from the origin to Front Door is not charged.
5. Data transfer from Front Door to the client:
* The agent’s size is approximately 50-60 KB, depending on the exact version and network compression algorithm used (some browsers may not support `br` encoding).
* The identification result size is up to 1KB per request.
* Enabling compression on the Front Door route will reduce the cost of data transfer to the client.
See [Azure Front Door billing](https://learn.microsoft.com/en-us/azure/frontdoor/billing) in the Azure documentation for more details.
## Azure cost calculation
You can use the [Azure pricing calculator](https://azure.microsoft.com/en-us/pricing/calculator/) to estimate your expenses.
### Azure Functions
* The number of executions is roughly equal to visitor identification events multiplied by two.
* Memory size is 128 MB.
* Execution time depends on your availability settings.
* The typical duration of the agent download request is 200ms.
* The typical duration of the Fingerprint Identification API request is 500ms.
### Storage account
* A Storage account is used to store function code in your infrastructure.
* Our template has the following settings:
* The storage type is `Block Blob Storage`.
* Performance is `Standard`.
* Storage Account Type is `General Purpose V2`.
* Redundancy is `LRS`.
* The capacity used is approximately 10 MB.
### Azure Front Door
1. The **number of requests** from your client to Front Door is roughly equal to visitor identification events multiplied by three. There are up to 3 requests for each visitor identification.
* The first request downloads the agent script. This request is typically cached by the browser.
* The second request calls the identification endpoint. Caching the identification request is up to you, but most of our [frontend libraries](/docs/frontend-libraries) have a caching mechanism built in.
* Potentially, a third helper request may be used to improve accuracy. This request is typically cached by the browser.
2. The number of requests from your client to Front Door is roughly equal to visitor identification events multiplied by two.
3. Data transfer from Front Door edge to origin (your Azure Function):
* Each identification request has a payload size of 5-10 KB.
4. Data transfer from the origin to Front Door is not charged.
5. Data transfer from Front Door to the client:
* The agent’s size is approximately 50-60 KB, depending on the exact version and network compression algorithm used (some browsers may not support `br` encoding).
* The identification result size is up to 1KB per request.
* Enabling compression on the Front Door route will reduce the cost of data transfer to the client.
See [Azure Front Door billing](https://learn.microsoft.com/en-us/azure/frontdoor/billing) in the Azure documentation for more details.